
Rainbow Seminole Patchwork - Pattern

Creating a personalized Support cards à jouer – Tuto – Pattern is the ultimate way to elevate your gaming experience while keeping your hands free and your strategy organized. Whether you are a fan of classic bridge, competitive poker, or modern trading card games like Magic: The Gathering, having a reliable support cards à jouer (playing card holder) ensures that you can focus on the game rather than fumbling with a handful of cards. This tutorial is designed to guide you through a simple yet professional tuto to help you craft your own customized holder using a versatile pattern.
The beauty of a DIY Support cards à jouer – Tuto – Pattern lies in its accessibility; you don’t need to be a master craftsman to achieve great results. Many players, especially children or those with limited hand mobility, find that a support cards à jouer makes the gaming environment much more inclusive and enjoyable. By following this tuto, you will learn how to select the right materials and apply a pattern that is both functional and aesthetically pleasing.
In this comprehensive guide, we will explore the nuances of the Support cards à jouer – Tuto – Pattern process, ensuring you have all the keywords and techniques to succeed. We will break down the construction into manageable steps, explaining why each element of the tuto is vital for a sturdy final product. By the end of this article, you will have a high-quality support cards à jouer and the confidence to share your unique pattern with your local gaming community.
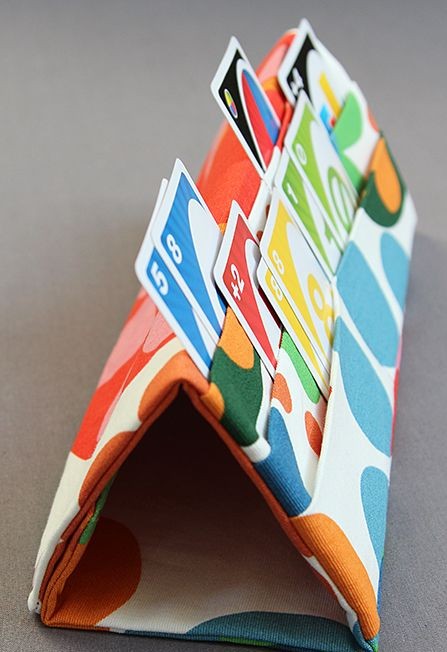
The term support cards à jouer refers to a device designed to hold playing cards in an upright, fanned-out position. This is essential for maintaining privacy during a match while allowing the player to see their entire hand at a glance. When we talk about a tuto, we are referring to the instructional sequence or tutorial that simplifies the building process.
A pattern is the blueprint or template used to cut and assemble the materials for your support cards à jouer. In this tuto, we focus on a pattern that is adaptable, meaning you can scale it up for larger cards or down for travel-sized decks. Using a well-defined pattern ensures that your holder is balanced and won’t tip over during intense gameplay.
When starting your Support cards à jouer – Tuto – Pattern project, the material choice is your first big decision. You can use wood for a premium feel, or heavy-duty cardboard for a quick and lightweight support cards à jouer. This tuto will primarily focus on a wooden or rigid plastic approach, as these provide the best longevity for your custom pattern.
Consistency is key when following a Support cards à jouer – Tuto – Pattern. You want to ensure that the grooves in your support cards à jouer are wide enough to fit multiple card sleeves but tight enough to keep them from sliding. Our tuto emphasizes measuring twice and cutting once to maintain the integrity of the pattern.
SEO enthusiasts and crafters alike know that a Support cards à jouer – Tuto – Pattern is a high-demand item in the tabletop world. By mastering this tuto, you are not just making a tool; you are creating a bespoke accessory. The pattern provided here is optimized for ergonomic comfort, reducing wrist strain during long sessions.
Finally, the Support cards à jouer – Tuto – Pattern serves as a creative outlet. You can paint, stain, or engrave your support cards à jouer once the assembly is complete. Following the tuto strictly at first ensures a functional base, allowing your artistic side to take over once the pattern has been successfully executed.
To begin your Support cards à jouer – Tuto – Pattern, you will need a few basic supplies that are likely already in your workshop. The core of the support cards à jouer requires a base material, such as a 12-inch piece of pine or oak. This tuto also suggests having sandpaper, wood glue, and a saw ready to bring your pattern to life.
Precision tools are a must for a successful Support cards à jouer – Tuto – Pattern. A miter saw or a fine-toothed hand saw is recommended to create the angled slots within the support cards à jouer. This tuto will explain how to set your blade at a specific angle (usually 15 degrees) to follow the pattern correctly.
Safety should always come first in any tuto. When cutting the slots for your support cards à jouer, ensure you are wearing eye protection and working in a well-lit area. The pattern requires several parallel cuts, so using a guide or a jig will help keep your Support cards à jouer – Tuto – Pattern symmetrical and professional.
If you prefer a soft-touch finish, you might consider adding felt to the bottom of your support cards à jouer. This part of the tuto is optional but highly recommended to prevent the holder from scratching your table. The pattern can be easily adjusted to include a small recessed area for this felt lining.
Measuring the depth of the slots is a critical step in the Support cards à jouer – Tuto – Pattern. If the cuts are too shallow, the cards will fall out; if they are too deep, you won’t see the bottom of the card face. This tuto suggests a depth of about 1/2 inch, which is standard for most pattern designs.
Once you have gathered all materials for the Support cards à jouer – Tuto – Pattern, lay them out on a clean surface. Organizing your workspace before starting the tuto saves time and prevents errors. Remember, the quality of your support cards à jouer is a direct reflection of the care you put into following the pattern.
The first active step in the Support cards à jouer – Tuto – Pattern is marking your base material. Take your ruler and mark the intervals where the slots will be cut into the support cards à jouer. According to our tuto, a spacing of 1.5 inches between slots works best for a standard pattern.
Next, set your saw to the desired angle to begin the tuto‘s cutting phase. The Support cards à jouer – Tuto – Pattern relies on these angled grooves to hold the cards at a viewable tilt. Slowly make your passes, ensuring each cut in the support cards à jouer is consistent in depth across the entire pattern.
After the cuts are made, the Support cards à jouer – Tuto – Pattern requires thorough sanding. Use a medium-grit sandpaper to smooth out the grooves of the support cards à jouer. This tuto emphasizes sanding inside the slots so that your cards don’t get snagged or damaged by the pattern edges.
Now it is time to assemble any side supports if your pattern includes them. While a single block support cards à jouer is common, some designs in this tuto suggest adding “feet” for extra stability. Applying wood glue to these joints will solidify your Support cards à jouer – Tuto – Pattern.
Once the glue has dried, give the entire support cards à jouer a final light sanding with fine-grit paper. This prepares the surface for any finish you wish to apply, as outlined in the tuto. Whether you choose a clear varnish or a vibrant color, your pattern will now look like a professional product.
Test your new support cards à jouer with a full deck of cards. The Support cards à jouer – Tuto – Pattern is successful if the cards stand firmly and are easy to remove. If the cards are too tight, this tuto suggests using a thin file to slightly widen the grooves of the pattern until the fit is perfect.
Customization is where the Support cards à jouer – Tuto – Pattern truly becomes yours. You can use wood stain to give your support cards à jouer a classic, antique look that fits perfectly in a study or den. This tuto suggests applying at least two coats of finish to protect the pattern from wear and tear.
For those who enjoy a more modern look, acrylic paints can transform your Support cards à jouer – Tuto – Pattern into a colorful accessory. You could even paint specific icons on the support cards à jouer, like hearts or spades, to match the theme of the tuto. Ensure the paint is fully dry before placing cards back into the pattern.
Another popular addition to the Support cards à jouer – Tuto – Pattern is wood burning (pyrography). You can burn your initials or a team logo directly onto the front of the support cards à jouer. This tuto recommends practicing on a scrap piece of wood from the same pattern before touching the final piece.
If you are making this Support cards à jouer – Tuto – Pattern for a gift, consider adding a personalized inscription. The wide base of the support cards à jouer is the perfect canvas for a thoughtful message. Following this tuto allows you to create a high-value, handmade item that follows a proven pattern.
Don’t forget the practical side of the Support cards à jouer – Tuto – Pattern finishing. Adding a thin layer of wax can make the cards slide in and out of the support cards à jouer even more smoothly. This little tip from our tuto is what separates a basic project from a professional-grade pattern.
Finally, your Support cards à jouer – Tuto – Pattern is ready for its first game night. Invite your friends over and show off the results of this tuto. You’ll find that the convenience of a custom support cards à jouer makes every game more relaxing, proving the worth of a well-executed pattern.
What is the best wood for a Support cards à jouer – Tuto – Pattern?
For a durable and attractive result, hardwoods like oak, maple, or walnut are excellent. However, for beginners following this tuto, pine or poplar are easier to cut and sand while still providing a sturdy support cards à jouer.
Can I make this Support cards à jouer – Tuto – Pattern without power tools?
Yes! While power tools make the process faster, you can use a hand saw and a miter box to achieve the same angled cuts for your support cards à jouer. It just takes a bit more patience and muscle to follow the pattern.
Is this pattern suitable for Tarot cards?
Absolutely. Tarot cards are generally larger and thicker, so you may need to adjust the pattern by making the slots slightly deeper and wider. This tuto is easily scalable to accommodate any card size.
How many cards can a standard support cards à jouer hold?
A standard 12-inch support cards à jouer created from this pattern can comfortably hold about 10 to 15 cards, depending on how much you overlap them. If you play games with larger hands, simply extend the length of the pattern in the tuto.
Does the Support cards à jouer – Tuto – Pattern work for kids?
Yes, it is perfect for children! Kids often struggle to hold a full hand of cards. A support cards à jouer allows them to participate in family games without frustration. You can even let them help with the painting part of the tuto.
In this article, we have explored the comprehensive process of creating a Support cards à jouer – Tuto – Pattern from scratch. We covered the essential materials, the precision required for cutting the angled slots, and the various ways you can finish and customize your holder.
By following this tuto, you now have a functional and stylish support cards à jouer that will last for years. The beauty of using a standardized pattern is that you can replicate this project easily for friends and family, making it a perfect DIY gift for any occasion. We hope this guide has inspired you to take your tabletop gaming to the next level with your own handmade gear.
