
American-style placemat with a fruit theme - Pattern

The Tiny House Block Quilt – Pattern is one of the most charming and versatile designs in the world of modern quilting, offering a nostalgic yet contemporary way to express your creativity through fabric. Whether you are looking to create a cozy heirloom for a family member or a vibrant wall hanging for your own home, mastering this specific quilting technique allows you to build a miniature neighborhood one stitch at a time. The beauty of The Tiny House Block Quilt – Pattern lies in its ability to use up even the smallest scraps of fabric, making it an eco-friendly choice for crafters who hate to see beautiful textiles go to waste.
When you decide to embark on the journey of creating The Tiny House Block Quilt – Pattern, you are engaging in a tradition of storytelling through needlework that has existed for generations. Each “house” you construct can represent a memory, a dream home, or simply a study in color theory and geometric precision. By following a structured The Tiny House Block Quilt – Pattern, beginners can learn the fundamentals of piecing angles and rectangles, while advanced quilters can experiment with intricate fussy-cutting and personalized embellishments to make each block truly unique.
In this comprehensive guide, we will dive deep into every aspect of The Tiny House Block Quilt – Pattern, ensuring you have the knowledge and confidence to complete your project from start to finish. We will explore the essential materials needed, the step-by-step construction of the house blocks, and how to arrange them into a cohesive masterpiece. By focusing on the The Tiny House Block Quilt – Pattern as our primary blueprint, we ensure that the proportions are aesthetically pleasing and the assembly process remains enjoyable rather than overwhelming for quilters of all skill levels.
At its core, The Tiny House Block Quilt – Pattern is a geometric puzzle that utilizes basic shapes like triangles for roofs and squares for windows to create a recognizable architectural form. The “pattern” refers to the specific measurements and cutting instructions that ensure every piece fits together perfectly without puckering. When you follow a professional The Tiny House Block Quilt – Pattern, you eliminate the guesswork involved in calculating seam allowances, which is vital for maintaining the integrity of the design.
The versatility of The Tiny House Block Quilt – Pattern is one of its greatest strengths, as it can be adapted to various sizes, from miniature pin cushions to king-sized bedspreads. The term “block” in this context signifies the individual square unit that contains one house, which is then repeated and joined with others. Understanding how to scale the pattern allows you to customize the density of your “neighborhood,” choosing between a sparse, minimalist look or a crowded, bustling town aesthetic.
Precision cutting is the secret to success when working with The Tiny House Block Quilt – Pattern, as even a sixteenth of an inch can throw off the alignment of the roofline. Most experts recommend using a rotary cutter and a high-quality acrylic ruler to ensure that every strip and square is exactly as specified in the instructions. By respecting the technical requirements of the The Tiny House Block Quilt – Pattern, you ensure that the finished quilt lies flat and looks professional.
Color selection plays a massive role in how The Tiny House Block Quilt – Pattern is perceived by the viewer; you can go for realistic tones or whimsical, bright hues. The “pattern” often suggests a neutral background to make the colorful houses “pop,” creating a high-contrast visual that draws the eye to the intricate details of the doors and windows. Choosing a consistent background fabric throughout the quilt helps unify the diverse house blocks into a singular, harmonious composition.
Fabric grain awareness is another technical aspect often highlighted in a quality The Tiny House Block Quilt – Pattern. Since roofs often involve diagonal cuts, or “bias edges,” they are prone to stretching if handled roughly. A good quilting pattern will provide tips on how to pin and sew these delicate edges to prevent distortion. Learning these nuances through The Tiny House Block Quilt – Pattern will significantly improve your overall sewing accuracy and confidence.
Finally, the The Tiny House Block Quilt – Pattern serves as a creative springboard for personal expression. While the pattern provides the structure, you provide the soul by choosing fabrics that mean something to you. Whether you use vintage linens, old shirts, or designer quilting cottons, the house motif acts as a universal symbol of comfort and safety, making your finished quilt a powerful piece of art.
To begin your journey with The Tiny House Block Quilt – Pattern, you must first assemble a toolkit that supports high-precision work. A quarter-inch sewing foot is arguably the most important accessory for your sewing machine, as it ensures consistent seam allowances throughout the project. When working with the small pieces required by The Tiny House Block Quilt – Pattern, even minor inconsistencies in seam width can lead to blocks that are different sizes, making the final assembly a nightmare.
Yarn-dyed cottons and high-quality “quilter’s weight” fabrics are the preferred materials for executing The Tiny House Block Quilt – Pattern. These fabrics have a stable weave that doesn’t fray excessively, which is crucial when you are dealing with the tiny “chimney” or “window” pieces. Using a The Tiny House Block Quilt – Pattern with high-quality cotton ensures that your quilt will survive decades of use and repeated washings without losing its vibrant colors or structural strength.
Thread choice is an often-overlooked component of the The Tiny House Block Quilt – Pattern process. A 50-weight cotton thread is ideal because it is thin enough to not add bulk to the seams but strong enough to hold the blocks together securely. Since you will be sewing many small pieces, a neutral grey or tan thread usually blends perfectly with most fabric colors, saving you the hassle of constantly changing bobbins as you work through the various houses.
An iron and a firm pressing mat are indispensable when following The Tiny House Block Quilt – Pattern. In quilting, “pressing” is different from “ironing”; you want to press the seams flat without sliding the iron, which could stretch the fabric. Proper pressing as dictated by the The Tiny House Block Quilt – Pattern ensures that the seams “nest” together, resulting in perfectly aligned corners where the different house components meet.
For those who enjoy a bit of extra detail, The Tiny House Block Quilt – Pattern can be enhanced with embroidery or appliqué tools. You might use a small hoop and embroidery floss to add “flowers” in the windows or a “knocker” on the door. Having these decorative supplies on hand allows you to deviate slightly from the standard pattern to add those “human” touches that make handmade items so special and cherished.
Lastly, consider the “batting” or “wadding” you will use once all the blocks from your The Tiny House Block Quilt – Pattern are joined. A low-loft cotton batting is excellent for showing off intricate quilting stitches, while a wool batting can provide more warmth and “poof.” Choosing the right foundation for your pieced quilt top is the final step in the material selection phase, ensuring that the physical feel of the quilt matches its visual beauty.
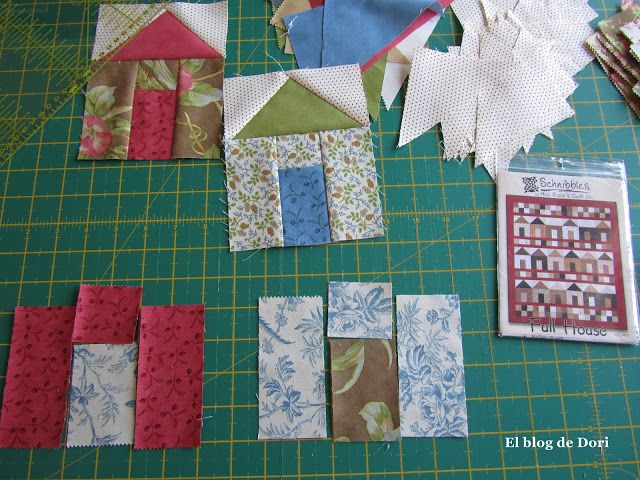
The first phase of constructing The Tiny House Block Quilt – Pattern involves cutting all your fabric units according to the master list. It is helpful to organize your pieces into “kits” for each house to avoid confusion later on. By following the The Tiny House Block Quilt – Pattern cutting guide, you will produce a series of rectangles for the walls, squares for the windows, and larger rectangles that will be transformed into the roof using the “snowball” technique.
To create the roof, the The Tiny House Block Quilt – Pattern typically instructs you to place a small square of background fabric on the corners of a larger roof rectangle. You sew diagonally across the small square, trim the excess, and flip it open to create a perfect triangle. This sew-and-flip method is a hallmark of modern quilting patterns because it avoids the difficulty of sewing “Y-seams” or dealing with triangles that have stretchy bias edges on all sides.
Next, you move on to the “body” of the house within The Tiny House Block Quilt – Pattern, which usually consists of sewing the window pieces to the wall pieces. This is where you can have the most fun with fussy-cutting, which means cutting the fabric so a specific motif—like a tiny cat or a flower—appears right in the center of the window. Following the The Tiny House Block Quilt – Pattern ensures that these small “fussy-cut” details remain centered and aren’t lost in the seam allowance.
Joining the roof to the body is the most satisfying part of the The Tiny House Block Quilt – Pattern assembly. You must align the center of the roof with the center of the house body to ensure the building doesn’t look “tilted.” Using fine glass-head pins will help keep the layers from shifting as they pass under the needle. Once this seam is sewn and pressed, the iconic shape of the tiny house finally emerges from the fabric scraps.
Once you have a collection of houses, The Tiny House Block Quilt – Pattern will guide you on how to add “sashing” or “border” strips. Sashing is the fabric that acts as the “streets” or “lawns” between the houses, providing visual breathing room. Without proper sashing as defined by the pattern, the quilt can look cluttered; with it, each individual house gets the attention it deserves as a standalone piece of art.
The final construction step in The Tiny House Block Quilt – Pattern is the “top assembly,” where rows of houses are joined together. It is vital to measure your rows as you go to ensure the quilt stays square and doesn’t become “wavy.” A well-designed The Tiny House Block Quilt – Pattern will include “check-up” measurements at various stages, allowing you to catch and correct any size discrepancies before they become a major problem in the final stages.
Once you have mastered the basic The Tiny House Block Quilt – Pattern, the world of customization opens up to you. You can alter the “pattern” to create different types of buildings, such as tall, skinny “townhouses” or wide “ranch-style” homes. By simply changing the proportions of the rectangles in the The Tiny House Block Quilt – Pattern, you can build an entire architectural history within a single quilt top, ranging from Victorian manors to modern cabins.
Seasonal variations are another way to breathe new life into The Tiny House Block Quilt – Pattern. Imagine a “Winter Village” version using icy blues and whites, with tiny embroidered snowflakes falling in the background. Or perhaps a “Halloween Neighborhood” using orange and black fabrics with “spooky” prints in the windows. The The Tiny House Block Quilt – Pattern is merely a skeleton that you can dress up in an infinite variety of “costumes” depending on the time of year.
For those interested in “improv quilting,” you can use The Tiny House Block Quilt – Pattern as a loose guide rather than a strict set of rules. You might make some roofs steeper or add “chimneys” made from tiny scraps of brick-printed fabric. This free-form approach to the pattern allows for a more organic, “folk-art” look that is currently very popular in the quilting community and looks beautiful in rustic home decor.
Layout is where you can truly show your design skills within the framework of The Tiny House Block Quilt – Pattern. Instead of a standard grid, why not try a “circular” layout where the houses face a central “park”? Or a “winding road” layout where the houses are staggered at different heights? A versatile The Tiny House Block Quilt – Pattern provides the mathematical basis for these creative layouts, ensuring that the final quilt is structurally sound regardless of the design.
Texture can also be added to your The Tiny House Block Quilt – Pattern by using different types of materials like flannel for the roofs or denim for the walls. Mixing textures adds a tactile dimension to the quilt that makes it even more inviting to touch and hold. When using mixed media, the The Tiny House Block Quilt – Pattern is essential for keeping track of how different fabric weights might react to being sewn together, helping you avoid tension issues.
Finally, consider the “back” of your quilt as a second canvas for The Tiny House Block Quilt – Pattern. Many modern quilters like to put one “giant” version of the house block on the back of the quilt, creating a reversible piece of art. By scaling the The Tiny House Block Quilt – Pattern up by 500% or more, you create a bold, graphic statement that complements the intricate “tiny” houses on the front, providing a perfect finish to your masterpiece.
1. Is The Tiny House Block Quilt – Pattern suitable for absolute beginners?
Yes, it is! While it requires careful cutting, the actual sewing consists mostly of straight lines. If you take your time and follow the pattern step-by-step, it is a great way to build your quilting confidence.
2. Can I use “Fat Quarters” for this project?
Absolutely. In fact, The Tiny House Block Quilt – Pattern is perfect for “Fat Quarter” bundles because you only need small amounts of many different prints to make the neighborhood look diverse and interesting.
3. How do I make sure my house blocks are all the same size?
The key is to use a consistent 1/4 inch seam allowance. If your blocks are slightly off, you can “trim them down” to a uniform size using a square acrylic ruler, as often recommended in the The Tiny House Block Quilt – Pattern instructions.
4. What is the best way to quilt the finished top?
“Stitch-in-the-ditch” is a popular choice for The Tiny House Block Quilt – Pattern because it hides the quilting lines in the seams. However, “free-motion quilting” swirls to represent smoke from chimneys or wind in the sky adds a lovely whimsical touch.
5. Do I need to use a specific type of background fabric?
While any cotton works, a “solid” or “low-volume” print is best for The Tiny House Block Quilt – Pattern. This ensures that the intricate shapes of the houses are clearly visible and not “lost” in a busy background pattern.
6. Can I make the houses different sizes in the same quilt?
Yes, but you will need to use “filler blocks” or extra sashing to make the rows even. Most versions of The Tiny House Block Quilt – Pattern provide a “math guide” for mixing and matching different house sizes within the same layout.
In conclusion, The Tiny House Block Quilt – Pattern is much more than just a sewing project; it is an invitation to build a world of your own through the medium of fabric. We have covered the technical foundations of the pattern, the essential tools required for precision, and the step-by-step methods for assembling your miniature homes.
We also explored how you can take the basic The Tiny House Block Quilt – Pattern and elevate it through customization, seasonal themes, and creative layouts. By focusing on accuracy, color, and personal storytelling, you can transform simple scraps into a breathtaking quilt that celebrates the concept of “home.”


