
American-style placemat with a fruit theme - Pattern

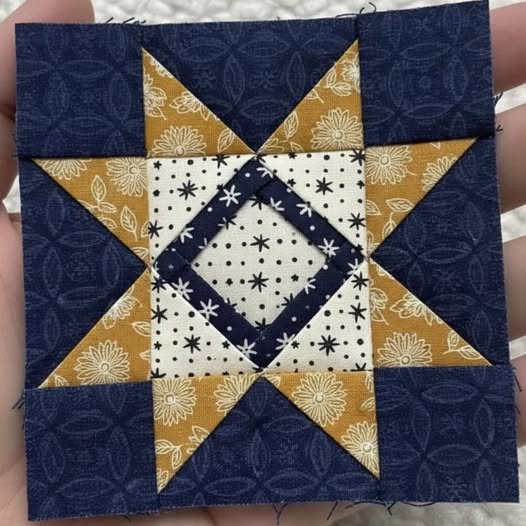
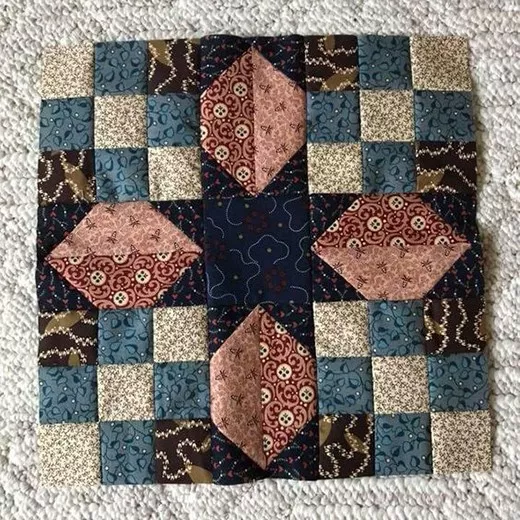
The Tiny Economy Star Quilt Block – Pattern is a mesmerizing fusion of two of the most beloved designs in the quilting world: the “Economy Block” (also known as Square-in-a-Square) and the classic “Sawtooth Star.” For those who find joy in precision and the challenge of working on a smaller scale, this miniature quilt design offers a unique opportunity to create a complex, multi-layered look that draws the eye toward a focal point. This specific quilt block layout is celebrated for its ability to showcase tiny “fussy cut” prints in the center while maintaining a crisp, architectural frame that highlights the celestial beauty of the star points.
Mastering the Tiny Economy Star Quilt Block – Pattern is often seen as a badge of honor among intermediate and advanced quilters because it requires a steady hand and an eye for meticulous detail. When you work with small-scale fabric pieces, the margin for error shrinks, but the visual reward increases exponentially. This block is perfect for creating “scrappy” quilts, holiday-themed table runners, or even delicate pincushions. Its structural balance allows it to stand alone as a single artistic unit or be repeated across a large quilt top to create a secondary pattern of intersecting diamonds and stars.
In this comprehensive guide, we will explore the nuances of the Tiny Economy Star Quilt Block – Pattern, from the initial fabric selection to the final pressing techniques that ensure your blocks lay perfectly flat. We will discuss the importance of high-contrast color palettes, the technical steps for piecing “diamond-in-a-square” units, and how to troubleshoot common issues like “blunted points.” Whether you are looking to use up your precious fabric scraps or embark on a new heirloom project, this classic quilting motif provides the perfect canvas for your creative expression and technical growth.
The success of a Tiny Economy Star Quilt Block – Pattern depends largely on the “scale” of the prints you choose. Because the pieces in a tiny block are often less than two inches wide, large floral prints or wide stripes will get lost or look cluttered. Instead, opt for “diminutive prints” like micro-dots, tiny sprigs, or solid-color “solids” that provide a clean, modern look. Using a high-quality quilting cotton with a high thread count is also essential, as it prevents the fabric from fraying at the edges when you are working with small seam allowances.
Contrast is the “secret sauce” of the Tiny Economy Star Quilt Block – Pattern. To make the “Economy” center pop, you should choose a fabric that stands out significantly from the first and second frames. A common strategy is to use a vibrant focal print in the absolute center, surrounded by a neutral “background” frame, and finally finished with dark, bold star points. This color layering technique creates a 3D effect, making the star look as though it is radiating light from the center of the block.
When sourcing materials for your Tiny Economy Star Quilt Block – Pattern, consider the “visual weight” of your fabric. If you use a very heavy or thick fabric like flannel for such a small block, the seams will become too bulky to press flat. Stick to premium lightweight cottons or even “lawn” fabrics for a smoother finish. Having a variety of coordinated fat quarters allows you to experiment with different color combinations, ensuring that each star in your quilt has its own unique personality while still feeling part of a cohesive collection.
“Fussy cutting” is a technique that shines in the Tiny Economy Star Quilt Block – Pattern. This involves cutting your fabric specifically to center a tiny motif—like a single bumblebee, a small heart, or a tiny house—inside the central square of the economy unit. This fussy-cut center acts as a “hidden gem” within the quilt, encouraging viewers to look closer at your work. It turns a standard geometric block into a storytelling piece of textile art that captures a specific moment or theme.
Don’t forget the importance of the background fabric in your Tiny Economy Star Quilt Block – Pattern. While white or cream is traditional, using a “low volume” print with a subtle grey or beige pattern can add extra depth without distracting from the star. The background is what defines the negative space of the quilt, and in a tiny block, this space is vital for letting the star “breathe.” Choosing a consistent background across all your blocks will help tie the entire quilt top together visually.
Finally, always prepare a bit more fabric than the Tiny Economy Star Quilt Block – Pattern calls for. When working on a miniature scale, it is very easy to miscut a piece by a quarter-inch, which can ruin the symmetry of the block. Having a fabric “stash” of matching scraps ensures that you can quickly recut a piece and continue your work without frustration. Pre-starching your fabric before cutting is another pro tip, as it makes the tiny fabric pieces stiffer and easier to handle under the sewing machine needle.
The “Economy” portion of the Tiny Economy Star Quilt Block – Pattern is built by sewing triangles to the sides of a center square. For a tiny block, accuracy starts with the initial cut. Using a rotating cutting mat and a sharp rotary blade will ensure that your squares are perfectly true. When sewing the triangles, aim for a “scant” quarter-inch seam. This tiny adjustment accounts for the fold of the fabric when you press it open, ensuring that your finished economy unit is exactly the right size to meet the star points.
The “Sawtooth Star” points in the Tiny Economy Star Quilt Block – Pattern are usually made using “Flying Geese” units. To keep these points sharp, many quilters prefer the “four-at-a-time” flying geese method. This technique eliminates the need to sew individual small triangles, which can often get “chewed up” by the feed dogs of your sewing machine. By using this efficient piecing method, you ensure that the points of your star are symmetrical and that you don’t lose the “tips” when you sew the blocks together.
“Pinning” is non-negotiable when working on a Tiny Economy Star Quilt Block – Pattern. Even if you are an experienced quilter who usually “eyeballs” seams, the small scale of this block requires fine glass-head pins to hold the intersections in place. Aligning the “point” of the star with the “seam” of the economy block is what creates the professional, crisp look of the star motif. Taking the extra thirty seconds to pin each junction will save you from the “seam ripper” later and guarantee a perfectly aligned block.
Pressing is a critical step in the Tiny Economy Star Quilt Block – Pattern that should be done after every single seam. Instead of “ironing” (which can stretch the bias edges), you should “press” by lifting the iron and setting it down firmly. For tiny blocks, pressing seams open is often recommended to reduce the bulk at the corners where multiple points meet. A flatter block is easier to quilt and looks much more professional than one with “lumpy” intersections, highlighting the delicate geometry of the star.
If you find that your Tiny Economy Star Quilt Block – Pattern is coming out slightly “wonky,” check your “stitch length.” For miniature piecing, a slightly shorter stitch length (around 1.8mm to 2.0mm) provides more stability for the small seams. It also prevents the stitches from pulling apart at the edges when you are handling the small quilt units. This structural reinforcement is especially important if you plan on using the blocks in a high-use item like a baby quilt or a decorative pillow.
The final assembly of the Tiny Economy Star Quilt Block – Pattern follows a “nine-patch” logic. You will have a center unit, four star-point units, and four corner squares. Joining these rows requires meticulous “nesting” of seams. When the rows come together, the “valleys” of one seam should sit perfectly against the “hills” of the next. This interlocking seam technique is the final secret to a square, flat, and beautiful Tiny Economy Star that is ready to be showcased in your masterpiece.
One of the most exciting aspects of the Tiny Economy Star Quilt Block – Pattern is its versatility in a full quilt layout. You can choose a “straight set” where the blocks are lined up in even rows, or an “on-point” layout where the stars are tilted at a 45-degree angle. The on-point layout is particularly effective for the Economy Star because it emphasizes the diamond shapes within the block, creating a sense of sophisticated movement and dynamic visual flow across the fabric.
Adding “Sashing” to your Tiny Economy Star Quilt Block – Pattern can completely change the look of the quilt. Sashing refers to the strips of fabric that separate the blocks. If you use a contrasting sashing color, each star becomes an individual “window” of art. If you omit the sashing, the points of the stars will touch, creating a “secondary star” pattern in the negative space. This “interlocking stars” effect is a classic hallmark of traditional Americana quilting.
You can also play with “color gradients” in your Tiny Economy Star Quilt Block – Pattern layout. For example, you could make the stars in the upper-left corner pale yellow and gradually transition to deep orange in the bottom-right corner, creating a “sunset” quilt effect. Because the Tiny Economy Star has multiple layers (center, frame, and star points), you have three different opportunities per block to play with color transitions and ombre effects.
The Tiny Economy Star Quilt Block – Pattern is also perfect for “Medallion Quilts.” You can place one large Economy Star in the center and surround it with several rounds of tiny stars. This “radial design” draws the viewer’s eye into the center and showcases your ability to work across different scales. It turns the quilt into a monumental piece of art that looks like a complex mosaic, celebrating the precision and artistry of the handmade craft.
For those who love “Scrappy Quilts,” the Tiny Economy Star Quilt Block – Pattern is the ultimate stash-buster. You can make every star a different color while keeping the background fabric consistent. This creates a “rainbow” effect that is joyful and eclectic. Using scrappy star points against a solid center can make the quilt look like a vibrant garden of wildflowers. The small size of the pieces means even your smallest fabric remnants can find a place of honor.
Finally, consider the “border” of your Tiny Economy Star Quilt Block – Pattern project. A “sawtooth border” made of even tinier triangles can echo the star points within the blocks. Or, a simple solid dark border can act as a frame, containing the intricate energy of the tiny stars. The way you “finish” the edges of your quilt determines whether it looks like a rustic country treasure or a sleek modern wall hanging, giving you final creative control over the design aesthetic.
Once your Tiny Economy Star Quilt Block – Pattern top is finished, the “quilting” (the stitching that holds the layers together) becomes the next creative layer. For tiny blocks, “Stitch in the Ditch” is a popular choice because it highlights the geometric lines of the star without adding distracting patterns. If you prefer more texture, a “micro-stippling” or “echo quilting” around the stars can make them appear to float on top of the background, adding a luxurious 3D quality to the finished work.
The choice of “Batting” is crucial for a Tiny Economy Star Quilt Block – Pattern. Since the piecing is so detailed, you want a low-loft batting (like 100% cotton or bamboo). A “puffy” batting will hide the precision of your seams and make the tiny stars look distorted. A flatter batting ensures that every point is visible and that the quilt has a beautiful “drape,” making it look like a high-end textile piece rather than a bulky blanket.
“Binding” your Tiny Economy Star Quilt Block – Pattern is the final step. For a miniature project, a “narrow binding” (around 1/4 inch finished width) is more proportional to the size of the blocks. A hand-stitched binding on the back of the quilt provides a seamless, clean look that is expected for heirloom-quality items. Choosing a striped or polka-dot binding can add a final touch of whimsy that frames the stars and completes the visual narrative of your quilt.
Caring for a Tiny Economy Star Quilt Block – Pattern requires a gentle touch. Because there are so many small seams, the quilt can be more delicate than a standard block quilt. Always wash in cold water on a “delicate” cycle and use “color catchers” to prevent any dark star-point fabrics from bleeding into the background. Air drying is the safest way to preserve the integrity of the cotton fibers and the crispness of your meticulous piecing.
Displaying your Tiny Economy Star Quilt Block – Pattern is a joy. If it’s a wall hanging, ensure it is hung out of direct sunlight to prevent the tiny fabric prints from fading. If it’s a table runner, consider using a clear acrylic topper to protect the star points from spills. These stars are meant to be admired, and proper display ensures that the hours of precision work you invested are appreciated by everyone who enters your home.
Ultimately, completing a Tiny Economy Star Quilt Block – Pattern is a journey in patience and craft. Every time you look at the finished quilt, you will see the perfectly matched points and the tiny focal prints that you carefully chose. It is a testament to the fact that “small is beautiful.” Whether you keep it as a personal treasure or gift it to a loved one, a hand-pieced star quilt is a symbol of guidance, hope, and the timeless beauty of handmade craftsmanship.
Is the Tiny Economy Star Quilt Block – Pattern too hard for a beginner?
It is certainly a challenge! While the individual steps are simple, the small scale requires a high level of accuracy. If you are a beginner, we recommend making a “test block” with larger pieces first to understand the construction logic before moving on to the tiny version.
What is the best “standard size” for this block?
Most Tiny Economy Star Quilt Block – Pattern designs result in a 6-inch or 4-inch finished block. These sizes are small enough to be “tiny” but large enough that you can still manage the seams on a standard home sewing machine. Anything smaller than 4 inches may require paper foundation piecing for accuracy.
Do I have to use a special thread for tiny blocks?
While standard 50-weight cotton thread works, many experts recommend a 60-weight or 80-weight “fine” thread. These thinner threads take up less room in the seam allowance, which is a major benefit when you are joining multiple layers of fabric in a tiny space, helping the block stay flat.
How can I stop my machine from “eating” the small corners?
The “eating” happens when the needle pushes the fabric down into the hole of the throat plate. To prevent this, use a “leader scrap” (a small piece of folded fabric) to start your stitching. You can also use a “single-hole” throat plate on your machine, which provides more support for the tiny fabric edges.
Can I use “pre-cuts” like Charm Squares for this pattern?
Yes! 5-inch Charm Squares are excellent for the center and frames of the Tiny Economy Star. However, you will still need to cut them down into the specific triangles and squares required by the pattern. Pre-cuts are a great way to get a coordinated “look” without buying yards of multiple fabrics.
Why is it called an “Economy” block?
Historically, the Economy Block was popular because it was a “thrifty” way to use up small fabric scraps. By surrounding a small center square with triangles, you could create a larger block using very little fabric. Combined with the Sawtooth Star, it becomes a “prosperous” design that looks much more expensive than the scraps it’s made from.
In conclusion, the Tiny Economy Star Quilt Block – Pattern is a masterclass in precision, color balance, and traditional design. Throughout this article, we have explored the importance of selecting diminutive prints and high-contrast fabrics, the technical necessity of scant quarter-inch seams and nested junctions, and the endless creative possibilities for on-point or sashed layouts.
This pattern is a beautiful reminder that even the smallest scraps can be transformed into a majestic “star” when approached with patience and care. By focusing on pressing techniques and sharp flying geese, you can create a quilt that is not only a functional blanket but a true work of art. The journey of piecing a tiny star is as rewarding as the final result, offering a meditative and fulfilling experience for any dedicated quilter.


