
American-style placemat with a fruit theme - Pattern

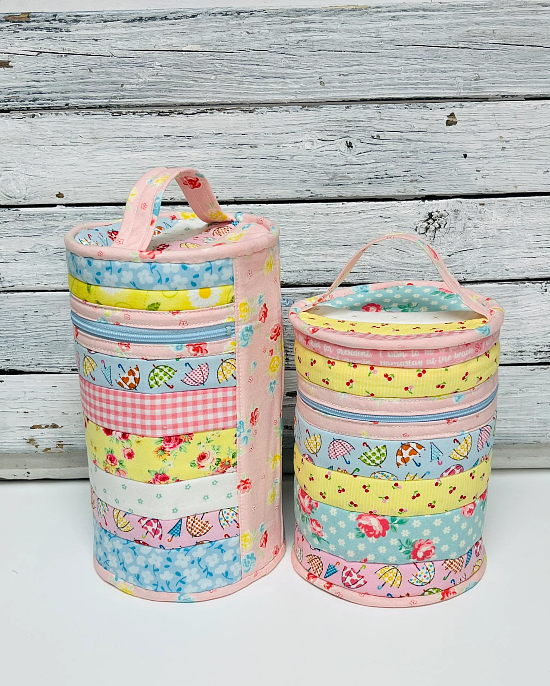
Creating a Toiletry bag with a circular zipper, in patchwork style – Pattern is one of the most fulfilling sewing projects for anyone who loves combining utility with artistic expression. This specific design allows you to organize your personal items in a compact, stylish way while utilizing the charming aesthetics of scrap fabric. By choosing a Toiletry bag with a circular zipper, in patchwork style tutorial, you are opting for a construction method that provides a wide opening, making it incredibly easy to access your cosmetics or travel essentials without digging through a deep, dark pouch.
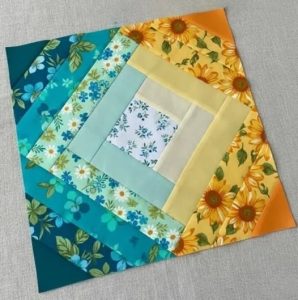
The beauty of working with a Toiletry bag with a circular zipper, in patchwork style – Pattern lies in its inherent sustainability and customization. Patchwork is an ancient technique that has evolved into a modern trend, allowing crafters to mix different colors, textures, and prints to create a one-of-a-kind mosaic. When you follow a Toiletry bag with a circular zipper, in patchwork style tutorial, you aren’t just making a bag; you are telling a story with your fabric choices, turning what might have been waste into a functional piece of art that can last for years.
In this comprehensive guide, we will walk you through every stage of mastering the Toiletry bag with a circular zipper, in patchwork style – Pattern. From selecting the right stabilizers to ensure your bag doesn’t collapse, to the delicate art of sewing a curved zipper, we have curated this Toiletry bag with a circular zipper, in patchwork style tutorial to be accessible yet detailed. Whether you are sewing this for your next vacation or as a thoughtful handmade gift, the structural integrity and visual appeal of this design will surely impress you and anyone who sees your finished work.
To get started with your Toiletry bag with a circular zipper, in patchwork style – Pattern, you must first curate your fabric scraps. Patchwork thrives on variety, so look for high-quality cotton fabrics in coordinating tones. In any Toiletry bag with a circular zipper, in patchwork style tutorial, the preparation of these small squares or strips is vital, as they form the “skin” of your bag, and having a diverse selection makes the final result look more professional and intentional.
The “circular” aspect refers to the zipper path, which requires a flexible but sturdy zipper, preferably a nylon coil one. When following a Toiletry bag with a circular zipper, in patchwork style – Pattern, the zipper length is crucial—it needs to be long enough to wrap around the curved top. This Toiletry bag with a circular zipper, in patchwork style tutorial recommends using a zipper that is slightly longer than the circumference of the lid to allow for easy handling during the sewing process.
Interfacing is the secret ingredient that gives your Toiletry bag with a circular zipper, in patchwork style – Pattern its shape. Without proper stabilization, a patchwork bag can feel flimsy. For this Toiletry bag with a circular zipper, in patchwork style tutorial, we suggest using a fusible fleece or a mid-weight foam stabilizer. This ensures that the circular zipper operates smoothly because the fabric around it remains taut and supported, preventing the dreaded “zipper snag” common in soft-sided bags.
You will also need a lining fabric that is durable and easy to clean, such as a laminated cotton or a simple broadcloth. In our Toiletry bag with a circular zipper, in patchwork style tutorial, we emphasize the importance of the lining because toiletries often involve liquids. When you draft your Toiletry bag with a circular zipper, in patchwork style – Pattern, remember that the lining pieces should be cut slightly smaller than the exterior to avoid bulkiness inside the finished bag.
Standard sewing tools like a rotary cutter, a cutting mat, and acrylic rulers are indispensable for this project. Precision is the soul of patchwork; if your squares aren’t cut accurately, the Toiletry bag with a circular zipper, in patchwork style – Pattern will not align correctly at the seams. A Toiletry bag with a circular zipper, in patchwork style tutorial always highlights that taking the time to cut precisely saves hours of frustration during the assembly phase.
Lastly, consider your thread choice and needle size. Since you will be sewing through multiple layers of fabric, interfacing, and zipper tape, a size 90/14 needle is often the best choice for a Toiletry bag with a circular zipper, in patchwork style – Pattern. This Toiletry bag with a circular zipper, in patchwork style tutorial encourages using a high-quality polyester thread to ensure the seams can withstand the tension of a fully packed toiletry bag during travel.
The first phase of the actual construction involves creating the patchwork panel that will serve as the main body. For this Toiletry bag with a circular zipper, in patchwork style – Pattern, you can choose a simple grid of squares or a more complex “quilt-as-you-go” method. The Toiletry bag with a circular zipper, in patchwork style tutorial focuses on the grid method, as it allows beginners to practice their seam allowance accuracy while building a beautiful, multicolored surface.
Once your patchwork panel is sewn together, you must quilt it to your stabilizer. This is a critical step in the Toiletry bag with a circular zipper, in patchwork style tutorial because it prevents the fabric layers from shifting. Whether you choose simple straight-line quilting or a decorative free-motion design, this step adds texture and durability to your Toiletry bag with a circular zipper, in patchwork style – Pattern, making the bag feel premium and sturdy.
Cutting the circular pieces for the top and bottom of the bag requires a steady hand. Most Toiletry bag with a circular zipper, in patchwork style – Pattern designs use a template or a compass to ensure perfect circles. In this Toiletry bag with a circular zipper, in patchwork style tutorial, we recommend using a bowl or a specialized circle ruler to get a consistent curve, which is essential for the zipper to sit correctly later on.
The side panel of the Toiletry bag with a circular zipper, in patchwork style – Pattern is usually a long rectangle that connects the top and bottom. When following a Toiletry bag with a circular zipper, in patchwork style tutorial, you must calculate the length of this panel by multiplying the diameter of your circle by Pi (3.14). Adding a small seam allowance to this measurement is a common tip to ensure the side panel wraps perfectly around the circular base.
As you assemble the exterior, pay close attention to the alignment of your patchwork seams. A high-quality Toiletry bag with a circular zipper, in patchwork style tutorial will remind you to press your seams open or to one side to reduce bulk. In a Toiletry bag with a circular zipper, in patchwork style – Pattern, bulky seams can make it difficult to sew the final curves, so keeping everything flat and tidy is a major advantage.
After the main body and circles are prepared, stay-stitching around the edges is a great practice. This Toiletry bag with a circular zipper, in patchwork style tutorial suggests stay-stitching $1/8$ inch from the edge to keep the patchwork from pulling apart during the more intensive assembly steps. This small detail ensures that your Toiletry bag with a circular zipper, in patchwork style – Pattern remains structurally sound throughout the life of the bag.
The circular zipper is often considered the most challenging part of the Toiletry bag with a circular zipper, in patchwork style – Pattern, but with the right technique, it is quite manageable. The trick is to use plenty of clips or pins to ease the straight zipper tape around the curved fabric edge. In this Toiletry bag with a circular zipper, in patchwork style tutorial, we recommend using “wonder clips” rather than pins to avoid distorting the fabric layers or pricking your fingers.
Before sewing, it helps to slightly notch the edges of the zipper tape. This technique, frequently mentioned in any advanced Toiletry bag with a circular zipper, in patchwork style tutorial, allows the tape to spread and lay flat against the curve. When working on a Toiletry bag with a circular zipper, in patchwork style – Pattern, these small snips should not go through the zipper teeth, just the outer fabric of the tape, providing the flexibility needed for a smooth circle.
Using a zipper foot on your sewing machine is mandatory for this stage of the Toiletry bag with a circular zipper, in patchwork style – Pattern. It allows you to get close to the teeth without hitting them, ensuring a tight and professional fit. Our Toiletry bag with a circular zipper, in patchwork style tutorial suggests sewing slowly, adjusting the fabric every few stitches to maintain a consistent seam allowance around the entire circumference.
The junction where the zipper ends meet is a point of focus in the Toiletry bag with a circular zipper, in patchwork style – Pattern. You can use a small fabric tab to cover the ends, providing a clean finish. This Toiletry bag with a circular zipper, in patchwork style tutorial teaches you how to hide these raw edges, which not only looks better but also prevents the zipper pull from sliding off and makes the bag more comfortable to use.
Once the top circle is attached to the zipper, you will repeat the process for the main body of the Toiletry bag with a circular zipper, in patchwork style – Pattern. Keeping the zipper open during this step is a vital tip from our Toiletry bag with a circular zipper, in patchwork style tutorial, as it allows you to maneuver the bag under the sewing machine needle more easily. It also ensures you don’t accidentally sew the bag shut!
Finalizing the zipper installation requires a top-stitch. This not only looks beautiful on a Toiletry bag with a circular zipper, in patchwork style – Pattern but also keeps the lining from getting caught in the zipper teeth. In this Toiletry bag with a circular zipper, in patchwork style tutorial, we suggest using a slightly longer stitch length for top-stitching to achieve a decorative, store-bought look that complements the patchwork aesthetic.
Assembling the interior lining is the final major step in the Toiletry bag with a circular zipper, in patchwork style – Pattern. You will essentially create a “mirror” version of the exterior bag but without the patchwork detail. Following this Toiletry bag with a circular zipper, in patchwork style tutorial, you will drop the lining into the finished exterior, wrong sides together, to hide all the raw internal seams and the back of the patchwork.
To secure the lining to the zipper area, many crafters prefer hand-stitching with a blind or ladder stitch. While some Toiletry bag with a circular zipper, in patchwork style tutorial methods suggest machine-stitching, hand-finishing gives you much more control over the delicate circular area. This ensures that your Toiletry bag with a circular zipper, in patchwork style – Pattern has a clean, “couture” finish inside that is free from visible machine tracks.
Adding a handle is a functional necessity for a Toiletry bag with a circular zipper, in patchwork style – Pattern. You can create a simple strap from one of your patchwork fabrics and attach it to the side or the lid. This Toiletry bag with a circular zipper, in patchwork style tutorial recommends reinforcing the attachment points with a “box-X” stitch, as the handle will bear the weight of all your shampoos, lotions, and brushes.
Don’t forget to inspect your Toiletry bag with a circular zipper, in patchwork style – Pattern for any loose threads or misaligned seams. A thorough “cleaning” of the project—snipping threads and giving it a final steam press—is what elevates a hobbyist project. Our Toiletry bag with a circular zipper, in patchwork style tutorial emphasizes that the pressing stage helps the circular shape “set” and makes the patchwork colors appear more vibrant.
If you want to take your Toiletry bag with a circular zipper, in patchwork style – Pattern to the next level, consider adding internal pockets. Even simple mesh or elasticated dividers can be included. This Toiletry bag with a circular zipper, in patchwork style tutorial is flexible enough to accommodate these additions, allowing you to customize the organization based on the specific items you plan to carry in your new handmade bag.
Now that you have completed the Toiletry bag with a circular zipper, in patchwork style – Pattern, take a moment to admire your work. You have mastered curved sewing, zipper installation, and the intricate art of patchwork all in one project. This Toiletry bag with a circular zipper, in patchwork style tutorial is a bridge to more complex bag-making, providing you with a solid foundation of skills that you can apply to countless other sewing adventures in the future.
Is the Toiletry bag with a circular zipper, in patchwork style – Pattern suitable for beginners?
While it involves some intermediate techniques like sewing curves and zippers, a patient beginner can definitely handle it. By following a detailed Toiletry bag with a circular zipper, in patchwork style tutorial, you can take it one step at a time and achieve great results.
What size should my patchwork squares be?
In a standard Toiletry bag with a circular zipper, in patchwork style – Pattern, squares of 2.5 inches or 3 inches work beautifully. They are small enough to show off many fabrics but large enough to be easy to handle during the sewing process.
Can I wash my finished toiletry bag?
Yes! If you used cotton fabrics and a washable stabilizer as suggested in this Toiletry bag with a circular zipper, in patchwork style tutorial, you can machine wash it on a gentle cycle. However, air drying is recommended to maintain the circular shape.
Why is my circular zipper wavy or bunching?
This usually happens if the fabric wasn’t notched or if the zipper was stretched while sewing. When working with a Toiletry bag with a circular zipper, in patchwork style – Pattern, it is vital to let the machine feed the fabric naturally without pulling on the zipper tape.
How much fabric do I need for this project?
One of the best things about the Toiletry bag with a circular zipper, in patchwork style tutorial is that it is a scrap-buster. You generally need less than a half-yard of fabric in total, making it very economical.
What is the best way to cut perfect circles for the pattern?
Using a rotary circle cutter or a sturdy cardboard template is the best way to ensure your Toiletry bag with a circular zipper, in patchwork style – Pattern has a professional base. Precision at this stage makes the zipper installation much easier.
Creating a Toiletry bag with a circular zipper, in patchwork style – Pattern is a wonderful way to combine practical organization with the colorful art of quilting. In this article, we have covered the essential materials, the method for building a sturdy quilted exterior, the secrets to a smooth circular zipper installation, and the final assembly steps to ensure a professional finish.
This Toiletry bag with a circular zipper, in patchwork style tutorial was designed to give you the confidence to tackle curves and layers with ease, resulting in a durable and beautiful accessory for your travels.


