
American-style placemat with a fruit theme - Pattern

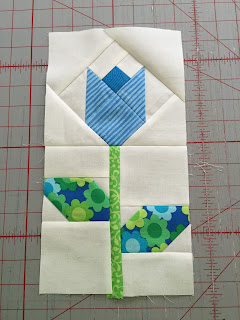
Creating a beautiful Tulip block – Pattern is one of the most delightful ways to bring a touch of eternal springtime into your home through the art of quilting and crochet. This specific design captures the elegance of the tulip flower, translating its soft curves and vibrant colors into a structured geometric form that looks stunning in any project. Whether you are planning to create a full floral garden quilt or a single decorative cushion, mastering this Tulip block – Pattern will provide you with a versatile skill that elevates your textile artistry to a whole new level of professional beauty.
When you first begin working with a Tulip block – Pattern, you will notice how the clever use of “snowballing” corners or specific stitch clusters creates the illusion of delicate petals. This Tulip block – Pattern is favored by many because it balances simplicity with a sophisticated visual outcome, making it accessible for intermediate crafters while still offering enough detail to satisfy the most experienced quilters. The joy of this pattern lies in the color play; you can use traditional reds and yellows or go for a modern aesthetic with teals and soft greys, ensuring that every piece you create feels unique and personal.
This comprehensive guide is dedicated to helping you master the Tulip block – Pattern from start to finish, ensuring your edges are crisp and your floral shapes are perfectly defined. We will explore the technical aspects of the design, the best materials to use for longevity, and how to troubleshoot common issues like mismatched seams or uneven petals. By following this Tulip block – Pattern guide, you are not just making a fabric square; you are learning a timeless technique that has been passed down through generations of makers who find peace and purpose in the rhythm of their craft.
Before you dive into the actual construction of your Tulip block – Pattern, the first step is selecting high-quality materials that will stand the test of time. For a quilting project, 100% cotton fabric is the gold standard because it holds its shape during pressing and offers a smooth texture that is easy to sew. When choosing colors for your Tulip block – Pattern, try to select a contrasting background fabric—like a crisp white or a soft cream—to make the vibrant “petals” of the tulip truly stand out and catch the eye.
Precision is the most important element when you are working on a Tulip block – Pattern. You will need a rotary cutter, a self-healing mat, and an acrylic ruler to ensure that every square and triangle is cut to the exact dimensions required. Because the Tulip block – Pattern relies on geometric symmetry, even a tiny deviation of an eighth of an inch can cause the points of your tulip to look blunt or misaligned, so taking your time during the cutting phase is a wise investment in the final result.
Thread choice is an often-overlooked aspect of the Tulip block – Pattern. It is best to use a high-quality 50wt cotton thread in a neutral color that blends into the fabric, preventing the seams from appearing bulky or visible on the right side of the work. If you are following a Tulip block – Pattern for crochet instead of quilting, ensure your yarn weight matches your hook size perfectly to maintain the structural integrity of the flower shape without it becoming too loose or too stiff.
Organization can make or break your experience with the Tulip block – Pattern. I highly recommend using small labeled containers or clips to keep your “petal” pieces separated from your “stem” and “leaf” pieces before you head to the sewing machine. Having everything organized according to the Tulip block – Pattern instructions allows you to enter a “flow state,” where you can focus on the beauty of the creation rather than hunting for a missing scrap of fabric under your table.
Your sewing machine or crochet hook should be in top condition before starting the Tulip block – Pattern. For quilters, a fresh needle (size 80/12 is usually perfect) will prevent skipped stitches and fabric snags as you navigate the multiple layers of the block. For those using the Tulip block – Pattern in a crochet context, checking your hook for any burrs or rough spots will ensure the yarn glides smoothly, resulting in even stitches that form a perfectly symmetrical floral motif.
Lastly, consider the lighting in your workspace as you begin the Tulip block – Pattern. Working with small pieces and intricate seams requires excellent visibility to avoid eye strain and ensure your stitches are landing exactly where they need to be. Once your environment is set and your materials are prepped according to the Tulip block – Pattern, you are ready to start the exciting process of watching a fabric flower bloom right beneath your fingertips.
The heart of the Tulip block – Pattern is the construction of the “Tulip Head,” which is typically made up of a central square flanked by two smaller triangles or “flip-and-stitch” corners. This part of the Tulip block – Pattern is what gives the flower its iconic silhouette, mimicking the way real tulip petals overlap in nature. Understanding how these pieces interact is the key to mastering the design and ensuring that your finished block looks clean and professional.
To achieve the best look for your Tulip block – Pattern, you must master the 1/4 inch seam allowance. In the quilting world, this is the “magic” measurement that ensures all pieces fit together like a puzzle; if your seams are too wide, the Tulip block – Pattern will shrink and the points will disappear into the seam. Many modern sewing machines have a specific foot for this, which is incredibly helpful when you are aiming for the high level of precision required for this specific floral design.
The “Stitch and Flip” technique is a staple of the Tulip block – Pattern. This involves placing a small square on the corner of a larger one, sewing diagonally across it, and then flipping the fabric to create a triangle. While it seems simple, this technique in the Tulip block – Pattern requires careful pressing to ensure the fabric doesn’t stretch or distort. Always press your iron down vertically rather than sliding it across the fabric to maintain the integrity of the tulip’s shape.
Next, you will focus on the stem and leaves portion of the Tulip block – Pattern. Most designs use a long rectangular strip for the stem and two half-square triangles (HSTs) to represent the leaves reaching toward the sun. In this Tulip block – Pattern, the angle of the leaves is crucial for creating a sense of movement; they should look as though they are gently cradling the flower head, giving the entire block a balanced and organic appearance.
As you assemble the various sections of the Tulip block – Pattern, you will practice the art of “nesting seams.” This is a method where you press the seam allowances of joining rows in opposite directions so they lock together perfectly at the intersections. This technique is vital for the Tulip block – Pattern because it reduces bulk at the points where the petals meet the stem, allowing your quilt top to lay flat and making the eventual quilting process much easier.
Don’t be afraid to experiment with the scale of the Tulip block – Pattern. While a standard 12-inch block is common, you can shrink the measurements to create a delicate 6-inch version or enlarge them for a bold, graphic 24-inch statement block. The fundamental logic of the Tulip block – Pattern remains the same regardless of size, allowing you to adapt the design to fit anything from a tiny pin cushion to a massive king-sized bedspread.
Choosing the right colors for your Tulip block – Pattern is where your personal creativity truly shines. While nature offers a vast array of pinks, reds, and purples, don’t feel limited by reality; a monochromatic Tulip block – Pattern using various shades of blue or even a “scrappy” version using leftover floral prints can look absolutely stunning. The goal is to create enough contrast between the flower and the background so that the Tulip block – Pattern is recognizable from across the room.
Fabric texture can also play a major role in the success of your Tulip block – Pattern. Mixing a solid fabric for the petals with a subtle “tone-on-tone” print for the leaves can add a layer of depth and sophistication to the design. In a Tulip block – Pattern, avoid using large-scale prints for the small corner pieces, as the pattern of the fabric might distract from the geometric shape of the tulip itself, making the flower look fragmented rather than cohesive.
The “Secondary Pattern” is a fascinating concept to keep in mind when repeating the Tulip block – Pattern across a large quilt. When four blocks meet, the background spaces and leaf corners often form new, unintended shapes like stars or diamonds. By carefully planning your fabric placement within each Tulip block – Pattern, you can manipulate these secondary designs to create a complex, interlocking lattice effect that adds a “wow factor” to your finished project.
Consider the “value” of your fabrics—meaning how light or dark they are—when following the Tulip block – Pattern. If your flower petals are a medium-value pink and your background is a medium-value grey, the Tulip block – Pattern might disappear because there isn’t enough visual separation. A helpful tip is to take a black-and-white photo of your fabric choices; if you can still clearly see the difference between the fabrics in grayscale, your Tulip block – Pattern will be a success.
For those using a Tulip block – Pattern for a baby quilt, choosing soft flannels or minky fabrics can add a wonderful tactile element. However, be aware that these fabrics stretch more than standard cotton, so you may need to use a stabilizer or extra pins to keep your Tulip block – Pattern perfectly square. The extra effort is worth it, as a soft, snuggly tulip quilt is a treasure that any new parent would be thrilled to receive for their nursery.
Finally, think about the “Directional Prints” if you are using them in your Tulip block – Pattern. If your fabric has a specific orientation (like stripes or little birds), you need to be careful when cutting and sewing so that they don’t end up sideways or upside down. A well-executed Tulip block – Pattern takes these small details into account, resulting in a polished look that demonstrates your attention to detail and your passion for the craft.
Once your Tulip block – Pattern is fully pieced together, the final pressing is the most satisfying part of the process. Use a bit of fabric starch to give the block some “body” and to ensure all the seams are perfectly flat. A well-pressed Tulip block – Pattern is much easier to quilt, as the foot of your machine won’t get caught on any uneven bumps or “valleys” created by lazy seam management during the assembly phase.
If you find that your Tulip block – Pattern is “wonky” or not perfectly square, don’t panic. This often happens if the fabric was pulled too hard during sewing or if the seam allowance wasn’t consistent. You can usually “trim down” a Tulip block – Pattern to a slightly smaller size to square it up, as long as you don’t cut off the points of your petals. This is a common fix that even expert quilters use to ensure their rows line up perfectly.
For those who want to add a bit of extra flair to their Tulip block – Pattern, consider embroidery or applique details. You could sew a tiny ladybug onto one of the leaves or use a decorative topstitch around the petals to give them more definition. These personal touches turn a standard Tulip block – Pattern into a piece of folk art that tells a story, making it much more than just a functional item of bedding or decor.
When it comes to quilting the Tulip block – Pattern, you have several options. “Stitch in the ditch”—sewing exactly along the seam lines—is a great way to hide your quilting while still securing the layers. Alternatively, you could do “echo quilting,” where you sew lines that follow the shape of the tulip, making the Tulip block – Pattern look like it is radiating light or energy. This adds a beautiful texture that complements the floral theme.
If you are struggling with the points of your Tulip block – Pattern getting “eaten” by your sewing machine, try using a “leader” scrap of fabric. Start sewing on a small scrap and then transition directly onto your tulip pieces without cutting the thread. This prevents the machine from pulling the delicate corner of your Tulip block – Pattern down into the bobbin area, a frustrating problem that many beginners face when working with small triangles.
The ultimate goal of completing a Tulip block – Pattern is the sense of accomplishment it brings. Whether it’s your first block or your hundredth, each one is an opportunity to refine your skills and express your love for color and shape. Take pride in your Tulip block – Pattern, even if it isn’t “perfect.” The small imperfections are what give handmade items their soul and remind us that there is a human heart and hand behind every stitch.
Is the Tulip block – Pattern suitable for beginners?
Yes, it is considered an “advanced beginner” project. While it requires basic knowledge of sewing a straight line and pressing, the Tulip block – Pattern is a great way to learn about half-square triangles and the “stitch and flip” method without being overly complicated.
How much fabric do I need for a single Tulip block – Pattern?
For a standard 12-inch block, you usually need less than a quarter-yard of background fabric and small scraps (about 5×5 inches) for the petals and leaves. This makes the Tulip block – Pattern an excellent “scrap buster” for using up pieces from previous projects.
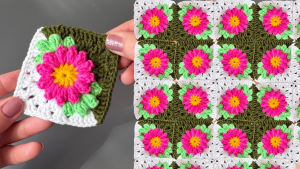
Can I use the Tulip block – Pattern for a crochet project?
Absolutely! In crochet, the Tulip block – Pattern is often worked as a “granny square” where the flower is created using popcorn or puff stitches for the petals. It is a very popular motif for baby blankets and springtime throws.
What is the most common mistake when making a Tulip block – Pattern?
The most common issue is losing the “points” of the petals. This happens when the seam allowance is wider than 1/4 inch. Always check your seam accuracy before finishing the entire Tulip block – Pattern to ensure the flower looks sharp and clear.
How do I make a larger quilt using this pattern?
You can simply make multiple units of the Tulip block – Pattern and sew them together in rows. You can separate them with “sashing” (strips of fabric between the blocks) to give the tulips more breathing room, or sew them edge-to-edge for a dense garden look.
Can I wash a quilt made with the Tulip block – Pattern?
Yes, provided you used high-quality cotton. It is recommended to wash on a gentle cycle with cold water and use a “color catcher” sheet to prevent the bright tulip colors from bleeding into the light background fabric of your Tulip block – Pattern.
In this article, we have journeyed through the intricate and rewarding process of creating a Tulip block – Pattern. From the initial stages of selecting the perfect cotton fabrics and organizing your workspace to mastering the “stitch and flip” geometry that brings the flower to life, we have covered everything you need to succeed.
We also discussed the importance of color value, precision in your seam allowances, and how to troubleshoot common issues like “lost points” to ensure your Tulip block – Pattern looks as beautiful as a real garden in bloom.


