
American-style placemat with a fruit theme - Pattern

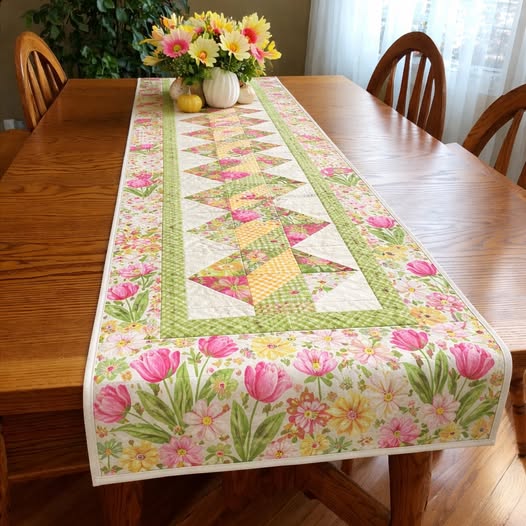
Creating a Twisted Pole Table Runner – Pattern is a sophisticated way to bring geometric elegance and a touch of traditional quilting history into your modern dining room decor. This specific design, often recognized by its interlocking “barber pole” or “candy cane” effect, relies on the clever use of negative space and high-contrast fabric choices to create a visual illusion of movement. Whether you are preparing your home for a festive holiday dinner or simply want to refresh your everyday table setting, mastering the Twisted Pole Table Runner – Pattern provides a rewarding challenge that balances precision piecing with artistic expression.
Working with a Twisted Pole Table Runner – Pattern allows quilters to explore the intersection of classical block designs and contemporary color theory. The “twist” in the pattern is achieved through a series of half-square triangles (HSTs) or specialized strip-piecing techniques that, when rotated correctly, form a continuous spiraling line across the length of the fabric. Many makers find this project particularly appealing because it is manageable in size—offering a sense of accomplishment much faster than a full-sized quilt—while still serving as a stunning centerpiece that draws the eye and sparks conversation among guests.
To achieve a professional-grade finish on your Twisted Pole Table Runner – Pattern, it is essential to focus on the technical foundations of quilting, such as maintaining a perfect quarter-inch seam and using high-quality quilting cotton. In this comprehensive guide, we will break down the construction process, from the initial fabric selection to the final binding stages. We will also discuss how to adapt the Twisted Pole Table Runner – Pattern for various seasons and table sizes, ensuring that your finished piece is not only beautiful but perfectly tailored to your unique home environment and personal style.
The foundation of any successful Twisted Pole Table Runner – Pattern begins with the quality of the yarn or fabric used to construct the piece. Most traditional versions of this runner use 100% quilting cotton because it holds a crisp crease and has a tight weave that prevents the “twist” from distorting over time. However, if you are looking for a more rustic aesthetic, you might consider a linen-cotton blend, which provides a beautiful organic texture while still offering the structural stability required for the interlocking geometric shapes within the pattern.
Color selection is perhaps the most critical decision when planning your Twisted Pole Table Runner – Pattern. To make the “pole” effect truly pop, you need a high-contrast color palette; traditionally, this involves a “light” background color, a “medium” accent, and a “dark” focal color. Using a solid white or cream for the background allows the twisted motifs to take center stage, while choosing a vibrant red or deep navy for the primary spiraling line ensures that the design remains clear and bold even from a distance.
Precision cutting tools are non-negotiable for a Twisted Pole Table Runner – Pattern. You will need a sharp rotary cutter, a self-healing mat, and a long acrylic ruler to ensure that every strip and square is exactly the same size. Because this pattern relies on the perfect alignment of diagonal seams, even a 1/8-inch error can cause the “pole” to look crooked or disconnected. Many experts recommend using a scant quarter-inch seam to account for the fabric lost when folding the seams over during the pressing stage.
Thread choice is a silent but vital component of the Twisted Pole Table Runner – Pattern. A 50-weight cotton thread is ideal because it is thin enough to prevent bulky seams but strong enough to withstand the frequent laundering that table runners often require. Choosing a neutral thread color, like light grey or tan, allows it to blend into almost any fabric choice, keeping the focus on your piecing skills rather than the construction lines of the Twisted Pole Table Runner – Pattern.
Don’t forget to consider the batting or interfacing for your project. Since a table runner needs to lie flat and provide a stable surface for plates and glasses, a low-loft cotton batting or a piece of fusible fleece is recommended. This provides just enough body to the Twisted Pole Table Runner – Pattern without making it too “puffy,” which could cause centerpieces or candles to wobble. A flat, sturdy finish is the hallmark of a well-made home accessory.
Finally, think about the backing fabric for your Twisted Pole Table Runner – Pattern. Since the back of the runner is rarely seen, it is an excellent opportunity to use a wide-back fabric or a coordinating print from your stash. However, if you want your runner to be reversible, you can choose a simple solid color that matches the front, allowing you to flip the Twisted Pole Table Runner – Pattern over if one side gets a minor stain during a meal, extending the life of your handmade creation.
The most iconic element of the Twisted Pole Table Runner – Pattern is the spiraling effect, which is usually created by joining small rectangular units at specific angles. To begin, you will likely work with strip sets—long pieces of fabric sewn together and then cut into smaller segments. This strip-piecing technique is highly efficient and ensures that the “twist” remains consistent throughout the entire length of the Twisted Pole Table Runner – Pattern, saving you hours of individual square-by-square assembly.
Managing the “bias” edges is one of the biggest challenges when following a Twisted Pole Table Runner – Pattern. Bias edges are cuts made at a 45-degree angle to the grain of the fabric, and they are notoriously stretchy. To prevent your twisted blocks from becoming distorted, it is helpful to use a light fabric starch or sizing spray before cutting. This makes the cotton slightly stiffer and more stable, ensuring that your Twisted Pole Table Runner – Pattern stays perfectly rectangular rather than bowing or warping during the sewing process.
As you assemble the blocks, nesting seams becomes your best friend. This involves pressing your seam allowances in opposite directions so that when you join two pieces of the Twisted Pole Table Runner – Pattern, the seams “lock” together. This not only results in perfectly matched intersections where the “pole” colors meet but also reduces the bulk at the corners. For a design that relies so heavily on clean lines and geometric flow, these small technical details are what make the pattern look truly professional.
The “turning chain” or the way you rotate the units is what creates the “twisted” illusion. In a Twisted Pole Table Runner – Pattern, you will typically alternate the direction of your half-square triangles or diagonal strips in a specific sequence. It is highly recommended to use a design wall or a large table to lay out the entire runner before you start sewing the rows together. This allows you to double-check that every “pole” segment is facing the right way to maintain the continuous spiral of the Twisted Pole Table Runner – Pattern.
Maintaining a consistent stitch length is crucial for the durability of a table runner. Since table runners are handled frequently and washed more often than bed quilts, you want your seams to be tight and secure. Setting your machine to a shorter stitch length (around 2.0mm) can provide extra strength to the many small pieces that make up the Twisted Pole Table Runner – Pattern. This ensures that the delicate “twisted” points don’t pull apart over time, preserving your hard work for many years of dinner parties.
Finally, the pressing stage is where the magic happens. After sewing each row of the Twisted Pole Table Runner – Pattern, press the seams flat as they were sewn to “set” the stitches, and then press them to the side or open, depending on the pattern’s instructions. A well-pressed runner is much easier to quilt and bind. Using a tailor’s clapper can help achieve those razor-sharp seams that make the Twisted Pole Table Runner – Pattern look like a high-end designer piece found in an expensive home goods boutique.
The beauty of the Twisted Pole Table Runner – Pattern is its immense adaptability. While the classic red and white “candy cane” look is a favorite for the holidays, you can easily transform the design by changing your fabric choices. For a summer-themed Twisted Pole Table Runner – Pattern, try using shades of turquoise and sandy beige to mimic the colors of the ocean. In the autumn, burnt oranges and deep browns can turn the “twist” into a harvest-themed masterpiece that complements pumpkins and fall leaves.
Size customization is another great feature of the Twisted Pole Table Runner – Pattern. Most patterns are designed for a standard 6-foot dining table, but you can easily scale the design up or down by adding or subtracting blocks. For a small coffee table or a dresser scarf, you might only need three or four “twisted” units. If you have a massive farmhouse table, simply continue adding segments to the Twisted Pole Table Runner – Pattern until you reach the desired length, making sure to leave enough “overhang” on the ends.
Experimenting with negative space can also give the Twisted Pole Table Runner – Pattern a very modern edge. Instead of a traditional solid background, try using a “low-volume” print—a fabric that is mostly white or cream but has a very subtle, light-colored pattern. This adds a layer of visual texture to the background of the Twisted Pole Table Runner – Pattern without distracting from the main spiraling design, creating a sophisticated and contemporary look that is very popular in modern quilting circles.
Adding borders is an optional but effective way to frame your work. A thin “stop border” in a dark color followed by a wider border in a matching print can give the Twisted Pole Table Runner – Pattern a more formal and finished appearance. Borders also allow you to adjust the final width of the runner; if your table is particularly wide, adding a few inches of border fabric ensures that the Twisted Pole Table Runner – Pattern doesn’t look too small or lost in the center of the table.
If you are a fan of embroidery, you can add small hand-stitched details to the “twisted” segments of the pattern. Small stars, snowflakes, or floral vines stitched onto the darker parts of the pole can add a touch of whimsy and personalization. This makes the Twisted Pole Table Runner – Pattern a fantastic choice for a personalized gift, as you can incorporate the recipient’s initials or favorite symbols into the decorative quilting or surface embroidery.
Finally, consider the quilting design itself as a way to customize the piece. You can use “straight-line quilting” to follow the lines of the Twisted Pole Table Runner – Pattern, emphasizing the geometric spiral. Alternatively, “free-motion quilting” with a swirling or floral design can provide a beautiful contrast to the sharp angles of the pieced top. The quilting is what truly brings the layers together, adding the final textural dimension to your Twisted Pole Table Runner – Pattern masterpiece.
The final stage of completing your Twisted Pole Table Runner – Pattern is the binding. Binding is the fabric strip that wraps around the raw edges of the “quilt sandwich” (the top, batting, and backing). For a professional look, many quilters choose a bias binding or a striped fabric that mimics the spiraling theme of the Twisted Pole Table Runner – Pattern. Using a double-fold binding ensures that the edges of your runner are durable and can withstand the wear and tear of being moved across a table.
Hand-sewing the binding to the back of the Twisted Pole Table Runner – Pattern provides a clean, “invisible” finish that is highly prized in competition-level quilting. However, if you are looking for speed and extra durability, machine binding is a perfectly acceptable and modern alternative. By using a decorative stitch or a thread that matches the binding fabric, you can make the machine-sewn edge look like an intentional design element of the Twisted Pole Table Runner – Pattern.
To ensure the longevity of your runner, proper laundering is essential. Because the Twisted Pole Table Runner – Pattern is used on a dining surface, it is prone to food and drink spills. It is recommended to wash your handmade runner on a gentle cycle with cold water and a mild, dye-free detergent. Using color catchers during the first few washes is a smart precaution, especially if you have used high-contrast colors like red and white, to prevent any dye from “bleeding” into the lighter areas.
After washing, avoid wringing out the Twisted Pole Table Runner – Pattern, as this can snap the quilting threads and distort the shape. Instead, roll it in a clean towel to remove excess moisture and then lay it flat to dry. If the runner needs ironing after it’s dry, use a medium heat setting and a dry iron (no steam) to press the Twisted Pole Table Runner – Pattern back into its crisp, geometric shape, ensuring it looks brand new for its next appearance on your table.
Proper storage will also protect your Twisted Pole Table Runner – Pattern from damage. Avoid folding it the same way every time, as permanent creases can form and eventually weaken the fabric fibers. Instead, consider rolling the runner around a cardboard tube (like an empty wrapping paper roll) to keep it smooth and wrinkle-free. This ensures that the Twisted Pole Table Runner – Pattern is ready to go whenever you decide to host a dinner or change up your home decor.
Ultimately, the Twisted Pole Table Runner – Pattern is a project that rewards the maker’s attention to detail. From the moment you pick out your fabrics to the final stitch of the binding, every step contributes to a piece of functional art that enhances the warmth and beauty of your home. The Twisted Pole Table Runner – Pattern is more than just a table covering; it is a testament to your craftsmanship and a timeless design that will be admired by all who sit at your table.
Is the Twisted Pole Table Runner – Pattern suitable for a beginner quilter?
While the pattern looks complex, it is actually a great “intermediate” project. If you are a beginner who has mastered sewing a straight line and basic cutting, you can successfully create a Twisted Pole Table Runner – Pattern by following the steps carefully and using plenty of pins to keep your points aligned.
How much fabric do I need for a standard-sized runner?
Typically, you will need about 1 yard of background fabric and 1/2 yard of two or three contrasting colors for the “pole” segments. This estimate covers the top of the Twisted Pole Table Runner – Pattern. You will also need about 1.5 yards for the backing and 1/2 yard for the binding. Always check the specific requirements of your chosen pattern before shopping.
Can I make this pattern using scrap fabrics?
Absolutely! The Twisted Pole Table Runner – Pattern is excellent for a “scrappy” look. Using various prints in the same color family (e.g., all different blue prints for the pole) can give the runner a charming, eclectic feel while still maintaining the clear “spiraling” design of the pattern.
What is the best way to keep the runner from sliding on a wooden table?
If your Twisted Pole Table Runner – Pattern feels a bit slippery, you can use a thin piece of non-slip shelf liner underneath it. Alternatively, choosing a slightly heavier cotton-linen blend for the backing can provide a bit more “grip” on smooth surfaces like polished wood or glass.
How do I adjust the length of the pattern?
The Twisted Pole Table Runner – Pattern is usually modular. To make it longer, simply add more “twisted” units to the central row. To make it shorter, remove a few units. Just ensure that you maintain the “flow” of the spiral when you add or subtract pieces to keep the Twisted Pole Table Runner – Pattern looking cohesive.
Why are my points not lining up perfectly?
This is usually due to a slight variation in seam allowance. Even a tiny discrepancy can add up over the length of the Twisted Pole Table Runner – Pattern. Try using a seam guide on your machine and pinning exactly at the intersections to ensure your points meet accurately every time.
In this article, we have explored the intricate and rewarding process of creating a Twisted Pole Table Runner – Pattern, from the foundational selection of high-quality fabrics and precision tools to the advanced techniques of nesting seams and bias management. We discussed how the “barber pole” effect is achieved through geometric rotation and how you can customize the pattern for various seasons—like using red and white for the holidays or turquoise and beige for a summer theme.
We also covered the professional finishing touches, such as proper binding, laundering, and storage, which ensure that your Twisted Pole Table Runner – Pattern remains a beautiful centerpiece for years to come. This project is a perfect marriage of technical skill and creative flair, resulting in a piece of functional decor that brings a sense of handmade luxury to any dining space.


