Easy Scrappy Lap Quilt - Tutorial

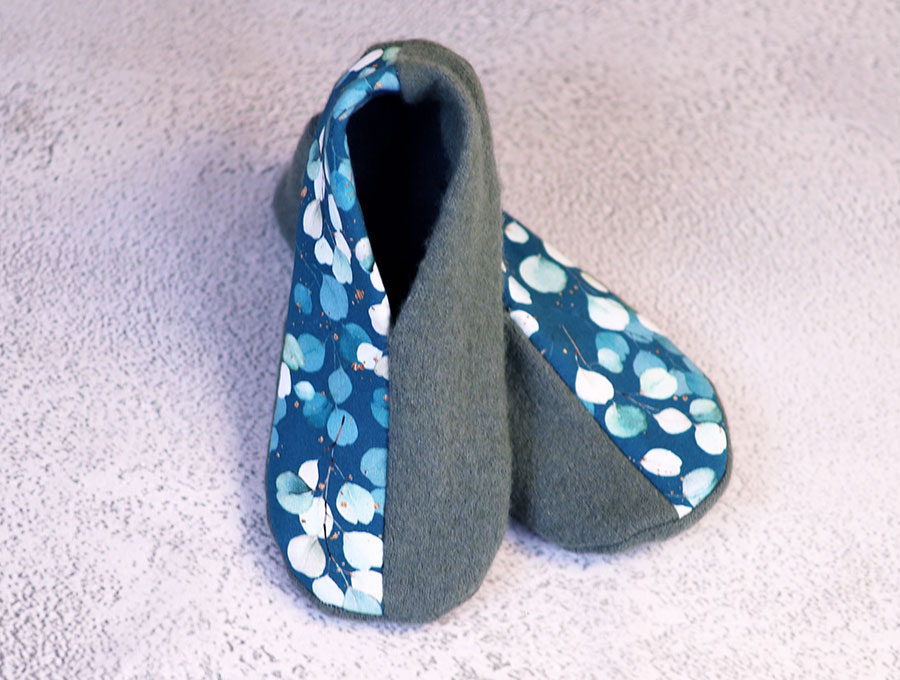
Finding the perfect Warm Winter Slippers – Pattern is the first step toward reclaiming comfort during those biting, sub-zero months. There is something deeply restorative about sliding your feet into a pair of handmade, cozy footwear items that you crafted with your own hands. This guide is designed to walk you through the nuances of selecting, creating, and maintaining the ultimate winter house shoes, ensuring your toes stay toasted regardless of the frost outside.
When we talk about a high-quality Warm Winter Slippers – Pattern, we are looking for more than just aesthetics; we are prioritizing thermal insulation and structural integrity. For many, the transition into the colder seasons means dealing with drafty floors, which makes a thick-soled slipper a non-negotiable household staple. By choosing to follow a DIY slipper guide, you gain the freedom to customize the fit, choose premium natural fibers, and add personal touches that store-bought options simply cannot replicate.
The beauty of working with a professional Warm Winter Slippers – Pattern lies in its versatility across different skill levels, from beginners picking up knitting needles to expert crocheters. In this article, we will delve into the essential materials like merino wool, the technical aspects of sole reinforcement, and the best practices for thermal lining. Whether you are making these for yourself or as a thoughtful gift, mastering the art of the winter slipper is a rewarding journey into the heart of functional textile art.
Selecting the proper yarn or fabric is the most critical decision when starting your Warm Winter Slippers – Pattern. For maximum heat retention, you should lean toward natural animal fibers like sheep’s wool, alpaca, or cashmere. These materials possess inherent insulating properties that trap warm air while allowing your skin to breathe, preventing the moisture buildup often found in synthetic alternatives.
If you prefer a vegan approach or need extra durability, look for high-quality acrylic blends or recycled cotton that have been brushed for softness. While pure synthetics might not offer the same “breathability” as wool, they are often easier to wash and maintain. Consider the yarn weight as well; a bulky or super-bulky yarn will provide a thicker barrier against cold tile or hardwood floors.
The interior of your slipper is just as important as the exterior shell. Many crafters choose to add a fleece lining or a faux fur trim to their Warm Winter Slippers – Pattern to increase the “cozy factor.” Using a soft, moisture-wicking fabric for the lining ensures that your feet stay dry, which is the secret to staying warm over long periods.
Don’t forget the importance of the slipper sole. Since yarn can be slippery on polished surfaces, integrating non-slip materials like suede patches, leather soles, or even dots of puffy fabric paint is essential for safety. A durable outer sole also extends the lifespan of your project, protecting the delicate stitches from friction and wear.
Color choice and aesthetic appeal play a significant role in the joy of crafting. Darker tones like charcoal, navy, or forest green are excellent for hiding the inevitable dust and lint of indoor wear. However, vibrant hues can brighten the gloomy winter atmosphere, making your hand-knit slippers a cheerful part of your morning routine.
Lastly, ensure you have the correct needle or hook size specified in your Warm Winter Slippers – Pattern. Using tools that are too large can result in a loose, “holey” fabric that lets the cold air in. Aim for a dense stitch tension to create a solid fabric that acts as a true windbreaker for your feet, keeping the warmth locked inside where it belongs.
The architecture of a Warm Winter Slippers – Pattern usually follows a few standard methods, such as working in the round or knitting flat and seaming. Understanding these methods helps you visualize how a flat piece of textile transforms into a 3D ergonomic shape. Most patterns begin at the toe and work toward the heel, or start with a sturdy base sole and build upward.
For those who prioritize a snug fit, the toe-up construction allows for constant “try-on” sessions to adjust the length as you go. This ensures that your custom winter slippers don’t end up being too loose, which can lead to heat loss. A well-fitted heel is equally important, often utilizing short-row shaping to create a cup that holds the foot securely in place.
Seaming is another vital skill when following a Warm Winter Slippers – Pattern. If your design involves flat pieces, using a Matthews stitch or a whipstitch ensures the seams are flat and won’t irritate your skin. Nobody wants a bulky, uncomfortable ridge under their foot while they are trying to relax, so seamless construction is often preferred by advanced makers.
The “cuff” or “ankle” section of the Warm Winter Slippers – Pattern provides an opportunity for extra warmth. A ribbed cuff can be folded down for a classic look or pulled up like a bootie to protect the ankles from drafts. This flexibility makes the bootie-style slipper one of the most popular designs for deep-winter climates where insulation is a priority.
Incorporating reinforcement threads in high-wear areas like the heel and toe is a pro-tip for longevity. You can carry a thin strand of nylon or polyester thread along with your main yarn. This hidden reinforcement ensures that your Warm Winter Slippers – Pattern doesn’t develop holes after just one season of heavy use around the house.
Finally, consider the “stretch” factor of your stitches. Over time, knitted or crocheted items tend to expand. To combat this, many Warm Winter Slippers – Pattern designs recommend working with a slight negative ease. This means the slipper is crafted slightly smaller than the foot, allowing it to stretch to a perfect, secure fit that won’t slip off while walking.
Personalization is where your Warm Winter Slippers – Pattern truly shines and becomes a unique piece of art. Sizing isn’t just about length; it’s about the width and instep height of your foot. If you have a high arch, you can easily add a few extra rows to the top of the foot to ensure the slipper doesn’t feel restrictive or tight.
To get the perfect measurement, trace your foot on a piece of paper and measure the widest part and the total length. Compare these dimensions to the sizing chart provided in your Warm Winter Slippers – Pattern. If you are between sizes, it is usually better to size down slightly due to the natural elasticity of the textile fibers used in the construction.
Embellishments can transform a basic Warm Winter Slippers – Pattern into something spectacular. Think about adding decorative buttons, embroidery, or even pompoms for a touch of whimsy. These small details don’t just look good; they also make the slippers feel like a luxury item rather than a simple utility piece.
For those living in extremely cold environments, consider double-thick soles. This involves making two separate sole pieces and joining them together, perhaps with a layer of quilted batting in between. This creates a “sandwich” of warmth that provides an incredible barrier against the freezing ground, elevating your Warm Winter Slippers – Pattern to professional-grade gear.
Colorwork, such as Fair Isle or Intarsia, can also be integrated into your project. While these techniques require more focus, they add an extra layer of yarn to the fabric, making the slippers significantly warmer. A stranded colorwork slipper is essentially double-layered, providing twice the protection against the winter chill.
Lastly, think about the ease of care. If you plan on wearing your slippers daily, you might want to choose a superwash wool or a blend that can handle a gentle machine cycle. Always check the yarn label before starting your Warm Winter Slippers – Pattern to ensure the maintenance requirements align with your lifestyle and laundry habits.
Once you have finished your Warm Winter Slippers – Pattern, proper care is essential to keep them looking and feeling brand new. Pilling is a common issue with high-quality wool, but it can be easily managed with a small fabric shaver or a wool comb. Removing these little fuzzballs periodically keeps the surface smooth and maintains the thermal efficiency of the fibers.
Washing should be done sparingly to preserve the shape and “loft” of the yarn. When you do wash your winter slippers, hand-washing in cool water with a gentle wool detergent is the gold standard. Avoid wringing the water out, as this can distort the stitches; instead, roll them in a dry towel to remove excess moisture before air-drying.
If you find that your Warm Winter Slippers – Pattern has become too loose over time, a light “fulling” or intentional shrinking can help. By washing them in slightly warmer water and agitating them, the wool fibers will lock together, creating a denser, smaller, and much warmer fabric. This is a common technique for creating boiled wool slippers.
Storage during the off-season is equally important. Ensure your handmade slippers are completely clean and dry before tucking them away. Use a breathable cotton bag and perhaps a few cedar blocks or lavender sachets to protect the natural wool fibers from moths and other pests that enjoy snacking on high-quality textiles.
Repairing small holes as soon as they appear will prevent them from becoming unfixable disasters. Using a darning technique with matching yarn allows you to reinforce the worn area while maintaining the comfort of the original Warm Winter Slippers – Pattern. A well-mended slipper is a badge of honor for any sustainable crafter.
Finally, consider refreshing the non-slip grip on the bottom of your slippers every year. If you used silicone dots or leather pads, check to see if they are peeling or wearing thin. Keeping the “traction” intact ensures your cozy winter footwear remains safe for navigating stairs and smooth floors throughout the entire holiday season.
1. What is the best yarn for a Warm Winter Slippers – Pattern? The best yarn is generally 100% sheep’s wool or an alpaca blend. These fibers are naturally insulating, moisture-wicking, and incredibly warm. For those with sensitive skin, merino wool is a softer alternative that provides the same thermal benefits without the itch.
2. How do I make my slippers non-slip? You can apply silicone sealant dots, use commercial “sock stop” products, or sew on suede/leather soles. This is a vital step for any Warm Winter Slippers – Pattern to ensure safety on hardwood or tiled surfaces.
3. Can I wash my handmade winter slippers? Yes, but check your yarn label first. If you used superwash wool, you can use a gentle machine cycle. For regular wool, hand-washing in cold water is necessary to prevent shrinking or felting.
4. How long does it take to finish a Warm Winter Slippers – Pattern? Depending on your skill level and the complexity of the design, a pair of slippers usually takes between 5 to 10 hours of active crafting. Using bulky yarn can significantly speed up the process.
5. Why are my slippers stretching out? Natural fibers like wool have a memory but can stretch with heat and pressure. To prevent this, use a smaller needle size to create a tighter gauge, or choose a Warm Winter Slippers – Pattern that incorporates a bit of nylon for elasticity.
6. Are these patterns suitable for beginners? Many patterns are specifically designed for beginners, using basic knit and purl stitches. Look for “beginner-friendly” or “easy” labels when selecting your first Warm Winter Slippers – Pattern.
In conclusion, creating your own Warm Winter Slippers – Pattern is one of the most fulfilling ways to prepare for the cold season. We have explored the importance of selecting high-quality fibers, the technical side of slipper construction, and how to customize your project for the perfect fit.
By focusing on durable soles and proper maintenance, your handmade creations can last for many winters to come, providing a level of warmth and comfort that mass-produced items simply cannot match.


