
American-style placemat with a fruit theme - Pattern

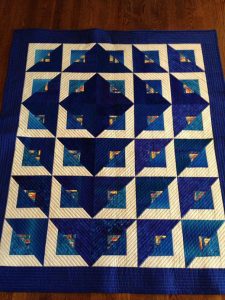
The Woven Star Block Quilt Tutorial – Pattern is one of those timeless projects that manages to look incredibly complex while remaining accessible to anyone with a bit of patience and a sewing machine. If you have been searching for a way to elevate your quilting game, this specific Woven Star Block Quilt – Pattern offers a stunning visual effect that mimics interlaced fabric strips. It is a brilliant choice for quilters who love geometric precision and want to create a finished piece that draws the eye inward toward its intricate, star-shaped center.
Mastering the Woven Star Block Quilt – Pattern requires a solid understanding of how colors and values interact within a design. Because the “woven” look depends on light and shadow, selecting the right fabrics is the most critical step in ensuring your Woven Star Block Quilt looks professional and polished. Whether you are aiming for a modern aesthetic with bold solids or a cozy, traditional feel with floral prints, the structural integrity of this pattern remains a favorite in the quilting community for its versatility and “wow” factor.
In this comprehensive guide, we will break down every stage of creating your own Woven Star Block Quilt – Pattern, from the initial fabric selection to the final pressing of the seams. By following this tutorial, you will learn the secrets to achieving perfect points and seamless transitions, ensuring your Woven Star Block Quilt becomes a cherished heirloom. Let’s dive into the world of creative geometry and explore how this Woven Star Block Quilt – Pattern can transform your next quilting session into a masterpiece of woven art.
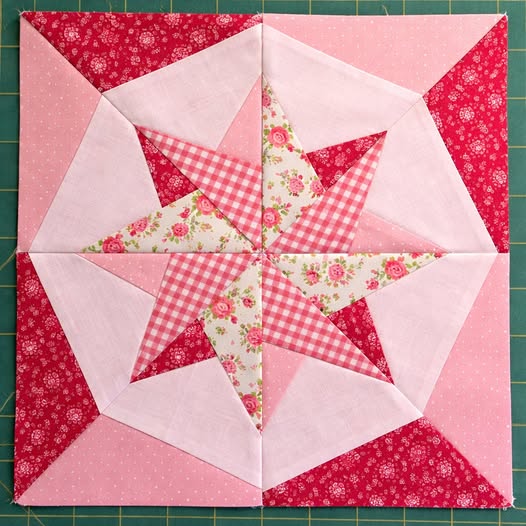
The Woven Star Block Quilt is a geometric marvel that uses clever placement to create an optical illusion. Unlike a standard star, this pattern makes it appear as though the points are ducking under and over one another. This depth is what sets the Woven Star Block Quilt – Pattern apart from more basic designs like the Sawtooth or Ohio Star.
When you work with a Woven Star Block Quilt – Pattern, you are essentially dealing with a grid system. Most versions of this quilt rely on a multi-block construction that uses squares and triangles to form the “woven” arms. Understanding the underlying grid is the first step to ensuring your Woven Star Block Quilt remains symmetrical and balanced throughout the sewing process.
Precision cutting is the backbone of any successful Woven Star Block Quilt – Pattern. Even a slight deviation of 1/8 of an inch can throw off the entire alignment, making it difficult to match your corners. For this Woven Star Block Quilt, we highly recommend using a fresh rotary blade and a high-quality acrylic ruler to maintain the exact dimensions required by the pattern.
Color theory plays a massive role in the Woven Star Block Quilt – Pattern. To achieve the “woven” effect, you generally need at least three distinct fabric values: a light background, a medium “star” fabric, and a dark “shadow” fabric. Without these contrasting tones, the Woven Star Block Quilt can look flat, losing the very characteristic that makes the pattern so special.
Many quilters find that the Woven Star Block Quilt – Pattern is easiest to manage when broken down into units. Instead of looking at the block as one giant puzzle, treat it as a collection of half-square triangles (HSTs) and flying geese. This modular approach makes the Woven Star Block Quilt much less intimidating for intermediate beginners who are just starting to experiment with complex patterns.
Finally, always remember that the Woven Star Block Quilt – Pattern is adaptable. While the traditional version is quite structured, many modern artists use “fussy cutting” to place specific motifs within the center of the Woven Star Block Quilt. This allows you to personalize the pattern even further, making each quilt you create a unique reflection of your individual style.
Before you begin your Woven Star Block Quilt – Pattern, gathering the right tools is essential for a frustration-free experience. You will need a standard sewing machine, high-quality cotton thread, and, most importantly, your fabric selection based on the Woven Star Block Quilt requirements. Having everything ready ensures that your pattern workflow remains smooth and efficient.
The fabric choice for a Woven Star Block Quilt – Pattern should ideally be 100% quilting-grade cotton. This material holds its shape well, which is vital when you are sewing the many diagonal seams found in a Woven Star Block Quilt. If you use fabric that stretches too much, the pattern will likely warp, leading to puckering when you attempt to quilt the layers together.
In addition to fabric, a high-quality “scant” quarter-inch foot for your sewing machine is a lifesaver for the Woven Star Block Quilt – Pattern. This specific seam allowance accounts for the fold of the fabric, ensuring that your Woven Star Block Quilt units end up the exact size intended by the pattern. It is a small detail that makes a massive difference in the final result.
Marking tools are also vital when executing a Woven Star Block Quilt – Pattern. You will often need to draw diagonal lines on the back of your fabric squares to create the triangles for the Woven Star Block Quilt. Using a water-soluble pen or a fine ceramic lead pencil ensures your marks stay visible while you sew the pattern but disappear once the project is finished.
Don’t overlook the importance of a good iron and pressing mat for your Woven Star Block Quilt – Pattern. The “woven” look is greatly enhanced by crisp, flat seams. In a Woven Star Block Quilt, pressing your seams to one side or open (depending on the pattern instructions) allows the blocks to lay flat and makes the quilting process much easier later on.
Lastly, consider using a design board when working on your Woven Star Block Quilt – Pattern. Because the pieces can look similar, it is easy to rotate a unit accidentally. Laying out your Woven Star Block Quilt pieces on a board according to the pattern prevents “sewing-ripping-resewing” cycles, keeping your creative energy focused on the joy of the craft.
The first stage of assembly for the Woven Star Block Quilt – Pattern involves creating your sub-units. Usually, this means making several sets of Half-Square Triangles (HSTs). For a standard Woven Star Block Quilt, these HSTs act as the outer points. Carefully following the pattern guidelines for trimming these units will ensure the star is perfectly centered.
Once your units are prepped, you will begin joining them into rows as specified by the Woven Star Block Quilt – Pattern. This is where the “woven” magic starts to happen. As you sew the pieces of the Woven Star Block Quilt together, pay close attention to the intersection points. Pinning at every junction is highly recommended to keep the pattern lines straight and sharp.
The center of the Woven Star Block Quilt – Pattern often consists of a larger square or a smaller sub-block. This serves as the anchor for the entire Woven Star Block Quilt. When attaching the surrounding “woven” arms to this center, ensure you are not stretching the fabric. Maintaining a light touch helps keep the pattern from bowing in the middle.
After completing the rows, the next step in the Woven Star Block Quilt – Pattern is to join the rows themselves. This is the most rewarding part of the Woven Star Block Quilt process, as the full star finally reveals itself. Use the “nesting seams” technique often found in professional patterns to get those perfect, sharp points where the rows meet.
After the block is fully assembled, give your Woven Star Block Quilt – Pattern a final, thorough press. Start from the center and work your way out to avoid creating any unintended pleats in the Woven Star Block Quilt. A well-pressed block is the hallmark of a disciplined quilter and ensures that the pattern looks its absolute best before being incorporated into a larger quilt top.
If you are making multiple blocks for a full Woven Star Block Quilt – Pattern project, consistency is key. Try to “chain piece” your units to save time and thread. This method involves sewing the same part of the Woven Star Block Quilt across all your blocks in one go, which helps maintain a steady rhythm and ensures every block in the pattern looks identical.
Even with a perfect Woven Star Block Quilt – Pattern, challenges can arise during the final stages. One common issue in a Woven Star Block Quilt is “lost points,” where the tip of the star gets cut off by the seam allowance. To prevent this, always sew just a hair’s breadth to the outside of the “X” created by your previous seams in the pattern.
If your Woven Star Block Quilt – Pattern results in a block that isn’t perfectly square, don’t panic. You can often “square up” a Woven Star Block Quilt by carefully trimming the outer edges, provided you don’t cut into the points of the star. A slightly smaller block that is square is always better for the pattern than a full-sized block that is wonky.
Choosing a quilting design for your Woven Star Block Quilt – Pattern is the final creative hurdle. Many people choose to “quilt in the ditch” to emphasize the woven lines of the Woven Star Block Quilt. Alternatively, a simple stipple or a geometric motif can complement the pattern without distracting from the intricate piecing you have worked so hard on.
The choice of binding can also make or break your Woven Star Block Quilt – Pattern. A dark, solid binding often acts like a frame, pulling the viewer’s eye into the Woven Star Block Quilt itself. If your pattern is very busy, a neutral binding can provide a much-needed resting place for the eyes, balancing the overall composition.
Longevity is important, so ensure your Woven Star Block Quilt – Pattern is finished with high-quality batting. A cotton or wool batting will highlight the texture of the Woven Star Block Quilt, making the woven effect pop even more. Cheap batting can beard or clump, which would be a disservice to the beautiful pattern you have just completed.
Finally, always label your Woven Star Block Quilt – Pattern creation. Include the date, your name, and perhaps the name of the Woven Star Block Quilt design. Years from now, when someone admires the intricate pattern, they will know the story behind the maker. Every quilt tells a story, and your woven star is a beautiful chapter in your creative journey.
Is the Woven Star Block Quilt – Pattern suitable for absolute beginners?
While a total beginner could attempt it, the Woven Star Block Quilt is generally recommended for confident beginners or intermediate quilters. It requires precise seam allowances and careful fabric placement to achieve the woven look intended by the pattern. If you are comfortable sewing half-square triangles, you can certainly handle this project.
How much fabric do I need for a standard Woven Star Block Quilt?
The amount of fabric depends on the size of the quilt you are making. For a single 12-inch block, you typically need small scraps or fat quarters. However, for a full Woven Star Block Quilt – Pattern, you will likely need 3 to 5 yards of coordinating fabrics. Always check your specific pattern instructions for exact yardage.
Can I make this Woven Star Block Quilt – Pattern using a jelly roll?
Yes! While the Woven Star Block Quilt is traditionally cut from yardage, you can adapt the pattern to use 2.5-inch strips (jelly rolls). You will just need to be mindful of the math to ensure the strips can be cut into the necessary squares and triangles for the Woven Star Block Quilt design.
Why doesn’t my Woven Star Block Quilt look like it’s “weaving”?
The “weaving” effect in the Woven Star Block Quilt – Pattern relies almost entirely on color contrast. If your fabrics are too similar in value (brightness), the eye won’t distinguish the overlapping layers. To fix this, ensure you have a clear distinction between your light, medium, and dark fabrics within the Woven Star Block Quilt.
What is the best way to press seams in a Woven Star Block Quilt?
Many quilters prefer pressing seams to the side in a Woven Star Block Quilt – Pattern to allow for nesting, which helps with alignment. However, if the block becomes too bulky at the center, pressing those specific seams open can help the Woven Star Block Quilt lay flatter.
Can I resize the Woven Star Block Quilt – Pattern?
Absolutely. The Woven Star Block Quilt is based on a grid, so you can scale the squares up or down. If the pattern calls for 4-inch units to make a 12-inch block, you could use 2-inch units to make a 6-inch block. Just remember to adjust your seam allowance focus accordingly.
In this guide, we have explored the intricate beauty of the Woven Star Block Quilt – Pattern, covering everything from the fundamental design principles to the final finishing touches. We learned that the secret to a successful Woven Star Block Quilt lies in the careful selection of contrasting fabrics and the precision of your cuts and seams.
By breaking the pattern down into manageable units like HSTs, any quilter can master this stunning visual effect. We also discussed the importance of pressing and troubleshooting common issues like lost points to ensure your Woven Star Block Quilt – Pattern turns out perfectly every time.


