
Horizontal Row Quilt - Pattern

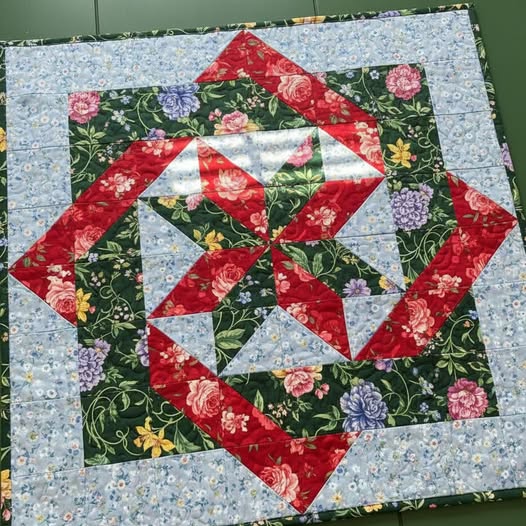
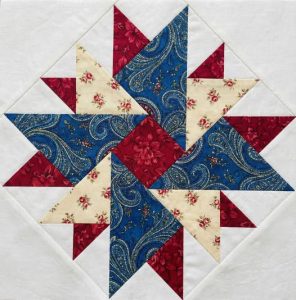
The Woven Star Quilt- Pattern is one of those timeless designs that manages to look incredibly intricate while remaining accessible to those who understand the basic building blocks of quilting. When you first lay eyes on a Woven Star Quilt- Pattern, the visual interlocking of fabric strips creates a stunning 3D effect that mimics the texture of a real woven basket, layered into a celestial star shape. Whether you are a seasoned quilter looking for a fresh challenge or a patient beginner ready to level up, this specific quilt design offers a unique way to play with color theory and fabric contrast.
Choosing the right Woven Star Quilt- Pattern is the first step in creating a family heirloom that will be cherished for generations. The magic of this quilting technique lies in the clever use of half-square triangles (HSTs) and square-in-a-square blocks, which, when arranged correctly, trick the eye into seeing movement across the surface of the quilt. Because the Woven Star Quilt- Pattern relies heavily on precision, it serves as an excellent project for honing your seam allowance skills and improving your fussy cutting abilities to highlight specific motifs within your fabric.
In this comprehensive guide, we will dive deep into everything you need to know about the Woven Star Quilt- Pattern, from selecting the perfect cotton fabrics to mastering the assembly process. We will explore the technical nuances that make this star block stand out from more traditional patterns like the Sawtooth or Ohio Star. By the end of this article, you will have a clear roadmap for creating your own handcrafted quilt that captures the geometric elegance and sophisticated charm of the Woven Star Quilt- Pattern.
When embarking on a Woven Star Quilt- Pattern, your fabric selection is the most critical decision you will make. To achieve that iconic “woven” look, you need to select high-contrast fabrics that allow the interlocking “ribbons” of the star to pop against the background. Most quilters find that using a mix of solids and small-scale prints works best, as large, busy patterns can sometimes camouflage the intricate seams that define the star geometry.
The weight of the fabric is also paramount for a successful Woven Star Quilt- Pattern. It is highly recommended to use 100% quilting weight cotton, which provides the stability needed for the many diagonal seams involved in this design. Using a fabric starch during the pressing process can help prevent the fabric from stretching, ensuring that your woven star blocks remain perfectly square and easy to join.
Color placement is what truly breathes life into the Woven Star Quilt- Pattern. To maximize the visual impact, try using a gradient approach or a “light-medium-dark” value scale. By placing the darkest values where the “strips” would naturally go under one another, you create an optical illusion of depth that makes the Woven Star Quilt- Pattern appear three-dimensional and professional.
Don’t forget the importance of your background fabric in a Woven Star Quilt- Pattern. A neutral background, such as crisp white, deep navy, or charcoal grey, acts as a canvas that allows the woven star motifs to take center stage. If the background is too busy, the “woven” effect might get lost, so many experts suggest using a low-volume print or a solid tone-on-tone fabric for the negative space.
Pre-washing your fabrics is a debated topic, but for a Woven Star Quilt- Pattern, it can be a lifesaver. Since this pattern often uses vibrant saturated colors next to light neutrals, pre-washing helps prevent fabric bleeding during the first wash of the finished quilt. You want your star points to remain sharp and your colors to stay distinct, maintaining the integrity of the woven design.
Lastly, consider the fabric grain when cutting pieces for your Woven Star Quilt- Pattern. Because this pattern involves many triangles, you will be dealing with bias edges, which are prone to stretching. Being mindful of the grain and using a rotary cutter with a fresh blade will ensure that every piece of your Woven Star Quilt- Pattern fits together like a perfect puzzle.
Precision is the heartbeat of a successful Woven Star Quilt- Pattern. Before you even touch your sewing machine, ensure you have a high-quality acrylic ruler and a sharp rotary cutter. In the world of patchwork quilting, being off by even an eighth of an inch can lead to misaligned star points, which is particularly noticeable in a structured design like the Woven Star Quilt- Pattern.
To start your Woven Star Quilt- Pattern, you will likely need to cut a variety of squares and rectangles that will eventually become half-square triangles. Using a quarter-inch seam foot on your sewing machine is an absolute game-changer for this project. It ensures that every seam is consistent, which is the secret ingredient to making the “woven” parts of the Woven Star Quilt- Pattern look seamless and fluid.
Organization is your best friend when working on a Woven Star Quilt- Pattern. Since there are many small pieces that look similar, use alphabetical labels or small bins to keep your “A” blocks separate from your “B” blocks. This prevents the common mistake of flipping a unit upside down, which would break the “woven” illusion that defines the Woven Star Quilt- Pattern aesthetic.
Many modern versions of the Woven Star Quilt- Pattern utilize foundation paper piecing (FPP). This technique involves sewing the fabric directly onto a paper template, which guarantees perfect points every time. If you find traditional piecing frustrating, looking for an FPP version of the Woven Star Quilt- Pattern can be a great way to achieve professional results with significantly less stress.
Pressing is just as important as sewing when creating a Woven Star Quilt- Pattern. Always “set” your seams by pressing the iron down on the stitches before opening the fabric. To reduce bulk where multiple points meet, try nesting your seams or pressing them open. A flat, well-pressed quilt top is much easier to quilt later on and makes the Woven Star Quilt- Pattern look much more high-end.
Finally, always do a test block before cutting into your favorite “fussy cut” or expensive fabrics. A test block allows you to check your seam accuracy and see how your color choices interact in the real world. Once you’ve mastered the first block of the Woven Star Quilt- Pattern, the rest of the quilt will come together much faster as you fall into a rhythmic chain-piecing flow.
The assembly of a Woven Star Quilt- Pattern usually begins with the construction of the center unit. In many variations, this is a square-in-a-square or a simple four-patch that acts as the anchor for the surrounding “woven” arms. Paying close attention to the color orientation at this stage is vital, as the center sets the tone for the direction of the “weave” in your Woven Star Quilt- Pattern.
Next, you will move on to the corner units and side units, which typically consist of HSTs (Half-Square Triangles). These units are what create the “points” of the star. When sewing these for your Woven Star Quilt- Pattern, be careful not to stretch the fabric along the bias. Use plenty of quilting pins to keep the edges aligned, ensuring that the “woven” strips appear to pass over and under each other correctly.
Once the individual units are prepared, it is time to arrange them on a design wall or a flat surface. This is the moment where the Woven Star Quilt- Pattern truly reveals its beauty. Seeing the blocks laid out allows you to check for any mistakes in fabric placement before you commit to sewing the rows together. It’s much easier to flip a block now than to use a seam ripper later!
Sew the units into rows, and then sew the rows together to complete the Woven Star Quilt- Pattern block. As you join the rows, focus on matching the intersections. If your points are slightly off, don’t panic; a little “finessing” with the iron can often hide minor discrepancies. However, the goal for a top-tier Woven Star Quilt- Pattern is always to keep those points as crisp as possible.
After the blocks are finished, you can decide on the quilt layout. You might choose to set the blocks “side-by-side” for a continuous woven look, or use sashing and cornerstones to frame each Woven Star Quilt- Pattern individually. Sashing provides a “resting place” for the eyes and can make the overall quilt feel less busy, especially if you used very bold colors for the stars themselves.
The final step in the assembly of the Woven Star Quilt- Pattern top is adding the borders. Borders act as a frame for your hard work and can also help “square up” the quilt if it has become slightly distorted during the piecing process. Choosing a complementary border fabric can pull all the colors of the Woven Star Quilt- Pattern together, resulting in a cohesive and stunning finished product.
Once your Woven Star Quilt- Pattern top is complete, the next phase is the actual quilting—the process of stitching the three layers (top, batting, and backing) together. For a geometric pattern like this, straight-line quilting or “stitching in the ditch” can emphasize the woven lines. Alternatively, free-motion quilting with a swirling or floral pattern can provide a beautiful organic contrast to the sharp angles of the star design.
The choice of quilt batting will affect the final look and feel of your Woven Star Quilt- Pattern. If you want a flat, modern look that highlights the piecing, a cotton or bamboo batting is ideal. If you prefer a more traditional, “puffy” look with lots of texture (known as loft), a polyester or wool blend might be a better choice for your handmade quilt.
Thread selection is another way to add a layer of detail to your Woven Star Quilt- Pattern. A monofilament (clear) thread is great if you want the quilting to be invisible, while a variegated thread that matches your fabric colors can add an extra pop of interest. High-quality 50wt cotton thread is the standard for most quilters, as it is strong yet thin enough to not add unnecessary bulk to the seams.
When it comes to the quilt backing, you have a chance to be creative. You can use a single wide-back fabric, or piece together leftover scraps from the Woven Star Quilt- Pattern top to create a “proprosi” or “after-quilt” on the back. This makes the quilt reversible and ensures that none of your beautiful quilting fabric goes to waste.
The binding is the final touch on your Woven Star Quilt- Pattern. Most quilters use a double-fold bias binding for durability. For a professional finish, consider hand-sewing the binding to the back of the quilt using a blind stitch. This creates a clean look without visible machine stitches, which is often preferred for competition-level quilts or special gifts.
Don’t forget to add a quilt label to the back of your Woven Star Quilt- Pattern. Include your name, the date, the location, and perhaps a small note about who the quilt was made for. This turns your Woven Star Quilt- Pattern project into a documented piece of history, ensuring that its story is told long after it leaves your sewing room.
1. Is the Woven Star Quilt- Pattern suitable for beginners?
While it is more complex than a basic patchwork quilt, a patient beginner can certainly tackle it. It is recommended to have a solid grasp of quarter-inch seams and how to make half-square triangles before starting.
2. How much fabric do I need for a standard throw-sized Woven Star Quilt?
Typically, you will need about 5 to 7 yards of fabric in total, depending on the number of colors you use and whether you include sashing and borders. Always check your specific Woven Star Quilt- Pattern instructions for exact yardage.
3. Can I use pre-cut fabrics like Jelly Rolls or Layer Cakes?
Yes! Many Woven Star Quilt- Patterns are designed to be “pre-cut friendly.” Using a Layer Cake (10-inch squares) is particularly effective for cutting the various triangles and squares needed for the star points.
4. Why do my star points keep getting cut off?
This usually happens if your seam allowance is too wide or if you aren’t leaving a “seam allowance” space at the tip of the triangle. Ensure there is a $1/4$ inch of fabric above the point where the two seams meet.
5. What is the best way to wash a finished Woven Star Quilt?
Wash your quilt on a gentle cycle with cold water and a mild detergent. Using color catchers is highly recommended to prevent any dark dyes from staining the lighter parts of your Woven Star Quilt- Pattern.
6. How do I make the “woven” effect more prominent?
The key is value contrast. Use a very dark fabric for the “under” parts of the weave and a light or bright fabric for the “over” parts. This creates the shadow effect necessary for the Woven Star Quilt- Pattern to look 3D.
Mastering the Woven Star Quilt- Pattern is a rewarding journey that combines technical skill with artistic expression. Throughout this article, we have explored the importance of fabric selection, the necessity of cutting precision, and the steps required to assemble and finish a professional-looking quilt.
This pattern remains a favorite in the quilting community because it offers endless possibilities for customization, whether you prefer a modern aesthetic or a traditional look. By focusing on high-contrast colors and accurate piecing, you can create a stunning visual masterpiece that showcases the beautiful complexity of the Woven Star Quilt- Pattern.


