
American-style placemat with a fruit theme - Pattern

Creating a Woven sunflower pincushion – Pattern is one of the most delightful ways to combine utility with artistic expression in your sewing room. Many crafters find that their workspace is often cluttered with loose needles and pins, which is why a dedicated project like this is so valuable. By following this Woven sunflower pincushion – Pattern, you are not just making a tool; you are crafting a small piece of sunshine that sits right at your fingertips while you work on larger garments or quilts.
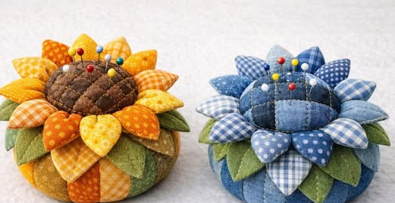
When you embark on the journey of completing a Woven sunflower pincushion – Pattern, you realize how the texture of the weaving adds a unique dimension compared to standard fabric cushions. The sunflower motif is timeless, symbolizing happiness and longevity, which makes this specific Woven sunflower pincushion – Pattern a fantastic gift for fellow sewists. Whether you are an expert at loom weaving or a beginner looking for a small-scale entry point, this guide will provide the structure you need to succeed.
The beauty of the Woven sunflower pincushion – Pattern lies in its intricate appearance which is surprisingly simple to achieve once you break down the steps. Using high-quality yarns or fabric strips, you can create a sturdy base that holds pins securely without them slipping through. Throughout this article, we will delve deep into the specifics of the Woven sunflower pincushion – Pattern, ensuring that every petal and every stitch contributes to a durable and aesthetically pleasing final product that you will be proud to display on your craft table.
To begin your Woven sunflower pincushion – Pattern, you must first select a high-quality base yarn, preferably in a rich golden or yellow hue for the petals. Cotton yarns are often favored for this Woven sunflower pincushion – Pattern because they offer excellent tension and don’t stretch too much over time. Having the right fibers ensures that the “woven” part of your project remains crisp and defined throughout years of use.
The center of your Woven sunflower pincushion – Pattern requires a darker brown or black material to simulate the seeds of a real sunflower. This contrast is vital for the visual success of the Woven sunflower pincushion – Pattern, creating that iconic look that everyone recognizes instantly. Many crafters enjoy using a slightly textured yarn for this section to add a tactile element that mimics the natural roughness of sunflower seeds.
A small circular loom or even a piece of sturdy cardboard cut into a circle is necessary to execute the Woven sunflower pincushion – Pattern. This tool acts as the skeleton for your weaving, allowing you to wrap your warp threads evenly. Without a consistent frame, the Woven sunflower pincushion – Pattern might lose its shape, so taking the time to prepare your loom is a step you should never skip.
Stuffing is another critical component of the Woven sunflower pincushion – Pattern, as it determines the firmness of the final product. Poly-fill is a common choice, but some professionals using the Woven sunflower pincushion – Pattern prefer crushed walnut shells or wool roving. These heavier fillings give the pincushion a nice weight, preventing it from sliding around your desk when you are trying to insert a needle.
You will also need a large-eye tapestry needle to weave the weft threads through the warp of your Woven sunflower pincushion – Pattern. Since this is a Woven sunflower pincushion – Pattern that focuses on detail, having a needle that glides easily through the fibers will make the process much more enjoyable. Avoid needles that are too sharp, as they might split the yarn and ruin the clean lines of your beautiful sunflower petals.
Lastly, consider adding a felt backing to your Woven sunflower pincushion – Pattern to hide the structural stitches and provide a smooth surface. This final touch in the Woven sunflower pincushion – Pattern process elevates the project from a simple craft to a professional-grade sewing accessory. With all these materials gathered, you are officially ready to bring the sunny charm of this project into your creative workspace.
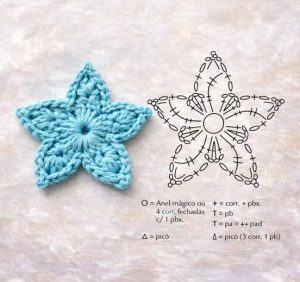
The “warp” is the set of vertical threads that are held in tension on a loom, and it is the first technical step in your Woven sunflower pincushion – Pattern. For a circular project like this, the warp threads will radiate from the center like the spokes of a wheel. Mastering the warp is essential for the Woven sunflower pincushion – Pattern because it dictates the number of petals your finished sunflower will have.
In this Woven sunflower pincushion – Pattern, you generally want an odd number of spokes if you are doing a simple over-under weave. An odd number ensures that when you go around the circle, the pattern alternates naturally without you having to manually skip threads. This technical detail is what makes the Woven sunflower pincushion – Pattern so “easy” for beginners to follow once they get the rhythm down.
When tensioning your warp for the Woven sunflower pincushion – Pattern, aim for a “snug but not tight” feel. If the threads are too tight, the loom might warp or the center of your Woven sunflower pincushion – Pattern might bulge unpleasantly. Conversely, if they are too loose, your weaving will look sloppy and the pins won’t stay in place securely once the project is finished and stuffed.
Choosing the color of the warp is a clever way to add depth to your Woven sunflower pincushion – Pattern. Some artists use the same yellow as the petals, while others use a neutral tan to let the weft colors stand out. In our Woven sunflower pincushion – Pattern, we recommend using a sturdy thread that won’t snap under pressure, as the warp carries the structural load of the entire cushion.
As you lay the warp for the Woven sunflower pincushion – Pattern, ensure that the center point where all threads cross is as small and tight as possible. This “hub” will be the foundation of the sunflower’s dark center. A well-constructed hub in the Woven sunflower pincushion – Pattern prevents the stuffing from leaking out later and keeps the shape perfectly circular and balanced.
Once the warp is secure, you can take a moment to admire the geometric beauty of your Woven sunflower pincushion – Pattern in its skeletal form. This is the moment where you can adjust the spacing of the spokes to ensure a perfect 360-degree distribution. A balanced start leads to a balanced finish, which is a core principle of this Woven sunflower pincushion – Pattern and weaving in general.
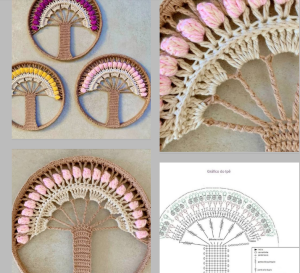
The actual weaving process of the Woven sunflower pincushion – Pattern begins at the center and works its way outward. You will start with the dark brown yarn to create the “seed” section of the sunflower. In this Woven sunflower pincushion – Pattern, using a “soumak” or a “plain weave” can create different textures that realistically represent the center of the flower.
As you transition from the dark center to the yellow petals in the Woven sunflower pincushion – Pattern, you will notice the flower truly coming to life. The yellow weft should be packed tightly against the previous rows to ensure there are no gaps. This density is a hallmark of a well-executed Woven sunflower pincushion – Pattern, as it provides the necessary resistance for holding pins and needles.
To create the petal effect in this Woven sunflower pincushion – Pattern, you can use a technique where you weave back and forth over only a few warp threads at a time. This creates individual points rather than a solid outer ring. Following this specific Woven sunflower pincushion – Pattern method allows each petal to have its own character, making the finished product look much more organic and artisanal.
Managing yarn transitions is another skill you will develop while working on the Woven sunflower pincushion – Pattern. Instead of tying bulky knots, which could be felt through the cushion, try overlapping the ends of the yarn within the weaving itself. This “seamless” transition is a preferred method in the Woven sunflower pincushion – Pattern to keep the surface smooth and professional for your sewing pins.
The outer edge of the Woven sunflower pincushion – Pattern requires a secure finishing stitch to prevent the whole thing from unraveling. A simple whip stitch or a blanket stitch around the perimeter works wonders. In this Woven sunflower pincushion – Pattern, the edge is where the front weaving meets the back fabric, so it needs to be strong enough to hold the internal pressure of the stuffing.
Don’t be afraid to experiment with different shades of yellow and orange in your Woven sunflower pincushion – Pattern. Real sunflowers have subtle gradients, and you can mimic this by “blending” your yarn colors as you weave outward. This advanced tip for the Woven sunflower pincushion – Pattern turns a functional tool into a stunning piece of fiber art that will brighten up any sewing room.
After you have completed the weaving portion of the Woven sunflower pincushion – Pattern, it is time to remove it from the loom. This step can be intimidating for beginners, but the Woven sunflower pincushion – Pattern is designed to be resilient. You will carefully snip the warp threads, leaving enough length to tie them off or weave them back into the body of the sunflower to secure the edges.
Once the woven top is free, you will pair it with a circular piece of backing fabric—usually felt or a heavy cotton—to complete the Woven sunflower pincushion – Pattern. Sewing the two halves together involves leaving a small opening for the stuffing. This stage of the Woven sunflower pincushion – Pattern is where you can truly see the volume and shape of the sunflower start to take hold.
Filling your Woven sunflower pincushion – Pattern requires a bit of patience to ensure the stuffing is distributed evenly. You want the cushion to be firm enough that it doesn’t collapse under the weight of the pins, but not so hard that it’s difficult to insert them. Most experts following the Woven sunflower pincushion – Pattern suggest stuffing it slightly more than you think you need, as the fibers will settle over time.
Closing the gap in your Woven sunflower pincushion – Pattern is best done with a “ladder stitch” or a “hidden stitch.” This keeps the seam invisible, maintaining the illusion that the sunflower is a solid, three-dimensional object. A clean closure is the final “test” of a well-made Woven sunflower pincushion – Pattern, proving that you have mastered both the weaving and the sewing aspects of the project.
If you want to add a loop to your Woven sunflower pincushion – Pattern, now is the time to do it. A small braided yarn loop allows you to hang the pincushion on a wall or attach it to your sewing machine. This functional addition to the Woven sunflower pincushion – Pattern makes it even more versatile, especially for those with limited desk space in their craft areas.
Finally, give your Woven sunflower pincushion – Pattern a gentle steam with an iron to set the stitches and relax the fibers. This “blocking” stage ensures that the petals lie flat and the colors look vibrant. Your Woven sunflower pincushion – Pattern is now complete—a beautiful, handmade tribute to nature that will serve you faithfully through countless sewing projects and creative sessions.
What is the best material for the back of the Woven sunflower pincushion – Pattern?
Felt is the most popular choice for the back of a Woven sunflower pincushion – Pattern because it does not fray and provides a nice grip on the table. However, any heavy-duty woven fabric like canvas or denim will also work perfectly for this Woven sunflower pincushion – Pattern.
How long does it take to complete this Woven sunflower pincushion – Pattern?
For an intermediate weaver, the Woven sunflower pincushion – Pattern can be finished in about 2 to 3 hours. Beginners might take a bit longer, perhaps an afternoon, to ensure the tension and petal shapes are just right. It is a very rewarding “weekend project.”
Can I use the Woven sunflower pincushion – Pattern with leftover fabric strips?
Yes! In fact, using thin strips of fabric (fabric yarn) instead of wool or cotton yarn can give your Woven sunflower pincushion – Pattern a very rustic, “shabby chic” look. Just make sure the strips are consistent in width.
Does the Woven sunflower pincushion – Pattern require a special loom?
No special equipment is required. While you can buy circular weaving looms, you can easily make your own out of a piece of thick cardboard or a plastic lid, making the Woven sunflower pincushion – Pattern very accessible and low-cost.
Is this Woven sunflower pincushion – Pattern safe for fine silk pins?
Absolutely. If you use a high-quality fill like wool roving or fine poly-fill, your silk pins will glide into the Woven sunflower pincushion – Pattern without any snagging or damage to the pin tips.
How do I clean my Woven sunflower pincushion – Pattern if it gets dusty?
Since it is stuffed, you shouldn’t submerge the Woven sunflower pincushion – Pattern in water. Instead, use a lint roller to remove threads and dust, or a slightly damp cloth to spot clean the surface of the weaving.
In conclusion, this article has guided you through the entire process of creating a Woven sunflower pincushion – Pattern, from selecting the best yarns and tools to mastering the art of circular weaving and final assembly.
We learned that the secret to a great pincushion is a combination of proper tension, high-quality stuffing, and a bit of creative flair in the petal design. This project is more than just a sewing accessory; it is a way to practice fiber art on a small, achievable scale that brings a sense of accomplishment and beauty to your craft room.


