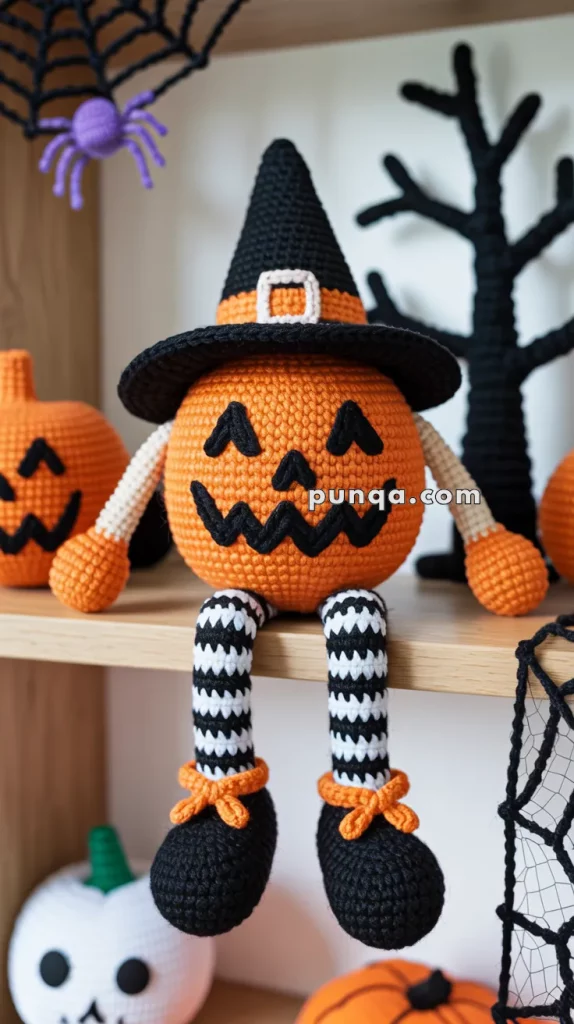
Amigurumi Pumpkin Witch Doll - Pattern

Crocheting a peacock is a delightful challenge that brings the beauty and vibrance of this magnificent bird to life in the form of a stunning amigurumi.
“Regal the Peacock” is a project that offers a perfect mix of intricate design and colorful appeal, making it a satisfying craft for both experienced and beginner crocheters.
This guide will help you step by step in creating your very own peacock, from its bright, eye-catching feathers to its elegant, sculpted body.
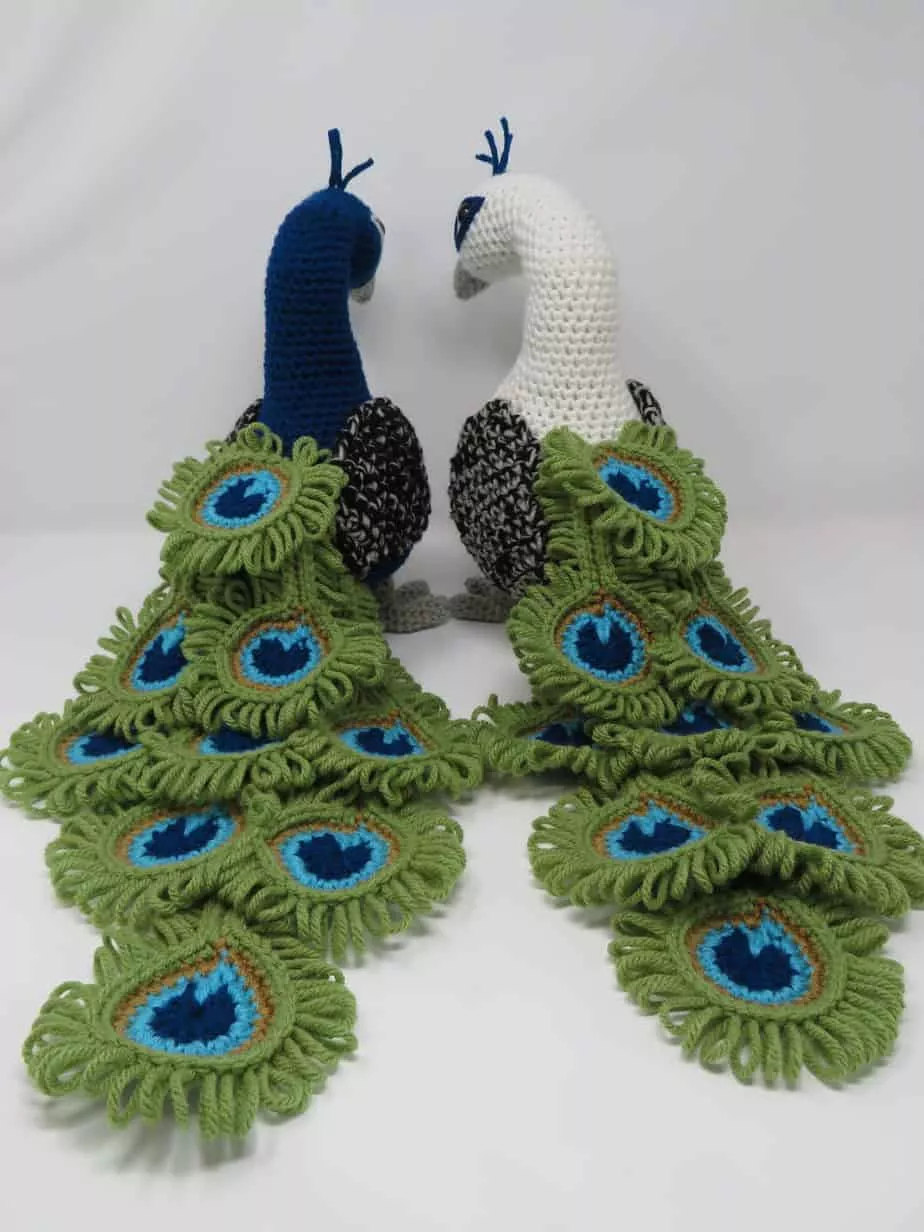
Image From Pinterest
Whether you’re looking to gift this exquisite creation to a loved one or simply add it to your collection of amigurumi animals, Regal the Peacock will add flair and grace to any crocheting portfolio. In this pattern, we will break down the process into easy-to-follow instructions, so that you can make the most of your crochet skills and create a beautiful peacock that shines!
Before you start crocheting Regal the Peacock, it’s important to gather all the materials you need. This will ensure a smooth crafting experience, and you won’t be running around looking for supplies while you’re in the middle of creating your masterpiece.
Once you have all these materials, you are ready to begin creating your very own Regal the Peacock. Now let’s move on to the first step of this exciting project!
The first part of creating Regal the Peacock is crocheting the body and head. This will set the foundation for the rest of the bird, and it’s where you’ll begin shaping its form. Follow these steps to crochet the body and head:
Crocheting the Body:
Crocheting the Head:
One of the most important and stunning features of a peacock is its tail. The vibrant feathers are what make this bird so majestic. Creating these feathers for Regal the Peacock requires a bit of patience and attention to detail. Here’s how you can create the beautiful tail feathers:
Making the Feather Shape:
Attaching the Feathers:
Now that you’ve made the body, head, and tail feathers, it’s time to add the finishing touches. These small details will bring your Regal the Peacock to life.
Crocheting the Legs:
Making the Beak:
Final Details:
With these finishing touches, your Regal the Peacock amigurumi will look incredibly lifelike and regal!
1. What size crochet hook should I use for Regal the Peacock? For the best results, use a 3mm or 4mm crochet hook with medium-weight yarn. This will allow for tight stitches that create a smooth texture for the peacock’s body.
2. How do I make the tail feathers more dramatic? To make the tail feathers more dramatic, consider using yarn in multiple colors and varying the length of each feather. You can also add extra layers of feathers to create a fuller look.
3. Can I crochet Regal the Peacock with other materials? Yes, you can experiment with different yarns, such as cotton or wool, for unique textures. You can also use different types of embellishments like sequins or beads for extra sparkle.
4. How do I make the peacock stand upright? Make sure to stuff the body and head of the peacock well to give it structure. Position the legs securely and make sure the tail feathers are well balanced to keep the peacock standing.
5. Can I adjust the size of Regal the Peacock? Yes, you can adjust the size by changing the yarn thickness and crochet hook size. Using thicker yarn and a larger hook will create a bigger peacock, while thinner yarn will produce a smaller version.
Crocheting Regal the Peacock is a rewarding and creative experience. With its stunning feathers, graceful body, and elegant details, this amigurumi project will become a prized piece in any collection. We hope that the step-by-step guide provided here makes it easier for you to create your own beautiful peacock, whether for display or as a gift.
If you’ve enjoyed this tutorial, feel free to leave your comments or suggestions below. We’d love to hear how your peacock turned out and any ideas you have for future crochet projects. Happy crocheting!
