
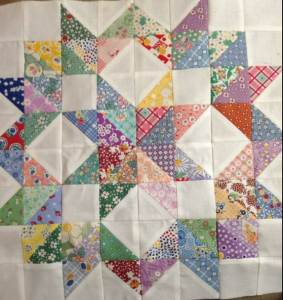
Square-in-a-Square Quilt Block - Tutorial

The Harvest Glow Quilt – Pattern is one of the most enchanting ways to celebrate the transition of seasons through the art of textile design. As the leaves begin to turn and the air grows crisp, quilters everywhere look for a project that captures the warmth and richness of autumn, and this specific design does exactly that. By blending traditional techniques with a modern aesthetic, the Harvest Glow Quilt – Pattern offers a versatile canvas for both beginners and seasoned experts to express their creativity while honoring the cozy traditions of the harvest season.
Creating a masterpiece like the Harvest Glow Quilt – Pattern requires more than just fabric and thread; it demands an understanding of how light and color interact to create a “glow” effect. When you choose a quilt pattern specifically designed for the autumn months, you are looking for motifs that evoke imagery of pumpkins, falling leaves, and golden sunsets. The Harvest Glow Quilt – Pattern is uniquely structured to guide you through the process of selecting the perfect palette, ensuring that your finished quilt feels like a warm embrace during a chilly November evening.
In this comprehensive guide, we will explore every facet of the Harvest Glow Quilt – Pattern, from the initial selection of high-quality quilting fabrics to the final stitches of the binding. Whether you are looking to create a stunning wall hanging or a full-sized heirloom to pass down through generations, understanding the intricacies of this quilt design is essential. We will dive into the technical aspects of the Harvest Glow Quilt – Pattern, providing you with the insights needed to master the piecing techniques and fabric coordination that make this design so iconic in the quilting community.
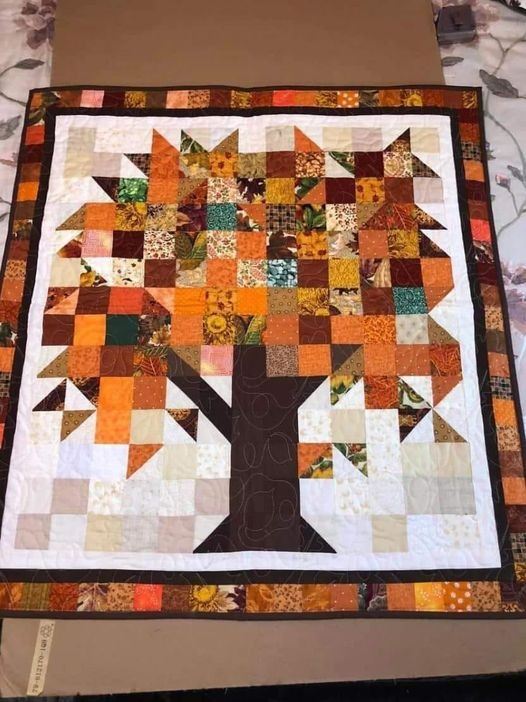
The Harvest Glow Quilt – Pattern is built upon a foundation of geometric precision and artistic color blending. At its heart, this pattern utilizes a series of block designs that simulate the flickering light of a harvest moon against a dark autumnal sky. To achieve the signature “glow,” the Harvest Glow Quilt – Pattern emphasizes the use of gradient colors and value contrast, moving from deep siennas and burnt oranges to bright, buttery yellows in the center of the blocks.
When starting your journey with the Harvest Glow Quilt – Pattern, the first step is selecting a fabric bundle that reflects the natural world. Look for cotton quilting fabrics that feature subtle textures, such as batiks or tone-on-tone prints, which add depth to the Harvest Glow Quilt – Pattern without distracting from the overall geometry. Many quilters prefer using fat quarter bundles specifically curated for fall themes to ensure that all colors harmonize perfectly within the quilt layout.
The structural integrity of the Harvest Glow Quilt – Pattern depends heavily on accurate cutting and piecing. Because this quilt pattern often involves multiple small triangles or “half-square triangles” (HSTs), using a rotary cutter and a high-quality quilting ruler is non-negotiable. Precision at this stage ensures that the points of your quilt blocks align perfectly, which is a hallmark of a professionally finished Harvest Glow Quilt – Pattern.
One of the most appealing aspects of the Harvest Glow Quilt – Pattern is its scalability. While the standard quilt instructions usually provide dimensions for a throw-size quilt, the repetitive nature of the blocks allows you to easily expand the Harvest Glow Quilt – Pattern into a queen or king-size bedspread. This flexibility makes the Harvest Glow Quilt – Pattern a favorite for those who want a project that can be customized to fit any room in their home.
For those new to the craft, the Harvest Glow Quilt – Pattern serves as an excellent educational tool for learning about seam allowance. Maintaining a consistent 1/4 inch seam is vital for the blocks to fit together like a puzzle. As you work through the Harvest Glow Quilt – Pattern, you will find that pressing your seams to one side—or “pressing to the dark side”—helps reduce bulk and keeps the quilt top lying flat and smooth.
Finally, the Harvest Glow Quilt – Pattern encourages the use of negative space. By surrounding the vibrant harvest colors with a neutral background, such as cream, charcoal, or deep navy, the “glow” of the Harvest Glow Quilt – Pattern becomes even more pronounced. This contrast is what elevates the design from a simple craft project to a piece of textile art that captures the essence of the season’s shifting light.
To successfully execute the Harvest Glow Quilt – Pattern, you must gather the right tools before making your first cut. Beyond the basic sewing machine, you will need quilting needles size 80/12 or 90/14, which are sturdy enough to handle multiple layers of fabric. The Harvest Glow Quilt – Pattern also benefits from the use of high-quality cotton thread in a neutral color like tan or grey, which blends seamlessly with the warm autumnal tones of the fabric.
The choice of quilt batting is another critical factor in how your Harvest Glow Quilt – Pattern will look and feel. If you want a traditional, crinkly look after washing, a 100% cotton batting is ideal. However, if you prefer a quilt with more “loft” and defined quilting stitches, a wool or polyester blend batting can make the motifs in your Harvest Glow Quilt – Pattern pop. The batting provides the “soul” of the quilt, offering the warmth associated with the harvest theme.
Organizing your workspace is key when working on a complex Harvest Glow Quilt – Pattern. Using a design wall—even if it is just a piece of flannel pinned to a wall—allows you to step back and see how the colors of your Harvest Glow Quilt – Pattern are interacting. This perspective is crucial for ensuring the “glow” is evenly distributed across the entire surface and that no two identical fabrics are touching in a way that disrupts the visual flow.
Marketing materials for the Harvest Glow Quilt – Pattern often suggest using pre-cut fabrics like layer cakes or charm packs. These can save a significant amount of time, especially for the smaller elements of the pattern. However, for the most authentic Harvest Glow Quilt – Pattern experience, many purists prefer cutting from the bolt to ensure the grainline of the fabric is consistent, preventing the quilt from stretching or warping over time.
Don’t forget the importance of a sharp seam ripper. Even the most experienced quilters make mistakes when following a detailed Harvest Glow Quilt – Pattern. Whether it’s a flipped triangle or a misaligned row, being able to quickly correct errors ensures that the final Harvest Glow Quilt – Pattern meets your expectations. Taking the time to “un-sew” and fix a mistake is what separates a good quilt from a great heirloom.
Lastly, the binding fabric for your Harvest Glow Quilt – Pattern acts as the frame for your artwork. Choosing a bold, dark color or even a striped fabric can give the Harvest Glow Quilt – Pattern a polished, professional finish. The binding is the most handled part of any quilt, so using a durable, high-quality cotton fabric ensures that your Harvest Glow Quilt – Pattern will withstand years of cozy use and frequent laundering.
Mastering the Harvest Glow Quilt – Pattern often involves learning the “fussy cutting” technique. This is where you intentionally cut a specific motif from your fabric—like a single leaf or a small pumpkin—to place it perfectly within a block of the Harvest Glow Quilt – Pattern. Fussy cutting adds a layer of detail and personalization that makes your version of the Harvest Glow Quilt – Pattern truly unique and showcases your attention to detail as a maker.
Another way to enhance the Harvest Glow Quilt – Pattern is through chain piecing. This efficiency technique involves sewing multiple pairs of fabric together without cutting the thread in between, creating a long “chain.” This not only saves thread but also keeps the components of your Harvest Glow Quilt – Pattern organized, making the assembly process much faster and reducing the likelihood of losing small pieces during the construction phase.
The quilting process itself—the stitching that holds the three layers together—is where the Harvest Glow Quilt – Pattern truly comes to life. You can choose free-motion quilting to create swirling wind patterns or falling leaf motifs across the surface. Alternatively, straight-line quilting or “walking foot quilting” can provide a modern, clean look that complements the geometric lines of the Harvest Glow Quilt – Pattern, emphasizing the structure of the blocks.
Consider incorporating metallic threads in copper or gold for a few of the quilting lines. This subtle addition mimics the way sunlight catches frost on a harvest morning, amplifying the “glow” of the Harvest Glow Quilt – Pattern. When using specialty threads, remember to adjust your machine’s tension and use a topstitch needle to prevent breakage, ensuring that your Harvest Glow Quilt – Pattern remains durable and beautiful.
For those who enjoy a bit of extra texture, appliqué can be added to the borders of the Harvest Glow Quilt – Pattern. Small felted wool pumpkins or embroidered vines can break up the straight lines of the quilt blocks, adding a whimsical touch. This hybridization of techniques makes the Harvest Glow Quilt – Pattern a versatile project that can grow and change as you add your own artistic flourishes to the base design.
Finally, the “glow” effect in the Harvest Glow Quilt – Pattern is most successful when you pay attention to color temperature. Mixing “warm” oranges with “cool” blues can create a vibration that mimics the energy of the season. Experimenting with color theory within the framework of the Harvest Glow Quilt – Pattern is a fantastic way to develop your eye for design, making you a more confident and skilled quilter in the long run.
Once your Harvest Glow Quilt – Pattern is complete, proper care is essential to ensure it lasts for decades. Always wash your finished quilt on a gentle cycle with cold water and a mild, fragrance-free detergent. To prevent colors from bleeding—especially those deep reds and oranges common in the Harvest Glow Quilt – Pattern—use “color catchers” in the wash, which trap loose dye before it can settle on the lighter fabrics of your quilt.
Drying your Harvest Glow Quilt – Pattern requires a bit of patience. While you can tumble dry on low heat to achieve that classic “quilt crinkle,” air-drying flat is the safest way to preserve the fibers. Avoid hanging a wet quilt, as the weight of the water can stretch the stitches of your Harvest Glow Quilt – Pattern and cause permanent distortion. A flat dry ensures the Harvest Glow Quilt – Pattern maintains its original shape and beauty.
Storage is another important consideration for your Harvest Glow Quilt – Pattern during the off-season. Never store a quilt in a plastic bag, as this can trap moisture and lead to mold or mildew. Instead, wrap your Harvest Glow Quilt – Pattern in a clean, white cotton sheet and store it in a cool, dry place. Refold the quilt every few months to prevent permanent creases from forming along the fold lines of the pattern.
Displaying your Harvest Glow Quilt – Pattern can turn your home into a seasonal sanctuary. Drape it over the back of a sofa, use a quilt ladder, or hang it on a large wall as a focal point. Because the Harvest Glow Quilt – Pattern is so visually striking, it often becomes a conversation piece, drawing guests in with its intricate details and the warm, inviting atmosphere it creates in any room.
If you decide to use your Harvest Glow Quilt – Pattern as a functional bedcover, consider rotating it regularly. This ensures that light exposure and wear are distributed evenly across the surface. Sunlight can fade the beautiful dyes in your quilting fabric over time, so try to keep your Harvest Glow Quilt – Pattern away from direct, harsh UV rays to maintain that vibrant “glow” for as long as possible.
The Harvest Glow Quilt – Pattern is more than just a sewing project; it is a labor of love and a celebration of the harvest. By following these care and display tips, you protect the time and effort you invested in the Harvest Glow Quilt – Pattern. Whether it’s being used for snuggling during a movie night or admired as art, your quilt will continue to bring joy and warmth to your home for many autumns to come.
Is the Harvest Glow Quilt – Pattern suitable for a complete beginner?
Yes, while it looks intricate, many versions of the Harvest Glow Quilt – Pattern are designed with beginners in mind. It typically uses basic shapes like squares and triangles. As long as you can sew a straight line and maintain a consistent seam allowance, you can successfully complete this quilt pattern.
How much fabric do I need for a standard Harvest Glow Quilt – Pattern?
The amount of fabric varies based on the size you choose. Typically, for a throw-size Harvest Glow Quilt – Pattern, you will need approximately 5 to 7 yards of fabric in total, including the background, various harvest-colored prints, and the binding. Always check the specific pattern requirements before purchasing.
Can I use scraps for the Harvest Glow Quilt – Pattern?
Absolutely! The Harvest Glow Quilt – Pattern is actually perfect for a “scrappy” look. Using a variety of different orange, yellow, and brown scraps can add even more depth and character to the “glow” effect, making the quilt look like a pile of fallen leaves.
What is the best way to choose colors for the “glow” effect?
To achieve the best results with the Harvest Glow Quilt – Pattern, use the “squint test.” When you squint at your fabrics, you should see a clear range from very dark to very light. The lightest fabrics should be placed where you want the “glow” to be strongest, usually in the center of the blocks.
Does the Harvest Glow Quilt – Pattern require special quilting feet?
While a standard presser foot works, a 1/4 inch quilting foot is highly recommended for accuracy. If you plan to do the final quilting yourself, a walking foot is essential for keeping the layers from shifting, and a darning foot is needed for free-motion quilting.
How long does it take to finish a Harvest Glow Quilt – Pattern?
The timeline depends on your experience level and how much time you dedicate to it. A dedicated quilter might finish the quilt top in a weekend, while the entire process—including cutting, piecing, quilting, and binding—might take 20 to 40 hours of work.
In conclusion, the Harvest Glow Quilt – Pattern is a magnificent project that captures the very essence of the autumn season. Through this article, we have explored the foundational elements of the design, the essential tools required, advanced techniques to enhance the visual “glow,” and the best practices for preserving your finished work. We have seen how the Harvest Glow Quilt – Pattern balances technical skill with artistic expression, offering a rewarding experience for quilters of all levels. By focusing on color value, precision piecing, and thoughtful quilting, you can create a stunning piece of textile art that provides both physical warmth and visual beauty. We hope this guide inspires you to pick up your rotary cutter and begin your own Harvest Glow Quilt – Pattern journey.
What do you think of this design? Do you prefer a traditional or a scrappy look for your autumn projects? Please leave your sincere opinion and suggestions in the comments below—we would love to hear about your quilting experiences and any tips you have for making a quilt truly “glow”!


