
Patchwork Bird Tutorial

The Liberty Legacy Quilt – Tutorial is a comprehensive guide designed to help quilters of all skill levels create a timeless piece of textile art that celebrates heritage and craftsmanship. This specific pattern focuses on a blend of traditional aesthetics and modern precision, ensuring that your finished product is not just a blanket, but a family heirloom. By following this Liberty Legacy Quilt – Tutorial, you will learn how to navigate the complexities of fabric selection and geometric assembly to produce a stunning visual result.
When you embark on a journey using the Liberty Legacy Quilt – Tutorial, you are engaging with a quilting project that emphasizes structural integrity and color balance. The “Liberty” aspect of the name often refers to the use of classic, floral-inspired Liberty fabrics or a patriotic palette, while “Legacy” suggests the enduring quality of the quilt pattern. This tutorial is structured to ensure your sewing experience is both educational and rewarding, focusing on precise cutting and consistent seam allowances.
Understanding the nuances of the Liberty Legacy Quilt – Tutorial requires a focus on textile coordination and block construction. In the world of modern quilting, clarity is key, and this guide provides the necessary step-by-step instructions to master the quilt top assembly. We will explore the essential quilting supplies, the importance of fabric grain, and the final finishing techniques that make a quilt stand out. Let’s dive into the details of creating your very own masterpiece.

Selecting the right quilting fabric is the foundational step of any successful project. For this Liberty Legacy Quilt – Tutorial, we recommend using high-quality cotton lawn or premium quilting cotton to ensure the drape of the quilt is soft yet durable. You will need a variety of print fabrics and solid blenders to create the necessary contrast that makes the quilt blocks pop.
Investing in a sharp rotary cutter and a high-quality acrylic ruler is non-negotiable for achieving accurate measurements. Since this Liberty Legacy Quilt – Tutorial relies on geometric precision, even a fraction of an inch can throw off the alignment of your quilt rows. Ensure your cutting mat is clean and your blade is fresh before you begin slicing into your precious fabric stash.
Don’t forget the essential notions such as fine glass-head pins, quality thread (50wt cotton is preferred), and a reliable sewing machine. The Liberty Legacy Quilt – Tutorial emphasizes the use of a 1/4-inch quilting foot to maintain consistent seams throughout the process. Having these tools ready at your sewing station will significantly reduce frustration and improve your overall stitching accuracy.
The quilt batting and backing fabric are equally important for the “Legacy” feel of this project. For a traditional look, choose a cotton/poly blend batting that offers a slight loft without being too heavy. The Liberty Legacy Quilt – Tutorial suggests picking a wide-back fabric to avoid unnecessary seams on the reverse side of your quilt, providing a professional and clean finish.
Pre-washing your fabrics is a debated topic, but for this Liberty Legacy Quilt – Tutorial, we suggest at least steam-pressing your fabrics to remove wrinkles and pre-shrink the fibers. This step ensures that when you finally wash your completed handmade quilt, it maintains its shape and doesn’t suffer from excessive fabric bleeding or uneven shrinkage.
Lastly, organize your cut pieces into labeled piles or trays. This organizational strategy is a core part of the Liberty Legacy Quilt – Tutorial because it prevents confusion during the assembly phase. Knowing exactly where your squares, triangles, and strips are located will make the actual sewing process much faster and more enjoyable.
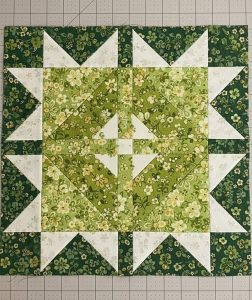
The heart of the Liberty Legacy Quilt – Tutorial lies in the construction of the individual quilt blocks. Each block is designed to represent a facet of traditional American quilting while incorporating a modern layout. You will start by piecing together the smaller units, such as Half-Square Triangles (HSTs) or Flying Geese, which serve as the building blocks for the larger design.
Precision in chain piecing is a technique highlighted in this Liberty Legacy Quilt – Tutorial. By sewing your units in a continuous string without cutting the thread, you save time and maintain a consistent tension. This method is particularly useful when you are dealing with a large volume of pieces, ensuring that every quilt unit is a mirror image of the last.
Pressing is just as important as sewing in the Liberty Legacy Quilt – Tutorial. We recommend pressing seams to the side (the darker fabric) to prevent “shadowing” and to help the seams “lock” or “nest” together. This nesting technique is vital for achieving those perfectly crisp quilt corners where multiple points meet, a hallmark of a high-quality artisan quilt.
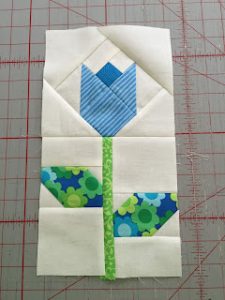
As you follow the Liberty Legacy Quilt – Tutorial, you will notice the importance of fussy cutting certain prints. If you are using Liberty of London style fabrics with intricate florals, centering a specific bloom within a square can add a level of detail that elevates the entire quilt design. It takes a bit more fabric, but the visual impact is worth the extra effort.
Squaring up your blocks is a step you cannot skip in the Liberty Legacy Quilt – Tutorial. Once a block is sewn, use your square ruler to trim it to the exact size specified in the pattern instructions. This ensures that when you join the blocks together, the quilt top stays flat and doesn’t develop the dreaded “wavy” edges that can plague beginner quilters.
The Liberty Legacy Quilt – Tutorial encourages a “slow sewing” mindset. Take your time to enjoy the process of watching the fabric colors interact. This stage is where the heritage aesthetic truly begins to shine, as the repetitive patterns form a cohesive and beautiful textile narrative that reflects your personal style and dedication to the craft.
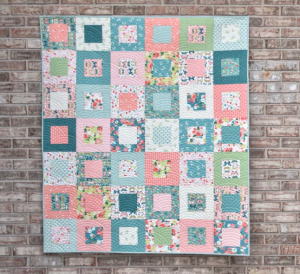
Once your blocks are complete, the Liberty Legacy Quilt – Tutorial moves into the quilt top assembly phase. This is where you lay out all your blocks on a design wall or a large floor space to check the color distribution. It is important to step back and look at the “big picture” to ensure no two identical fabrics are touching, maintaining a balanced composition.
Sewing the blocks into rows is the next logical step in our Liberty Legacy Quilt – Tutorial. Use long quilting pins to match your seam intersections perfectly. If you have pressed your seams in alternating directions in the previous step, they should “click” together naturally. This precision piecing is what gives the Liberty Legacy Quilt its professional look.
After the rows are joined, the Liberty Legacy Quilt – Tutorial focuses on the inner and outer borders. Borders act as a frame for your hard work, stabilizing the edges of the quilt top. Always measure through the center of your quilt to determine the length of your border strips, rather than measuring the sides, to prevent the quilt from “ruffling” at the edges.
Adding a sashing between blocks is an optional variation in the Liberty Legacy Quilt – Tutorial. Sashing can add “breathing room” to a busy design, especially if you have used many vibrant prints. If you choose to use sashing, ensure your sashing strips are cut precisely on the straight of grain to provide the best possible stability for the finished piece.
In this Liberty Legacy Quilt – Tutorial, we emphasize the importance of final pressing. Once the top is fully assembled, give it a thorough press with a bit of best press or starch. This helps flatten any bulky seams and prepares the quilt sandwich (top, batting, and backing) for the actual quilting process, whether you do it by hand or machine.
The Liberty Legacy Quilt – Tutorial aims to transition you from a collection of fabric scraps to a unified textile masterpiece. At this stage, you can truly see the Liberty Legacy coming to fruition. The combination of your chosen color palette and the geometric structure creates a visual rhythm that is both soothing and technically impressive.
The final phase of the Liberty Legacy Quilt – Tutorial involves the “quilting” itself—the stitching that holds the three layers together. Whether you choose straight-line quilting, free-motion quilting, or stitch-in-the-ditch, your goal is to enhance the design of the blocks. The Liberty Legacy Quilt – Tutorial suggests a simple diagonal grid to complement the geometric nature of the pattern.
Basting is a critical sub-step in the Liberty Legacy Quilt – Tutorial. You can use curved safety pins or basting spray to secure your layers. Proper basting prevents the backing from bunching up (tucking) while you are sewing. A well-basted quilt sandwich is the secret to a smooth, pucker-free finish that will last for generations.
The Liberty Legacy Quilt – Tutorial recommends using a walking foot if you are quilting on a domestic sewing machine. The walking foot feeds all three layers through the machine at the same rate, preventing the top layer from shifting. This is especially important for the Liberty Legacy design, where alignment is key to the overall visual symmetry.
Binding is the “ribbon on the package” in the Liberty Legacy Quilt – Tutorial. We recommend a double-fold bias binding for maximum durability. Choose a fabric that provides a strong contrast to the outer border to “frame” the quilt. This binding technique ensures that the edges of your legacy quilt are protected from wear and tear over the years.
Hand-sewing the binding to the back of the quilt is a relaxing way to finish the Liberty Legacy Quilt – Tutorial. While machine binding is faster, a hand-stitched binding provides a hidden, clean finish that is highly valued in quilt shows and among heirloom enthusiasts. It’s the perfect time to reflect on the work you’ve put into this sewing project.
Finally, the Liberty Legacy Quilt – Tutorial concludes with adding a quilt label. A label documenting your name, the date, and the occasion ensures that the “Legacy” part of the name is fulfilled. Years from now, your descendants will know the story behind the Liberty Legacy Quilt, making it a truly priceless family treasure.
What is the best fabric for the Liberty Legacy Quilt – Tutorial?
High-quality 100% cotton is the gold standard. Specifically, Tana Lawn is often used for “Liberty” style quilts because of its high thread count and silky feel, but any premium quilting cotton will work beautifully for this tutorial.
Can a beginner complete the Liberty Legacy Quilt – Tutorial?
Yes! While the design looks intricate, this Liberty Legacy Quilt – Tutorial breaks the process down into manageable steps. As long as you can sew a straight 1/4-inch seam and have patience for accurate cutting, you can successfully create this quilt.
How long does it take to finish the Liberty Legacy Quilt?
The timeline depends on your experience level and the size of the quilt. A lap-sized Liberty Legacy Quilt can typically be completed in a few weekends if you follow the Liberty Legacy Quilt – Tutorial efficiently.
Do I need a special sewing machine for this project?
No special machine is required, but a walking foot and a 1/4-inch foot are highly recommended. This Liberty Legacy Quilt – Tutorial is designed to be accessible for those using a standard domestic sewing machine.
How do I care for my finished Liberty Legacy Quilt?
To preserve the “Legacy” of your work, wash the quilt on a gentle cycle with cold water and a mild detergent. Use color catchers to prevent dyes from bleeding, and either air dry or tumble dry on a low-heat setting.
Creating a Liberty Legacy Quilt is a journey through color, pattern, and personal expression. This Liberty Legacy Quilt – Tutorial has covered everything from the initial fabric selection and precise cutting to the final binding and labeling.
By focusing on accurate seam allowances and thoughtful block construction, you have created a piece of art that bridges the gap between the past and the present. We hope this guide has inspired you to explore the world of heirloom quilting with confidence and creativity.


