
Square-in-a-Square Quilt Block - Tutorial

Learning how to Stitch a Strippy Pumpkin Quilt Block for Fall- Pattern is one of the most delightful ways to welcome the harvest season into your sewing room. This specific Stitch a Strippy Pumpkin Quilt Block for Fall- Pattern combines the rustic charm of autumn with the efficient technique of strip piecing, making it an ideal choice for both beginners and experienced quilters. By using varying widths of fabric, the Stitch a Strippy Pumpkin Quilt Block for Fall- Pattern creates a textured, multidimensional look that captures the organic irregularities of real pumpkins found in a patch.
The beauty of the Stitch a Strippy Pumpkin Quilt Block for Fall- Pattern lies in its incredible versatility and scrap-friendly nature. Whether you have a stash of burnt orange batiks, polka-dotted calicos, or solid ginger-toned cottons, this Stitch a Strippy Pumpkin Quilt Block for Fall- Pattern allows you to mix and match textures to create a unique harvest aesthetic. Because the block is constructed using vertical or horizontal strips, the Stitch a Strippy Pumpkin Quilt Block for Fall- Pattern avoids the stress of matching intricate points, focusing instead on color play and simple straight-line sewing.
In this comprehensive guide, we will walk you through every stage of the Stitch a Strippy Pumpkin Quilt Block for Fall- Pattern, ensuring your seasonal project is a resounding success. We will discuss the essential quilting supplies, the “snowballing” technique used to round off the pumpkin’s corners, and creative ways to incorporate the Stitch a Strippy Pumpkin Quilt Block for Fall- Pattern into larger projects like table runners or wall hangings. By mastering this autumn quilt block, you will be able to celebrate the changing leaves and cooler temperatures with a handmade piece of art that radiates warmth and hospitality.
The first step to Stitch a Strippy Pumpkin Quilt Block for Fall- Pattern is selecting a diverse range of orange fabrics. To make the pumpkin look vibrant, choose at least four to six different prints, ranging from pale peach to deep terracotta, which will give your Stitch a Strippy Pumpkin Quilt Block for Fall- Pattern a beautiful “scrappy” depth.
You will also need a high-quality background fabric to make your pumpkin pop. Most quilters prefer a neutral cream, a soft beige, or even a low-volume print with tiny gray stars or dots, which helps the Stitch a Strippy Pumpkin Quilt Block for Fall- Pattern maintain a clean and modern farmhouse look while highlighting the central motif.
A rotary cutter and a self-healing mat are essential for the Stitch a Strippy Pumpkin Quilt Block for Fall- Pattern. Since the design relies on straight strips, having perfectly squared edges ensures that your block remains symmetrical and easy to join with other blocks later in the assembly process.
For the stem and leaf of your Stitch a Strippy Pumpkin Quilt Block for Fall- Pattern, gather small scraps of brown and green fabric. A fat eighth or even just a few 2.5-inch squares will suffice, as these smaller details provide the finishing touches that make the Stitch a Strippy Pumpkin Quilt Block for Fall- Pattern look truly authentic.
Using a quarter-inch quilting foot on your sewing machine is highly recommended when you Stitch a Strippy Pumpkin Quilt Block for Fall- Pattern. Consistent seam allowances are the secret to ensuring that all your strips align correctly and that the final dimensions of your pumpkin block match the intended size of your quilt project.
Finally, don’t forget a reliable fabric starch. Spraying your strips before you begin to Stitch a Strippy Pumpkin Quilt Block for Fall- Pattern helps prevent the fabric from shifting or stretching, which is particularly helpful when working with the small “corner triangles” used to shape the pumpkin’s curves.
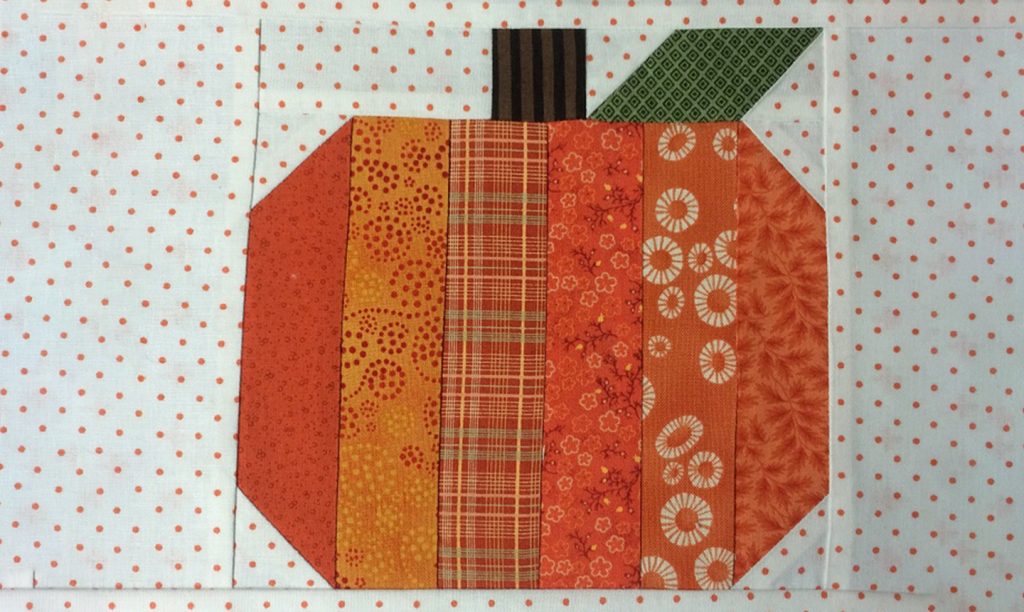
To begin the Stitch a Strippy Pumpkin Quilt Block for Fall- Pattern, you will cut your orange fabrics into strips of varying widths, such as 1.5 inches, 2 inches, and 2.5 inches. This irregularity is what gives the Stitch a Strippy Pumpkin Quilt Block for Fall- Pattern its “strippy” character and makes it much more interesting than a solid fabric block.
Once your strips are cut, you will sew them together side-by-side to create a large “fabric set.” When you Stitch a Strippy Pumpkin Quilt Block for Fall- Pattern, remember to press your seams to one side or open; pressing to one side often helps nest the seams if you are making a full quilt of many pumpkins.
The next stage of the Stitch a Strippy Pumpkin Quilt Block for Fall- Pattern involves the “snowball” technique. You will place small background squares on the four corners of your orange strip set and sew diagonally across them. This effectively “rounds off” the corners, giving your Stitch a Strippy Pumpkin Quilt Block for Fall- Pattern a natural, spherical shape.
The stem is constructed separately in the Stitch a Strippy Pumpkin Quilt Block for Fall- Pattern. Usually, a small brown rectangle is flanked by two background rectangles. When these are joined, they form the top unit of your Stitch a Strippy Pumpkin Quilt Block for Fall- Pattern, which is then sewn directly to the top of the orange strip section.
If you wish to add a leaf to your Stitch a Strippy Pumpkin Quilt Block for Fall- Pattern, you can use a small green square and repeat the diagonal sewing method used for the pumpkin’s corners. This adds a delightful touch of greenery and a bit of extra complexity to the Stitch a Strippy Pumpkin Quilt Block for Fall- Pattern without being overly difficult.
After the top and bottom units are joined, your Stitch a Strippy Pumpkin Quilt Block for Fall- Pattern is nearly complete. It is vital to “square up” the block at this stage, trimming any excess fabric from the sides to ensure the block is perfectly square, which is a best practice for successful quilting.
One of the most exciting ways to use the Stitch a Strippy Pumpkin Quilt Block for Fall- Pattern is to create a “Pumpkin Patch” throw quilt. By making 12 or 20 of these blocks and alternating them with simple checkerboard blocks, you can create a cozy and festive blanket that is perfect for snuggling on a cool October evening.
For a smaller project, you can Stitch a Strippy Pumpkin Quilt Block for Fall- Pattern to make a seasonal table runner. Placing three pumpkins in a row, separated by thin sashing strips, creates an elegant centerpiece for your Thanksgiving dinner table that will surely be a conversation starter among your guests.
You can also adapt the Stitch a Strippy Pumpkin Quilt Block for Fall- Pattern into a decorative pillow cover. By adding a wide border around a single pumpkin block, you create an 18-inch square that fits a standard pillow form, allowing you to update your home decor for the autumn season effortlessly.
If you enjoy smaller crafts, consider scaling down the Stitch a Strippy Pumpkin Quilt Block for Fall- Pattern. By using 1-inch strips, you can create miniature pumpkins that work perfectly as quilted coasters or even as part of a festive fabric bunting to hang across a fireplace mantle or a doorway.
The Stitch a Strippy Pumpkin Quilt Block for Fall- Pattern also looks fantastic when worked in non-traditional colors. Try making a “Whimsical Pumpkin” using teals, pinks, or purples. This modern twist on the Stitch a Strippy Pumpkin Quilt Block for Fall- Pattern is very popular in contemporary quilting and adds a unique flair to your autumn projects.
Finally, consider the “Ombre” effect for your Stitch a Strippy Pumpkin Quilt Block for Fall- Pattern. Arrange your strips from the lightest orange on one side to the darkest on the other. This simple adjustment creates a sense of light and shadow, making your quilted pumpkin look three-dimensional and artfully rendered.
Once you have finished the Stitch a Strippy Pumpkin Quilt Block for Fall- Pattern, the quilting process begins. For a pumpkin-themed project, “echo quilting” or “spiral quilting” works beautifully, as it emphasizes the round shape of the pumpkin and adds a sense of movement to the finished quilt top.
Using a high-quality cotton batting is important when you Stitch a Strippy Pumpkin Quilt Block for Fall- Pattern. Cotton provides a low-loft, traditional feel that drapes well and washes beautifully, ensuring that your fall quilt remains soft and cozy for many years of seasonal celebrations.
The binding is the final frame for your Stitch a Strippy Pumpkin Quilt Block for Fall- Pattern. Choosing a striped fabric or a dark brown “twine” look can provide a rustic finish that complements the autumn theme. A sturdy double-fold binding is the best choice for durability and a professional edge.
If you plan to give your Stitch a Strippy Pumpkin Quilt Block for Fall- Pattern project as a gift, don’t forget to add a quilt label. Documenting the date, your name, and the occasion on the back of the quilt ensures that your hard work and creativity are recognized as a cherished handcrafted heirloom.
Proper care will keep your Stitch a Strippy Pumpkin Quilt Block for Fall- Pattern looking new. Wash your quilts in cold water on a gentle cycle and use a “color catcher” sheet to prevent the vibrant orange dyes from migrating into the light background fabrics, especially during the first few launderings.
Lastly, remember that the Stitch a Strippy Pumpkin Quilt Block for Fall- Pattern is a reflection of your creative spirit. Each stitch you take is part of a long tradition of quilting as a form of storytelling. Whether you make one block or fifty, enjoy the process and the warmth that this autumn pattern brings to your home.
What is the best size for a Strippy Pumpkin block?
The most common size to Stitch a Strippy Pumpkin Quilt Block for Fall- Pattern is a 10-inch or 12-inch square. This size is large enough to show off the different fabric strips but small enough to be manageable for beginners who are still learning strip piecing techniques.
Can I use jelly rolls for the Stitch a Strippy Pumpkin Quilt Block for Fall- Pattern?
Absolutely! Jelly rolls (pre-cut 2.5-inch strips) are perfect for this project. You can use the orange strips from the roll and cut them down to different widths to achieve the “strippy” look that is central to the Stitch a Strippy Pumpkin Quilt Block for Fall- Pattern.
How do I make the pumpkin look more round?
The secret to a round pumpkin in the Stitch a Strippy Pumpkin Quilt Block for Fall- Pattern is the size of the background squares used for the “snowball” corners. Using larger squares on the bottom corners and slightly smaller ones on the top can create a more organic, tapered look.
What fabrics work best for the background?
Neutral colors like cream, ivory, or light gray are traditional favorites. However, if you want a “Nightmare Before Christmas” vibe, you could Stitch a Strippy Pumpkin Quilt Block for Fall- Pattern using a dark navy or black background to make the orange strips glow.
Do I need to line up the strips perfectly?
While you want your seams to be straight, the beauty of the Stitch a Strippy Pumpkin Quilt Block for Fall- Pattern is that the strips themselves don’t have to be uniform. The slight variations in width actually add to the rustic charm and “whimsical” nature of the design.
Is this pattern suitable for hand quilting?
Yes! The large areas of orange strips in the Stitch a Strippy Pumpkin Quilt Block for Fall- Pattern provide a great canvas for hand quilting. You can follow the lines of the strips or quilt curved “ribs” to enhance the pumpkin’s shape and add a beautiful handmade texture.
In this article, we have explored the wonderful world of autumn sewing by learning how to Stitch a Strippy Pumpkin Quilt Block for Fall- Pattern. We discussed the importance of selecting a varied color palette, the technical steps of strip piecing and “snowballing” corners, and the various ways you can assemble these blocks into stunning home decor.
Whether you are making a simple pillow or a full-sized heritage quilt, the Stitch a Strippy Pumpkin Quilt Block for Fall- Pattern offers a perfect blend of simplicity and artistic expression. By using these techniques, you can capture the essence of the harvest season and create a piece that brings comfort and joy to your family for years to come.


