
Patchwork Bird Tutorial

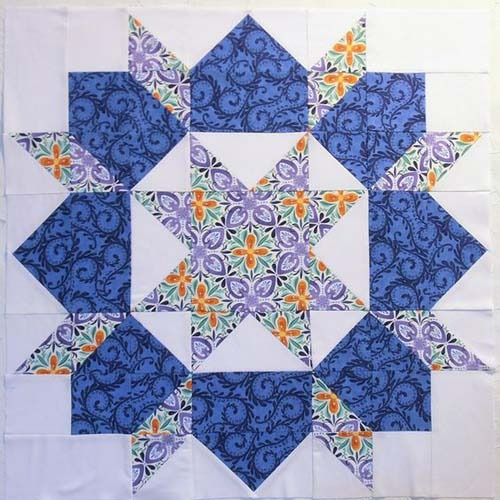
The Swoon Sixteen Block Tutorial – Pattern is one of the most beloved projects in the modern quilting community because it perfectly balances vintage charm with a clean, geometric aesthetic. This specific pattern is a variation of the classic Swoon block, scaled down and multiplied to create a stunning visual impact that works beautifully for quilts, throw pillows, or even wall art. Whether you are a seasoned quilter looking for a fresh weekend project or a beginner eager to master star-shaped quilt patterns, this guide will walk you through every step of the process with clarity and precision.
Quilting is more than just sewing fabric together; it is an art form that allows for endless personalization through color theory and fabric selection. The Swoon Sixteen Block Tutorial – Pattern relies heavily on the interaction between background fabrics and focal prints, creating a “glowing” effect that makes the central star pop. By understanding the math behind the cuts and the logic of the assembly, you can ensure that your quilt points remain sharp and your seams align perfectly every single time.
In this comprehensive guide, we will explore the nuances of creating this iconic design while maintaining a high standard of craftsmanship. We will cover everything from the initial fabric requirements and cutting instructions to the final assembly of the sixteen-block grid. By following this Swoon Sixteen Block Tutorial – Pattern, you are not just making a quilt; you are creating a contemporary heirloom that showcases your dedication to the craft of patchwork and quilting.
Before diving into the Swoon Sixteen Block Tutorial – Pattern, it is crucial to gather high-quality materials that will ensure the longevity of your quilt. You will need a variety of fat quarters or yardage depending on the size of your final project, but the key is to choose fabrics with high contrast. Using 100% cotton quilting fabric is highly recommended because it holds its shape well under the iron and provides a professional finish to your quilt blocks.
Preparing your fabric is a step that many beginners skip, but it is vital for a project as detailed as the Swoon Sixteen Block Tutorial – Pattern. Start by starching your fabric lightly; this adds stiffness, which is incredibly helpful when working with half-square triangles (HSTs). Starching prevents the fabric from stretching along the bias, ensuring that your sixteen-block layout remains perfectly square and flat throughout the construction process.
In addition to your fabric, you will need a sharp rotary cutter, a self-healing cutting mat, and a reliable quilting ruler. Accuracy is the soul of the Swoon Sixteen Block Tutorial – Pattern, and having the right tools makes a world of difference. Ensure your sewing machine is fitted with a new needle and that you are using a high-quality 50wt cotton thread that won’t add unnecessary bulk to your seams during the assembly phase.
The Swoon Sixteen Block Tutorial – Pattern thrives on a mix of prints and solids. When selecting your palette, consider using a neutral background fabric like cream, white, or light grey to let the intricate star design take center stage. You can use a “scrappy” approach by mixing various floral or geometric prints for the star points, which gives the finished quilt a vibrant, eclectic feel that is very popular in modern quilting circles.
Do not forget the importance of a consistent 1/4-inch seam allowance. This is the standard for all quilting projects, and the Swoon Sixteen Block Tutorial – Pattern is no exception. If your seams are even slightly off, the blocks will not line up, and the secondary patterns created by the intersection of the blocks will be lost. Practice on a few scraps of scrap fabric before starting your main project to ensure your machine settings are perfect.
Lastly, organize your cut pieces into labeled stacks. The Swoon Sixteen Block Tutorial – Pattern involves several different sizes of squares and rectangles, and it is easy to get them mixed up. By staying organized from the very beginning, you reduce the risk of errors and make the sewing process much more enjoyable. Think of this preparation phase as setting the foundation for a beautiful, symmetrically balanced quilt top.
The heart of the Swoon Sixteen Block Tutorial – Pattern lies in the creation of perfect half-square triangles. These units form the points of the stars and are responsible for the dynamic movement within the design. To begin, you will cut squares from both your print fabric and your background fabric, usually adding an extra half-inch to the final desired size to allow for trimming and squaring up later.
To assemble the HSTs for your Swoon Sixteen Block Tutorial – Pattern, place one print square and one background square right sides together. Draw a diagonal line across the back of the lighter fabric and sew exactly 1/4 inch away from both sides of that line. Once you cut along the drawn line, you will have two identical units. This “two-at-a-time” method is efficient and ensures that your fabric grain remains stable.
Trimming is arguably the most important part of the Swoon Sixteen Block Tutorial – Pattern. Even if you are a confident sewer, small shifts can occur during the stitching process. Use a squaring ruler to trim each HST to the exact measurement required by the pattern. This precision ensures that when you join these units with the other elements of the Swoon block, the corners will meet at crisp, clean points.
Pressing is another critical element. When working on the Swoon Sixteen Block Tutorial – Pattern, most quilters prefer to press their seams toward the darker fabric to prevent the seam allowance from showing through the lighter background fabric. Alternatively, you can press your seams open to reduce bulk, which is particularly helpful if you plan on machine quilting with a dense pattern later on.
Once your HSTs are ready, you can start to see the Swoon Sixteen Block Tutorial – Pattern come to life. These units will be paired with solid squares and rectangles to form the larger sections of the block. The repetition of these shapes is what gives the Swoon pattern its iconic, kaleidoscope-like appearance. Take your time during this stage, as the quality of your triangles defines the quality of the entire quilt.
Remember that the Swoon Sixteen Block Tutorial – Pattern is scalable. While this tutorial focuses on the sixteen-block variation, the techniques for creating the HSTs remain the same regardless of the size. Mastery of this unit will allow you to tackle many other classic quilt patterns, making it a fundamental skill for any aspiring quilter. Keep your scraps, as they can often be used for matching quilt borders or binding.
Now that your HSTs are complete, it is time to move on to the central components of the Swoon Sixteen Block Tutorial – Pattern. Each block consists of a center unit, which is often a simple square or a smaller sub-block, surrounded by the star points you just created. Laying out your pieces on a design wall or a flat table is a great way to visualize the final look before you start sewing the rows together.
In the Swoon Sixteen Block Tutorial – Pattern, the assembly usually follows a grid system. You will sew your units into three distinct rows and then join those rows to complete the block. Paying close attention to the orientation of your triangle units is vital here. If one HST is flipped the wrong way, the star shape will be broken, and the geometric symmetry of the pattern will be compromised.
Pinning is your best friend during this phase of the Swoon Sixteen Block Tutorial – Pattern. When joining the rows, use pins to “nest” your seams. Nesting involves pressing the seams of adjacent rows in opposite directions so they lock together like a puzzle. This technique results in perfectly aligned intersections, which is a hallmark of a high-quality, professional-looking handmade quilt.
As you assemble each block for your Swoon Sixteen Block Tutorial – Pattern, check the size frequently. Each of the sixteen blocks should be exactly the same size. If you notice a block is slightly smaller or larger, check your seam allowance or your pressing technique. Consistency is key to ensuring that the sixteen blocks fit together seamlessly when it comes time to assemble the quilt top.
The beauty of the Swoon Sixteen Block Tutorial – Pattern is the secondary pattern that emerges when multiple blocks are placed side by side. By carefully choosing where your colors land, you can create a secondary “frame” or “lattice” effect that adds depth to the design. This is where your creative vision truly shines, turning a standard pattern into a unique piece of textile art.
After all sixteen blocks are finished, give them a final press with plenty of steam (if your fabric allows). Flattening the seams at this stage makes the final assembly of the Swoon Sixteen Block Tutorial – Pattern much easier. You should now have a collection of beautiful, uniform blocks ready to be joined into the final quilt composition. This is often the most rewarding part of the process, as the scale of the project becomes apparent.
The final stage of the Swoon Sixteen Block Tutorial – Pattern is joining the blocks into a 4×4 grid. This creates a large, impressive quilt top that highlights the intricate work you’ve put into each individual star. Lay the blocks out and step back to look at the color distribution. Sometimes, swapping two blocks can improve the overall balance and flow of the quilt design.
When sewing the blocks together for the Swoon Sixteen Block Tutorial – Pattern, work in rows first. Sew the four blocks of the top row together, then the second row, and so on. Use the same pinning and nesting techniques you used for the individual blocks. Once the rows are complete, sew them to each other to finish the quilt center. This systematic approach prevents the fabric from warping or stretching.
After the center is assembled, you might choose to add borders to your Swoon Sixteen Block Tutorial – Pattern. Borders can act as a frame, providing a visual resting place for the eye before reaching the edge of the quilt. Whether you choose a narrow inner border or a wide, decorative outer border, ensure they are measured and cut accurately to keep the quilt top square and prevent “wavy” edges.
Once the top is finished, it is time to prepare the “quilt sandwich,” which consists of the quilt top, the batting, and the backing fabric. For a project as detailed as the Swoon Sixteen Block Tutorial – Pattern, a simple straight-line quilting design or a subtle “stitch-in-the-ditch” can look very elegant. Alternatively, a free-motion floral design can provide a beautiful contrast to the sharp lines of the stars.
Binding is the final touch for your Swoon Sixteen Block Tutorial – Pattern. Choose a fabric that complements the colors used in your stars. A striped or bias-cut binding can add an extra layer of professional detail. Hand-sewing the binding to the back of the quilt provides a clean, invisible finish, though machine-binding is a durable and faster alternative for quilts that will see heavy use.
Congratulations on completing the Swoon Sixteen Block Tutorial – Pattern! You have successfully navigated the complexities of HSTs, precision cutting, and large-scale assembly. This quilt is a testament to your patience and skill. Whether you keep it for yourself or give it as a gift, the Swoon Sixteen quilt is sure to be admired for its classic beauty and modern execution for years to come.
What is the best fabric for the Swoon Sixteen Block Tutorial – Pattern?
High-quality, 100% cotton is the best choice. It is easy to handle, presses well, and lasts for a long time. Look for “quilter’s weight” cotton from reputable manufacturers to ensure the best results for your quilt project.
Can a beginner attempt the Swoon Sixteen Block Tutorial – Pattern?
Yes! While it looks complex, the pattern is made up of basic units like squares and half-square triangles. As long as you focus on accurate cutting and a consistent 1/4-inch seam, a beginner can definitely succeed with this tutorial.
How do I keep my star points from getting cut off?
The key is to pay attention to your “quarter-inch” intersections. When sewing units together, ensure your needle passes exactly through the “X” created by previous seams. This preserves the sharp points of your Swoon stars.
What size is the finished Swoon Sixteen block?
The size can vary depending on the specific pattern version you follow, but traditionally, each block in a sixteen-block layout is smaller (around 12 inches) than the original giant Swoon block (which is often 24 inches).
Do I need a special ruler for this pattern?
While a standard square quilting ruler works, a specialized HST ruler or a “Tucker Trimmer” can make the process of squaring up your units much faster and more accurate.
How much fabric do I need for a full quilt?
For a standard throw-sized quilt using the Swoon Sixteen Block Tutorial – Pattern, you typically need about 3 to 4 yards of background fabric and a variety of fat quarters (usually 16) for the stars.
In this article, we have explored the detailed process of creating a stunning quilt using the Swoon Sixteen Block Tutorial – Pattern. From the meticulous selection of fabrics and the precision required in cutting and sewing half-square triangles to the final assembly of the sixteen-block grid, we have covered all the essential steps to ensure your success.
This pattern is a fantastic way to practice your quilting fundamentals while producing a visually striking piece of art that looks much more complicated than it actually is. By focusing on consistency and organization, you can create a masterpiece that highlights the beauty of geometric quilt designs.


