
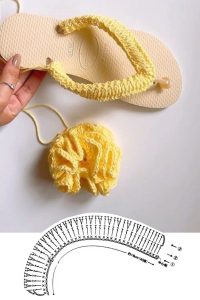
Patchwork Bird Tutorial

The Yankee Puzzle Quilt Block – Tutorial is a journey into the heart of traditional American quilting, offering a geometric elegance that has captivated makers for generations. This specific block is a classic example of how simple shapes, when rotated and arranged with precision, can create a sense of dynamic movement across a fabric surface. Whether you are a seasoned quilter looking to revisit the basics or a complete beginner eager to learn the art of piecework, mastering this design is a fundamental milestone.
When you dive into a Yankee Puzzle Quilt Block – Tutorial, you are not just learning to sew fabric together; you are engaging with a piece of history. This block belongs to the “four-patch” family, meaning its grid is based on a $2 \times 2$ layout, which makes it incredibly versatile for various quilt sizes. The beauty of the Yankee Puzzle Quilt Block lies in its use of Half-Square Triangles (HSTs), which are the building blocks of countless quilting patterns, providing the sharp diagonals needed to create the “puzzle” effect.
Choosing the right materials is the first step toward a successful Yankee Puzzle Quilt Block – Tutorial experience. You will typically need two contrasting fabrics—often a “light” and a “dark”—to ensure the geometric pattern pops. High-quality quilting cotton is the gold standard here because it holds its shape well and resists fraying during the many seams required for this design. By focusing on fabric contrast, seam allowance accuracy, and pressing techniques, you can turn a few scraps of cloth into a stunning visual masterpiece.

The Yankee Puzzle Quilt Block is primarily composed of Half-Square Triangles, which are squares made up of two equal right-angled triangles. In this design, the arrangement of these triangles creates a pinwheel-like motion that draws the eye toward the center of the block. Understanding how these units interact is crucial for ensuring your finished project looks professional and symmetrical.
To start your Yankee Puzzle Quilt Block – Tutorial, you must first master the HST construction method. Most modern quilters prefer the “two-at-a-time” method, where two fabric squares are sewn together and cut diagonally to produce two identical units. This technique saves time and increases the structural integrity of the block by minimizing the handling of bias edges, which can stretch easily.
Accuracy in quilt block sizing is another vital component of the anatomy. If your initial units are even a fraction of an inch off, the entire “puzzle” will fail to align correctly at the end. For a standard 12-inch finished block, your individual units must be trimmed with clinical precision using a rotary cutter and a quilting ruler to ensure every corner is a perfect 90-degree angle.
The color placement within the block dictates the final look of the Yankee Puzzle Quilt Block. Traditionally, the dark fabrics are placed to form the “blades” of the puzzle, while the light fabrics serve as the background. However, modern variations often use scrappy quilting techniques or vibrant solids to give this 19th-century design a contemporary, 21st-century aesthetic.
Another key element is the diagonal alignment. When you look at a finished Yankee Puzzle Quilt Block, the central diagonal lines should meet perfectly in the middle without “chopping off” the points of your triangles. This requires careful pinning and a consistent quarter-inch seam allowance, which is the universal standard in the world of quilting.
Finally, the scale of the block can be adjusted depending on your project needs. While this Yankee Puzzle Quilt Block – Tutorial focuses on a standard size, the math can be scaled up for a large bedspread or down for a delicate quilted pillowcase. The geometric logic remains the same regardless of the size, making it one of the most mathematically sound patterns in a quilter’s repertoire.
Before sewing a single stitch in your Yankee Puzzle Quilt Block – Tutorial, you must gather the right tools. A sharp rotary cutter and a self-healing cutting mat are non-negotiable for achieving the clean edges required for the Yankee Puzzle Quilt Block. Dull blades can chew the fabric, leading to inaccurate shapes and frustrating “waves” in your finished quilt top.
Fabric starching is a “pro-tip” often overlooked by beginners but highly recommended for this specific block. Because the Yankee Puzzle Quilt Block involves many diagonal (bias) cuts, the fabric is prone to stretching. Applying a light mist of starch before cutting stabilizes the cotton fibers, making the fabric act more like paper and ensuring your triangle units stay perfectly square.
In addition to cutting tools, a high-quality thread is essential for a durable Yankee Puzzle Quilt Block. Many experts suggest a 50-weight cotton thread in a neutral color like grey or tan. This weight is thin enough to disappear into the seams without adding bulk, which is critical when you have multiple layers of fabric meeting at the center of the quilt block.
Your sewing machine setup plays a massive role in the outcome of your Yankee Puzzle Quilt Block – Tutorial. Using a quarter-inch presser foot can be a game-changer, as it provides a physical guide to keep your seams perfectly straight. If your machine doesn’t have one, you can use a piece of painter’s tape on the throat plate to mark the $1/4$ inch line.
Ironing is not the same as pressing in quilting. For the Yankee Puzzle Quilt Block, you should always press your seams to the “dark side” to prevent the seam allowance from showing through the lighter fabric. Use a dry iron and press straight down rather than sliding the iron back and forth, as sliding can distort the delicate HST units.
Lastly, don’t forget the importance of a design board. As you follow this Yankee Puzzle Quilt Block – Tutorial, laying out your cut pieces on a felt board or a flat surface helps you visualize the rotation of the triangles. It is very easy to accidentally flip a unit the wrong way, but a quick visual check against your quilt pattern can save you hours of work with a seam ripper.
The first active step in the Yankee Puzzle Quilt Block – Tutorial is creating the Half-Square Triangles. Take your light and dark fabric squares and place them right sides together. Draw a diagonal line from one corner to the other on the back of the lighter fabric. Sew exactly $1/4$ inch away from this line on both sides, then cut along the drawn line to reveal two HST units.
Once cut, you must square up your blocks. This means trimming the HSTs to the exact size required by the Yankee Puzzle Quilt Block instructions. Use a square ruler with a 45-degree line and align it with the seam of your triangle. This ensures that the seam is perfectly centered, which is the secret to getting those crisp, sharp points that every quilter dreams of.
After you have prepared all your triangle units, it is time for the layout. Arrange the four smaller units into a $2 \times 2$ grid. In a Yankee Puzzle Quilt Block, the dark triangles should rotate around the center, creating a sense of circular movement. Double-check your orientation; even one misplaced triangle will break the “puzzle” effect and result in a different pattern altogether.
Now, sew the units together in rows. Sew the top two units together, then the bottom two. This creates two rectangular halves. When sewing these, pay close attention to the intersection points. You want your seams to “nest”—which means the seam allowances of the top row point one way, and the bottom row point the opposite way—allowing them to lock together for a flat finish.
The final major seam of the Yankee Puzzle Quilt Block – Tutorial is joining the two rows. This is where most quilters get nervous because it involves the “center point.” Pin the center intersection carefully, ensuring the seams align perfectly. Sew slowly across this junction. When you open the block, you should see a perfect “X” where all the colors meet in the middle.
To finish the assembly, give the entire Yankee Puzzle Quilt Block a final press. Some quilters prefer to “spin” the center seam, which involves opening up a few stitches in the seam allowance at the very center to allow the fabric to lie in a tiny pinwheel shape on the back. This reduces the fabric bulk at the center, making it much easier to quilt over later on.
Even with a detailed Yankee Puzzle Quilt Block – Tutorial, mistakes can happen. One common issue is “blunted points,” where the tip of the triangle gets sewn into the seam allowance. To avoid this, always aim your needle just a hair’s breadth to the outside of the “V” created by the previous seams. This small adjustment ensures your quilt points remain sharp and visible.
If your Yankee Puzzle Quilt Block looks wavy or doesn’t lay flat, the culprit is usually fabric distortion. This often happens if you pulled the fabric while sewing or used a steam iron too aggressively. To fix a slightly wonky block, you can try “blocking” it by pinning it to a padded board in the correct dimensions and lightly steaming it, letting it dry completely before moving it.
Another frequent challenge is seam allowance consistency. If your seams vary even slightly, the block will not measure the correct size. Using a seam guide or a magnetic gauge on your sewing machine can help you maintain that perfect $1/4$ inch. Remember, in a Yankee Puzzle Quilt Block – Tutorial, consistency is more important than speed.
Choosing the right fabric value is also a key factor in success. “Value” refers to the lightness or darkness of a color. If your two fabrics are too similar in value, the Yankee Puzzle Quilt Block pattern will disappear. To test this, take a photo of your fabrics in black and white on your phone; if they look like the same shade of grey, you need more contrast.
For those who want to take their Yankee Puzzle Quilt Block – Tutorial further, consider fussy cutting. This involves cutting your fabric so that a specific motif (like a flower or a bird) is centered within the triangles. This adds a layer of complexity and charm to the quilt design, making each block a unique work of art within the larger quilt.
Finally, keep a quilting journal. Document the fabric brands, the needle size (usually an 80/12), and any challenges you faced during the Yankee Puzzle Quilt Block process. This record-keeping allows you to improve your skills over time and makes it easier to replicate your success in future projects. Quilting is a lifelong learning process, and every block is a step toward mastery.
1. What is the best fabric for a Yankee Puzzle Quilt Block?
The best fabric is 100% quilting cotton. It has a stable weave that prevents excessive stretching and holds a crease well when pressed, which is vital for geometric blocks.
2. Can a beginner sew a Yankee Puzzle Quilt Block?
Yes! While it requires precision, it only uses Half-Square Triangles, which are a basic quilting skill. This Yankee Puzzle Quilt Block – Tutorial is designed to guide beginners through the process.
3. What size should I cut my initial squares?
To get a specific finished size, you usually add 7/8 of an inch to the desired size of the unit to account for seams. For example, if you want 4-inch units, you should start with 4 7/8-inch squares.
4. Why are my corners not lining up?
This is usually due to an inconsistent seam allowance. Ensure you are using a true $1/4$ inch seam and that you are “squaring up” your units before sewing them together.
5. How many fabrics do I need for this block?
The classic version uses two contrasting fabrics, but you can use four different fabrics for a “scrappy” or more colorful Yankee Puzzle Quilt Block.
6. Do I need to pre-wash my fabric?
This is a personal preference. Pre-washing prevents future shrinkage and dye bleeding, but many quilters prefer the “crispness” of unwashed fabric for easier cutting.
In this Yankee Puzzle Quilt Block – Tutorial, we have explored the history, anatomy, and technical steps required to create a stunning and precise quilt block. We covered everything from the importance of fabric contrast and Half-Square Triangle construction to the final pressing techniques that ensure your block lays perfectly flat. By following the steps of assembly and paying close attention to your seam allowance, you can master this classic design and incorporate it into various beautiful projects, from wall hangings to full-sized quilts.
Quilting is an art form that rewards patience and attention to detail. The Yankee Puzzle Quilt Block is a testament to how simple shapes can create complex beauty. We hope this guide has inspired you to pick up your rotary cutter and start sewing.


