
Patchwork Bird Tutorial

A Tulip Wall Cover – Pattern is a breath of fresh air for any interior space, offering a unique blend of botanical elegance and handmade charm that can transform a sterile room into a vibrant sanctuary. This specific design focuses on capturing the iconic, soft curves of the tulip flower, translating its natural beauty into a textile or paper-based format that serves as a stunning focal point for your home. When you engage with a Tulip Wall Cover – Pattern, you are not just following a set of artistic instructions; you are curating an atmosphere of renewal and springtime that persists throughout the year, regardless of the weather outside.
The versatility of the Tulip Wall Cover – Pattern is truly remarkable, as it can be adapted for various mediums including intricate crochet lacework, modern macramé, or even structured quilting panels. For those who appreciate the “maximalist” decor trend, a repeating floral motif provides a lush, garden-like texture to the walls, while those favoring minimalism can use a single, large-scale Tulip Wall Cover – Pattern as a sophisticated piece of statement art. This pattern is designed to be accessible yet deeply rewarding, allowing the maker to experiment with color gradients that mimic the diverse varieties of real tulips, from parrot-style bicolors to classic solid pastels.
In this comprehensive guide, we will delve into the essential components of creating a high-quality Tulip Wall Cover – Pattern, focusing on material selection, technical execution of the floral motifs, and the best practices for mounting your finished work. We will explore how different fiber weights and textures can alter the “mood” of your wall hanging and provide professional tips for ensuring your edges remain crisp and your tulips remain perfectly symmetrical. Whether you are a seasoned fiber artist or a curious DIY enthusiast, the Tulip Wall Cover – Pattern offers a meditative and productive way to personalize your environment with a touch of timeless floral grace.
Selecting the right materials is the foundational step for any Tulip Wall Cover – Pattern, as the texture of the medium directly impacts how the light hits the floral shapes. For a soft, traditional look, we recommend using a mercerized cotton yarn or a high-quality linen thread if you are crocheting or weaving your wall cover. These fibers provide excellent stitch definition, which is crucial for making the individual petals of the Tulip Wall Cover – Pattern stand out against the background fabric. If you are creating a paper-based version, opting for a heavy-weight cardstock with a matte finish will prevent glare and give the tulips a sturdy, architectural feel.
Color theory plays a pivotal role in bringing the Tulip Wall Cover – Pattern to life and ensuring it complements your existing furniture. To create a realistic effect, consider using variegated yarns or “ombre” papers that transition from a deep saturated hue at the base of the petal to a lighter shade at the tip. This mimics the natural biology of the flower and adds a three-dimensional depth to your Tulip Wall Cover – Pattern. For a more avant-garde or modern interior, you might choose “non-traditional” colors like metallic golds, deep teals, or charcoal greys, which transform the classic floral motif into a chic piece of contemporary art.
The background of your Tulip Wall Cover – Pattern acts as the “canvas” for your floral masterpiece, and its color should be chosen with care. A neutral backdrop—such as cream, soft beige, or light grey—allows the vibrant colors of the tulips to “pop” and become the focal point of the room. However, if you want a moody, dramatic Tulip Wall Cover – Pattern, a dark navy or forest green background can create a stunning “Dutch Masters” painting effect, where the flowers appear to glow from within the wall hanging. Always test your color combinations under the specific lighting of the room where the cover will be displayed.
Durability and weight are also important considerations when choosing materials for a Tulip Wall Cover – Pattern. Since this item will hang vertically, it must be light enough not to stretch or sag over time, but heavy enough to hang straight without curling at the corners. For larger floral wall covers, using a blend of acrylic and wool can offer the perfect balance of lightness and structural memory. In a high-quality pattern, the choice of material should also factor in ease of cleaning, especially if the wall cover is destined for a high-traffic area like a hallway or a dining room.
The “stems” and “leaves” of your Tulip Wall Cover – Pattern provide the necessary visual “anchor” for the blossoms. Using a slightly different texture for these parts—perhaps a matte green yarn next to a silk-finish petal—can add a layer of sensory interest to the piece. When you follow a Tulip Wall Cover – Pattern, pay close attention to the shades of green you select; a “sage” or “olive” green often looks more sophisticated and natural than a bright primary green, which can sometimes look a bit too “crafty” for an adult living space.
Finally, consider the mounting hardware as part of your material list for the Tulip Wall Cover – Pattern. A rustic wooden dowel or a sleek copper rod can completely change the vibe of the finished piece. If your pattern is designed as a modular set of tiles, you might need adhesive strips or small finishing nails. Planning these details during the material phase ensures that the final installation of your Tulip Wall Cover – Pattern is as professional and polished as the needlework or paper-crafting itself, resulting in a seamless integration into your home decor.
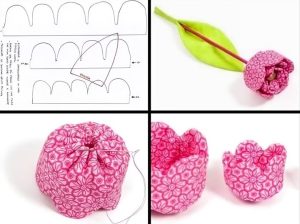
The core challenge of the Tulip Wall Cover – Pattern is achieving the characteristic “cup” shape of the tulip petal. This is usually accomplished through a series of strategic increases and decreases that create a curved, convex surface. If you are crocheting, this might involve using “puff stitches” or “popcorn stitches” to give the petals a raised, 3D appearance. In a well-written Tulip Wall Cover – Pattern, the instructions will guide you through building the flower from the base upward, ensuring that each layer of petals overlaps the previous one to create a realistic, blooming effect.
Symmetry is vital for the professional look of a Tulip Wall Cover – Pattern, but a touch of organic “imperfection” can actually make the flowers look more authentic. When following the pattern, try to keep your tension consistent so that all the tulips are roughly the same size, but don’t worry if a petal leans slightly to one side—real tulips in nature are rarely perfectly straight. The goal of the Tulip Wall Cover – Pattern is to capture the essence of the flower’s movement, whether it’s a tight, elegant bud or a wide-open, flamboyant bloom.
If your Tulip Wall Cover – Pattern features a repeating “tapestry” or “filet” style, you will be working with a grid system. This technical approach requires a high level of focus, as a single misplaced stitch can throw off the entire silhouette of the flower. Using stitch markers at the beginning of each tulip repeat is a lifesaver, allowing you to catch mistakes early. This grid-based Tulip Wall Cover – Pattern is excellent for creating a “wallpaper” effect that covers a large surface area with a consistent, rhythmic floral design that is very pleasing to the eye.
The transition between the flower and the background in a Tulip Wall Cover – Pattern is where the “magic” happens. You can use a technique called intarsia or fair isle to change colors mid-row, or you can applique the finished tulips onto a pre-made base. The applique method is often easier for beginners, as it allows you to focus on the flower and the background separately. A high-quality Tulip Wall Cover – Pattern will offer clear instructions on how to sew or glue the flowers so that the joins are invisible, making the tulips appear as if they are naturally growing out of the fabric.
Adding “veining” to the petals can elevate your Tulip Wall Cover – Pattern from a simple craft project to a work of fine art. This can be done with a thin embroidery needle and a slightly darker shade of thread after the main flower is finished. By following the natural lines of the pattern, you can add subtle highlights and shadows that make the tulips look more vibrant and alive. This extra step is a hallmark of a professional-grade wall cover design and shows a high level of attention to detail and craftsmanship.
Lastly, the “blocking” phase is essential for any textile-based Tulip Wall Cover – Pattern. Once you have finished the construction, you must pin the piece out to its final dimensions and lightly steam it. This “sets” the fibers and ensures that the tulips lay flat against the wall without curling. For a Tulip Wall Cover – Pattern, blocking helps to open up any lace-work and smooths out the transitions between the flowers and the background, giving the final piece a crisp, boutique-ready finish that will impress any visitor to your home.
The beauty of the Tulip Wall Cover – Pattern is that it can be scaled to fit any wall in your house, from a tiny powder room to a grand living room. For smaller spaces, a “miniature” version of the pattern with delicate, fine thread can provide a subtle touch of elegance without overwhelming the room. In contrast, for a large accent wall, you can use chunky yarns or oversized paper cutouts to create a bold, “macro” Tulip Wall Cover – Pattern that demands attention and serves as the primary decor element in the space.
Consider the “density” of the tulips when planning your layout. A “scattered” Tulip Wall Cover – Pattern where the flowers have plenty of space between them creates a calm, airy atmosphere that is perfect for a bedroom or a nursery. A “dense” layout, where the tulips are packed together in a lush meadow effect, is more suited for a social space like a dining room or an entryway. When you customize your Tulip Wall Cover – Pattern, think about how the repetition of the floral motif will influence the “energy” of the room.
The height at which you hang your Tulip Wall Cover – Pattern can also change its impact. Hanging a long, vertical panel of tulips can make a ceiling appear higher, while a wide, horizontal “frieze” of flowers can make a room feel cozier and more grounded. If you are using a Tulip Wall Cover – Pattern as a headboard alternative, ensure it is wide enough to frame the bed perfectly. The flexibility of the pattern allows you to be the architect of your own space, using the floral shapes to guide the eye and define the room’s proportions.
Texture-on-texture is a sophisticated way to use the Tulip Wall Cover – Pattern. If you have a room with a lot of smooth surfaces (like glass tables and leather sofas), a heavily textured crochet or felted tulip cover adds much-needed warmth and softness. Conversely, in a room that is already “soft” with many rugs and pillows, a sleek, paper-cut Tulip Wall Cover – Pattern provides a clean, modern contrast. Balancing the “hard” and “soft” elements of your decor with the floral pattern is a key secret of professional interior designers.
You can also adapt the Tulip Wall Cover – Pattern for “corner” installations. By splitting the pattern and wrapping it around a 90-degree angle, you can create a “secret garden” corner that feels like an immersive experience. This is a great use for a modular Tulip Wall Cover – Pattern, where you can add as many or as few flowers as the space allows. This type of creative installation makes the wall cover feel less like a “poster” and more like a permanent, sculptural part of the home’s architecture.
Finally, think about the interaction with light. If you place your Tulip Wall Cover – Pattern opposite a window, the natural sunlight will highlight the textures and colors of the tulips throughout the day. For evening ambiance, placing a small spotlight or a set of “fairy lights” behind or above the tulips can create beautiful shadows and a warm, glowing effect. A well-placed Tulip Wall Cover – Pattern becomes a dynamic piece of art that changes with the light, providing a constant source of visual interest and joy in your daily life.
To keep your Tulip Wall Cover – Pattern looking fresh and vibrant, regular maintenance is a must. For textile-based covers, a gentle dusting with a soft-bristled brush or a light vacuuming with a brush attachment once a month will prevent dust from settling into the fibers. If you used natural fibers like cotton or wool, avoid direct, prolonged sunlight, as UV rays can fade the beautiful “tulip” dyes over time. A high-quality Tulip Wall Cover – Pattern is a long-term investment in your home’s beauty, and a little care goes a long way.
If your Tulip Wall Cover – Pattern happens to get a stain, spot-cleaning is the safest approach. Use a mild, “ph-neutral” soap and a clean white cloth to gently dab the area—never rub, as this can distort the delicate stitches or fibers of the flower. For paper-based versions, a dry “magic eraser” can often remove small scuffs or marks. Because the Tulip Wall Cover – Pattern is often a labor of love, taking the time to clean it properly ensures that the “petals” remain as crisp as the day you finished the project.
Seasonal swapping is a fun way to use the Tulip Wall Cover – Pattern to refresh your home. You might have a “Spring” version in bright yellows and pinks, and a “Winter” version in deep reds and creams. Since many Tulip Wall Cover – Patterns are lightweight and easy to store, you can simply roll them up and keep them in a breathable bag when not in use. This “rotating gallery” approach keeps your home decor from feeling stagnant and allows you to celebrate the changing seasons through your floral artwork.
If you are using the Tulip Wall Cover – Pattern in a kitchen or a high-humidity area like a bathroom, ensure your materials are moisture-resistant. Acrylic yarns or “sealed” papers are better in these environments than delicate silks or untreated cardstock. A well-planned Tulip Wall Cover – Pattern takes the environment into account, ensuring that the flowers don’t wilt or sag due to humidity. This practical foresight is what makes a handcrafted pattern truly functional and durable for real-world living.
For those who have pets or small children, hanging the Tulip Wall Cover – Pattern slightly higher on the wall can prevent curious hands or paws from pulling on the delicate petals. You can also use “stiffening spray” on the tulips to help them hold their shape and resist minor tugging. The Tulip Wall Cover – Pattern is meant to be lived with and enjoyed, so making these small adjustments for safety and durability ensures that the piece remains a source of happiness rather than a source of stress.
Ultimately, the Tulip Wall Cover – Pattern is a testament to the beauty of “slow decor.” In a world of mass-produced, plastic art, a handmade wall cover represents a commitment to quality, creativity, and personal expression. As you live with your tulips, you will find that they bring a sense of peace and natural harmony to your space. Whether it’s the centerpiece of your living room or a hidden gem in your bedroom, the Tulip Wall Cover – Pattern is a timeless addition that celebrates the enduring charm of the garden within the walls of your home.
1. Is the Tulip Wall Cover – Pattern suitable for a beginner?
Yes, many versions of the Tulip Wall Cover – Pattern are designed with beginners in mind. If you are new to fiber arts, look for a “modular” pattern where you make individual tulips and then attach them to a base. This allows you to practice the floral shapes on a small scale before committing to a large wall piece. The “applique” style Tulip Wall Cover – Pattern is particularly beginner-friendly.
2. How long does it take to complete a full Tulip Wall Cover – Pattern?
The time investment depends on the scale and complexity of the design. A small, 12×12 inch Tulip Wall Cover – Pattern might take a weekend to finish, while a large, 4-foot wall hanging could take several weeks of evening work. Because the pattern is often repetitive, many people find it to be a very relaxing “slow project” that provides a sense of accomplishment with every finished flower.
3. What is the best way to hang a heavy Tulip Wall Cover – Pattern?
For heavier textile covers, we recommend using a sturdy wooden dowel and two or three wall hooks to distribute the weight evenly. If the Tulip Wall Cover – Pattern is made of paper or light fabric, “command strips” or a decorative “washi tape” can be used for a damage-free installation. Always ensure your mounting method is secure enough to keep the flowers perfectly level.
4. Can I wash my Tulip Wall Cover?
We generally do not recommend machine-washing a Tulip Wall Cover – Pattern, as the agitation can distort the delicate floral shapes and cause colors to run. Hand-washing or spot-cleaning is much safer. If the item is very dusty, you can also “refresh” it by putting it in a large bag with a cup of baking soda, shaking it gently, and then brushing it off outside.
5. How do I make the tulips look more three-dimensional?
The secret to 3D tulips in a Tulip Wall Cover – Pattern is “layering.” Instead of one flat shape, use multiple layers of petals that are slightly curled or stuffed with a tiny bit of fiberfill. In crochet, using “back loop only” (BLO) stitches can also create ridges that give the petals a structural, 3D feel. A high-quality Tulip Wall Cover – Pattern will always include tips for adding depth.
6. Can I use the Tulip Wall Cover – Pattern for other items?
Absolutely! The floral motifs in the Tulip Wall Cover – Pattern can be used for pillows, table runners, or even on the back of a denim jacket. Once you master the “tulip” shape from the pattern, you can apply it to almost any fiber or paper project, making it a very versatile skill to have in your creative toolkit.
In this guide, we have explored the multifaceted world of the Tulip Wall Cover – Pattern, a project that allows you to infuse your home with the timeless elegance of nature through the art of handmade decor. We discussed the importance of choosing the right “flavor” of materials—from mercerized cottons to heavy cardstocks—and how color theory can turn a simple floral motif into a sophisticated work of art.
We covered the technical execution of the “cup-shaped” petals, the importance of symmetry and blocking, and how to scale the Tulip Wall Cover – Pattern to fit the specific proportions of your space. Furthermore, we touched on the essential care and maintenance routines that preserve the vibrancy of your tulips for years to come. The Tulip Wall Cover – Pattern is more than just an interior design choice; it is a celebration of springtime, creativity, and the joy of crafting a home that reflects your unique personality.


