
Patchwork Bird Tutorial

Creating a Minnie Mouse Quilt – Pattern is one of the most delightful projects a sewing enthusiast can undertake, bringing a touch of Disney magic into any nursery or bedroom. Whether you are an experienced quilter or a beginner looking for a whimsical challenge, working with a Minnie Mouse Quilt – Pattern allows you to blend nostalgia with modern craftsmanship. This iconic character, known for her cheerful polka dots and signature bow, provides a versatile aesthetic that works beautifully in various color palettes, from classic red and black to soft pastels.
The beauty of a Minnie Mouse Quilt – Pattern lies in its ability to be customized according to the skill level of the maker. You can opt for intricate appliqué techniques to recreate Minnie’s silhouette or use a simple patchwork style featuring themed fabrics to tell a story through textiles. High-quality cotton fabric is essential for these projects, ensuring that the finished quilt is not only visually stunning but also soft enough for a child to snuggle with for years to come.
As you embark on your journey to create a Minnie Mouse Quilt – Pattern, it is important to consider the overall quilt layout and the color scheme that will best suit your space. By integrating Disney-inspired designs with traditional quilting blocks, you create a timeless piece of decor that celebrates one of the most beloved characters in animation history. In this guide, we will explore the essential steps, from selecting the right quilt templates to mastering the final stitching details that make your project stand out.
Choosing the perfect Minnie Mouse Quilt – Pattern is the foundational step that determines the complexity and the final look of your handcrafted masterpiece. Many quilters prefer a digital download pattern because it provides instant access to detailed sewing instructions and printable quilt templates. When browsing for designs, look for patterns that offer clear fabric requirements and step-by-step diagrams to ensure a smooth sewing process.
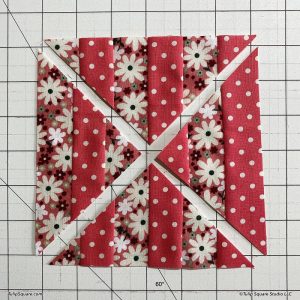
A popular choice for many is the Minnie Mouse Quilt – Pattern that utilizes fussy cutting, a technique where you specifically cut out Minnie’s face or her iconic bow from a larger piece of fabric to serve as the centerpiece of your blocks. This ensures that the character remains the focal point of the quilt top, creating a professional and polished appearance. If you are a fan of traditional styles, look for patterns that incorporate nine-patch blocks or half-square triangles around a central Minnie motif.
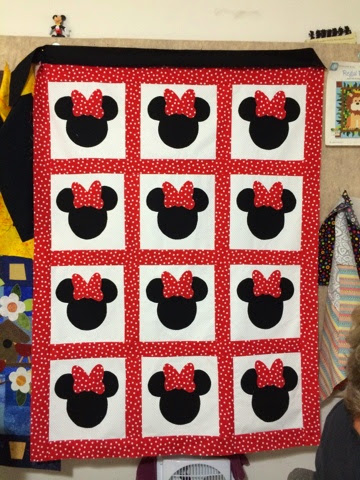
For those who enjoy a more modern aesthetic, a minimalist Minnie Mouse Quilt – Pattern might focus on the iconic three-circle silhouette (the “Hidden Mickey” style) rather than a detailed illustration. This approach allows for a sophisticated use of negative space and bold color blocking, making the quilt suitable for older children or even as a decorative throw for a Disney-themed guest room. Always check the finished size listed in the pattern to ensure it meets your needs, whether it is a crib quilt, a lap quilt, or a twin-size bedspread.
Materials play a crucial role in the success of your Minnie Mouse Quilt – Pattern, so prioritizing 100% quilting cotton is highly recommended. Cotton is easier to handle under the sewing machine and holds its shape better than synthetic blends, which is vital when working with the precise curves often found in Minnie Mouse designs. Additionally, consider using a high-quality cotton batting to provide the perfect amount of loft and warmth without making the quilt too heavy for small children.
The Minnie Mouse Quilt – Pattern you select should also align with your preferred quilting technique, such as paper piecing or raw-edge appliqué. Paper piecing is excellent for achieving sharp points and perfect proportions in Minnie’s ears, while appliqué is the go-to method for adding character details on top of a base fabric. Regardless of the method, make sure your pattern includes a seam allowance guide, usually a standard 1/4 inch, to keep your blocks uniform throughout the assembly.
Finally, don’t be afraid to personalize your Minnie Mouse Quilt – Pattern by adding custom embroidery or a monogram of the recipient’s name. This adds a layer of sentimental value to the homemade quilt, transforming it from a simple bedding item into a cherished family heirloom. By taking the time to select a design that resonates with your personal style and skill level, you set yourself up for a rewarding and successful quilting journey.
Once you have secured your Minnie Mouse Quilt – Pattern, the next exciting phase is selecting the fabric palette that will bring the character to life. The most iconic colors for a Minnie-themed project are cherry red, jet black, and crisp white, often accented with polka dot prints. However, modern interpretations of a Minnie Mouse Quilt – Pattern frequently use blush pink, lavender, or mint green to create a softer, more contemporary feel for a nursery.
When purchasing materials for your Minnie Mouse Quilt – Pattern, it is wise to buy a little more fabric than the pattern suggests to account for any cutting errors or fabric shrinkage during the pre-washing phase. Pre-washing fabric is a debated topic, but for a quilt with high-contrast colors like red and white, it is essential to prevent color bleeding. Using color catchers in the laundry can also help protect your hard work once the quilt is fully assembled and needs its first wash.
The backing fabric for your Minnie Mouse Quilt – Pattern is just as important as the front; many quilters choose a soft flannel or a minky fabric to make the quilt extra cozy. If you choose minky, keep in mind that it can be slippery to sew, so using plenty of quilting pins or spray baste is necessary to keep the layers from shifting. A themed Disney print for the backing can also provide a fun surprise when the quilt is flipped over.
In addition to fabric, you will need high-quality all-purpose polyester thread or cotton thread that matches your primary colors. For a Minnie Mouse Quilt – Pattern that involves a lot of appliqué, a monofilament thread or a matching embroidery thread can help the stitches blend seamlessly into the design. Having a sharp rotary cutter, a self-healing cutting mat, and a clear quilting ruler will make the process of cutting out your quilt pieces much more accurate and efficient.
Don’t overlook the importance of the quilt binding, which is the fabric that wraps around the edges to finish the quilt. For a Minnie Mouse Quilt – Pattern, a striped binding or a small polka dot print can add a whimsical “frame” to the entire project. You can choose to sew the binding by hand for an invisible finish or use a machine-binding technique for extra durability, which is often preferred for quilts that will be used and washed frequently by children.
Lastly, ensure your sewing machine is in good working order before starting your Minnie Mouse Quilt – Pattern. Using a walking foot is highly recommended when you reach the quilting stage, as it helps move all three layers (top, batting, and backing) through the machine at the same rate. This prevents puckering and ensures that your quilt blocks remain flat and square, preserving the integrity of the Minnie Mouse design.
The soul of a Minnie Mouse Quilt – Pattern often lies in the appliqué work used to create her iconic face and bow. Appliqué involves sewing smaller pieces of fabric onto a larger background piece, and for Minnie, this usually means working with circular shapes and curved lines. Using fusible web is a great trick for beginners; it allows you to iron the character pieces onto the background fabric before stitching, ensuring they stay perfectly in place as you work.
When stitching around the edges of your Minnie Mouse Quilt – Pattern elements, you can use a zigzag stitch, a blanket stitch, or a satin stitch. A satin stitch provides a thick, raised border that mimics professional embroidery, while a blanket stitch gives the quilt a more rustic, handmade charm. Regardless of the stitch you choose, take your time around the curves of Minnie’s ears to maintain a smooth, rounded shape that is instantly recognizable.
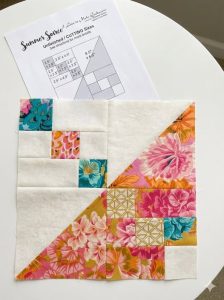
The patchwork sections of your Minnie Mouse Quilt – Pattern provide the structure and background for the character elements. You might use foursquare blocks or disappearing nine-patch designs to create a vibrant field of color around the Minnie motifs. Proper seam pressing is vital here; always press your seams toward the darker fabric to prevent them from showing through the lighter areas of your quilt top.
Incorporating 3D elements can take your Minnie Mouse Quilt – Pattern to the next level. For instance, instead of flat appliqué, you could create a fabric bow that is only tacked down in the center, allowing the loops to stand off the surface of the quilt. This adds a sensory and tactile element that children love, making the quilt pattern interactive and unique compared to standard store-bought bedding.
As you assemble the quilt rows, it is important to stay organized. Many quilters use numbered clips or labels to keep track of which block goes where according to the Minnie Mouse Quilt – Pattern diagram. Laying out the entire quilt top on a design wall or a clean floor before sewing the rows together allows you to check the balance of colors and ensure no two identical prints are touching.
The final step in the construction of the top is the addition of borders. A simple inner border in a solid color can act as a “mat” for the artwork, while a wider outer border featuring a Disney-licensed fabric can tie the whole Minnie Mouse Quilt – Pattern together. Once the top is complete, give it a final press with a steam iron to ensure everything is flat and ready for the quilting process, where you will join the layers together.
The quilting stage is where you stitch through all the layers, and for a Minnie Mouse Quilt – Pattern, the “stipple” or “meandering” stitch is a classic choice that adds wonderful texture. However, if you want to emphasize the theme, you can try free-motion quilting to create small Mickey heads or heart shapes throughout the background. This “hidden” detail is a favorite among Disney fans and adds a professional touch to your handmade quilt.
If you are new to free-motion quilting, you can follow the lines of the Minnie Mouse Quilt – Pattern by “stitching in the ditch”—sewing directly into the seams of your patchwork. This method secures the quilt without distracting from the main design. Another option is to use a stencil and a fabric marker to trace a specific design onto the quilt top, providing a guide for your needle to follow.
The quilt sandwich (top, batting, and back) must be properly basted before you start the final stitching. You can use safety pins placed every few inches or a temporary spray adhesive. For a Minnie Mouse Quilt – Pattern, making sure the character appliqué is perfectly flat during this stage is critical, as any shifts can cause unsightly wrinkles that are difficult to fix once the quilting is done.
Once the quilting is finished, it is time to square up your quilt. This involves using a large square ruler and a rotary cutter to trim the excess batting and backing, ensuring all four corners are exactly 90 degrees. This step is essential for the binding to lay flat and for the Minnie Mouse Quilt – Pattern to hang straight if you ever decide to display it on a wall instead of using it on a bed.
The binding process is the “victory lap” of your project. For a Minnie Mouse Quilt – Pattern, hand-sewing the binding to the back provides a clean, stitch-free look on the front, but machine-sewing is much faster and incredibly sturdy. Use a double-fold binding for extra durability at the edges, where quilts tend to show the most wear and tear over the years.
Finally, don’t forget to add a quilt label to the back of your Minnie Mouse Quilt – Pattern. This label should include your name, the date, and perhaps a special message for the recipient. It documents the love and effort put into the project and ensures that future generations know the history of this beautiful Disney-themed creation. Once labeled, give your quilt a gentle wash to achieve that classic, crinkly “quilt look” that makes it so inviting.
1. Is a Minnie Mouse Quilt – Pattern suitable for absolute beginners?
Yes, there are many variations of the Minnie Mouse Quilt – Pattern designed specifically for beginners. If you are new to quilting, look for a pattern that uses simple patchwork or large-scale appliqué rather than intricate paper piecing. Using pre-cut fabric bundles like charm packs can also simplify the process by reducing the amount of initial cutting required.
2. Where can I find a reliable Minnie Mouse Quilt – Pattern?
Reliable patterns can be found on platforms like Etsy, Pinterest, or dedicated quilting websites. Many designers offer PDF patterns that include templates for Minnie’s silhouette. Additionally, local quilt shops often carry Disney-licensed patterns and fabrics that are perfect for this type of project.
3. What is the best fabric for a Minnie Mouse Quilt – Pattern?
The best fabric is high-quality 100% cotton. It is durable, breathable, and easy to sew. For a softer feel, you can use flannel or minky for the backing, but stick to cotton for the quilt top to ensure the Minnie Mouse Quilt – Pattern details remain sharp and well-defined.
4. How do I prevent the red fabric from bleeding in my Minnie Mouse quilt?
To prevent bleeding, it is highly recommended to pre-wash your fabrics with a color-fixing agent or use color catchers during the first few washes. This is especially important for a Minnie Mouse Quilt – Pattern that combines vibrant reds with bright whites.
5. Can I use a regular sewing machine for a Minnie Mouse Quilt – Pattern?
Absolutely! Most Minnie Mouse Quilt – Pattern designs can be completed on a standard home sewing machine. Using a walking foot for the quilting layers and a darning foot for free-motion work will make the process much easier, but a basic straight stitch is all you truly need for the patchwork.
6. How long does it take to finish a Minnie Mouse Quilt – Pattern?
The timeframe depends on the complexity of the design and your experience level. A simple baby quilt might take a weekend to complete, while a more detailed full-size quilt with extensive appliqué could take several weeks. Breaking the project down into steps—cutting, piecing, and quilting—makes the process manageable and enjoyable.
In conclusion, creating a Minnie Mouse Quilt – Pattern is a wonderful way to express your creativity while celebrating a timeless Disney icon. We have covered everything from selecting the right quilt templates and high-quality fabrics to mastering the appliqué techniques and the final finishing touches like binding and labeling.
This project is more than just a piece of bedding; it is a labor of love that combines technical skill with heartfelt sentiment. By following the tips and structures outlined in this article, you can confidently create a handmade quilt that will be cherished for its beauty and comfort.


