
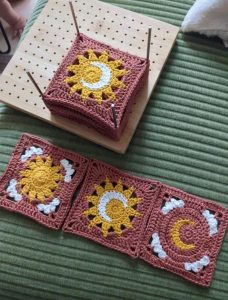
Crochet Flower - Tutorial

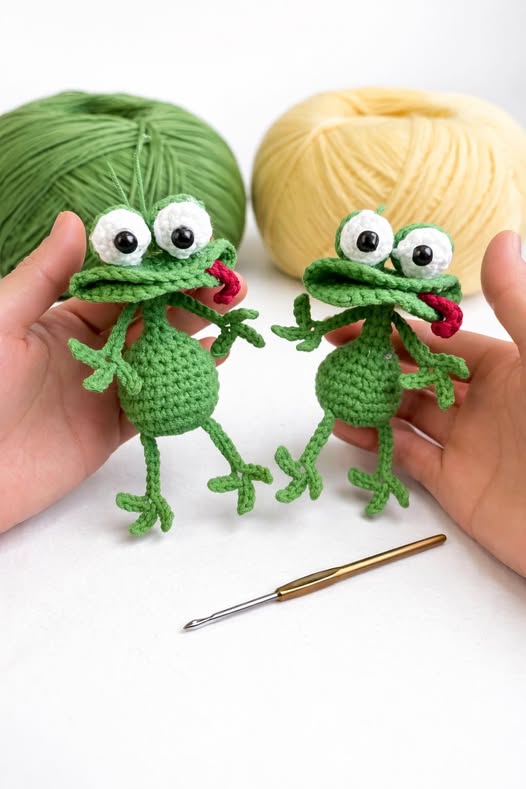
Creating a Crochet Frog Keychain – Pattern is a delightful way to dive into the world of amigurumi while producing a practical and adorable accessory. There is something incredibly charming about a tiny, wide-eyed amphibian dangling from your keys or backpack, reminding you of the whimsy that handmade crafts bring to everyday life. This Crochet Frog Keychain tutorial is designed to guide you through every stitch, ensuring that even if you are relatively new to the craft, you can achieve a professional and high-quality result that looks like it came straight from a boutique.
When you decide to follow a Crochet Frog Keychain – Pattern, you are engaging in a project that combines basic geometry with creative flair. These little frogs are typically worked in continuous rounds, which helps maintain a seamless appearance and makes the structure sturdy enough to withstand the daily wear and tear of being a keychain. By focusing on a Crocheted Frog Keychain tutorial that emphasizes clear instructions and proper technique, you ensure that your finished frog has the perfect “squish” factor and a personality all its own through simple embroidery and beadwork.
The beauty of this specific Crocheted Frog Keychain – Pattern lies in its efficiency and the minimal amount of yarn required to complete it. It serves as an excellent “scrap-buster,” allowing you to use up those small amounts of green and white yarn left over from larger projects. In this Crocheted Frog Keychain tutorial, we will explore the nuances of choosing the right hook size for tight stitches, the importance of safety eyes, and how to assemble the limbs to give your frog a lively, jumping pose. Let’s get our hooks ready and jump into the details of this wonderful crochet adventure.
The first step in successfully completing a Crocheted Frog Keychain – Pattern is selecting the right yarn. For amigurumi projects like this one, a 100% cotton yarn is often the preferred choice because it doesn’t pill and provides excellent stitch definition. When you follow a Crocheted Frog Keychain tutorial, you’ll notice that cotton helps the frog maintain its shape, which is crucial for an item that will be handled frequently as a keychain.
Choosing the correct hook size is the next vital component of your Crocheted Frog Keychain – Pattern. Typically, you should use a hook that is one or two sizes smaller than what the yarn label recommends, such as a 2.5mm or 3.0mm hook. This Crocheted Frog Keychain tutorial suggests a smaller hook to create a tight fabric that prevents the polyester fiberfill stuffing from peeking through the stitches, ensuring a clean and professional look.
Safety eyes are a hallmark of any great Crocheted Frog Keychain – Pattern, giving the character its expressive and cute face. Usually, 6mm or 8mm black safety eyes work best for a small keychain size. If you are following this Crocheted Frog Keychain tutorial to make a gift for a very young child, you might consider embroidering the eyes with black thread instead to ensure there are no small parts that could pose a choking hazard.
Stuffing is what gives your Crocheted Frog Keychain – Pattern its three-dimensional form. High-quality polyester fiberfill is the standard, as it is washable and stays bouncy over time. This Crocheted Frog Keychain tutorial recommends adding the stuffing gradually as you close the rounds, making sure to fill the “cheeks” of the frog to give it that iconic, slightly chubby amphibian appearance that everyone loves.
A sturdy metal keychain ring is the finishing touch for your Crocheted Frog Keychain – Pattern. You can find these at any craft store, often with a small chain attached. In our Crocheted Frog Keychain tutorial, we will discuss how to securely sew the frog’s head to the keychain link so that it stays firmly attached to your keys or bag without the risk of falling off during your daily commute.
Lastly, you will need basic sewing notions like a tapestry needle and sharp scissors to finish the Crocheted Frog Keychain – Pattern. A needle with a large eye but a blunt tip is perfect for weaving in ends and sewing on the legs without splitting the yarn fibers. This Crocheted Frog Keychain tutorial emphasizes the importance of a clean finish, as those final hidden stitches are what make the project durable and aesthetically pleasing.
Most amigurumi designs, including this Crocheted Frog Keychain – Pattern, rely heavily on the single crochet stitch. Because single crochet creates a dense, sturdy fabric, it is the ideal foundation for structural projects. As you progress through the Crocheted Frog Keychain tutorial, you will find that consistency in your single crochet tension is the key to making sure both sides of the frog look identical and symmetrical.
The magic ring is a fundamental skill you will learn while working on a Crocheted Frog Keychain – Pattern. This technique allows you to start a round with a hole that can be pulled completely shut, which is essential for the top of the frog’s head. If you are new to this Crocheted Frog Keychain tutorial, don’t get frustrated if the magic ring takes a few tries; once you master it, it will become your favorite way to start any round project.
Increasing and decreasing are the “shaping” tools used in the Crocheted Frog Keychain – Pattern. To make the frog’s head widen, you will put two stitches into one (an increase), and to narrow it back down towards the neck, you will join two stitches into one (a decrease). Our Crocheted Frog Keychain tutorial uses the “invisible decrease” method, which is a specialized technique that makes the reduction of stitches almost impossible to see on the finished product.
The legs and arms of the frog in this Crocheted Frog Keychain – Pattern are often made using simple chain sequences and slip stitches. This creates a thin, flexible limb that gives the frog a playful appearance. In this Crocheted Frog Keychain tutorial, we focus on creating “webbed” feet by working multiple stitches into a single chain at the end of the leg, providing that unmistakable frog-like silhouette that makes the design so recognizable.
Working in continuous rounds is a standard practice for the Crocheted Frog Keychain – Pattern. This means you don’t join each round with a slip stitch, which avoids a visible seam running down the back of your frog. A Crocheted Frog Keychain tutorial tip is to always use a stitch marker to keep track of where your round begins, as it is very easy to lose your place when the stitches are small and the yarn is the same color.
Finally, the Crocheted Frog Keychain – Pattern often includes a small amount of embroidery for the mouth and perhaps some pink yarn for the cheeks. This is where your personal creativity shines. This Crocheted Frog Keychain tutorial encourages you to experiment with different mouth shapes—a simple “v” for a happy frog or a straight line for a more serious one—to give each keychain you make a unique personality and charm.
To begin the main body of the Crocheted Frog Keychain – Pattern, start with a magic ring and work 6 single crochets into it. Round two will involve increasing in every stitch to reach 12 stitches. This Crocheted Frog Keychain tutorial follows a standard mathematical expansion (6, 12, 18, 24) to create a perfectly circular head that serves as the focal point of your little green friend.
As you move into the middle rounds of the Crocheted Frog Keychain – Pattern, you will work several rounds of even single crochets. This builds the height of the head and body. It is during these rounds in the Crocheted Frog Keychain tutorial that you should place your safety eyes, usually between rounds 8 and 9. Make sure they are spaced about 5 or 6 stitches apart to give the frog that cute, wide-set eye look.
The body and head are often worked as one piece in this Crocheted Frog Keychain – Pattern to minimize sewing later. After completing the widest part of the head, you will perform a series of decreases to form the neck before slightly increasing again for the belly. This Crocheted Frog Keychain tutorial technique creates a “pear” shape that is incredibly popular in amigurumi because it looks organic and adorable.
Once the body of your Crocheted Frog Keychain – Pattern is finished and stuffed, it’s time to create the limbs. You will crochet four separate legs using the chain and slip stitch method mentioned earlier. This Crocheted Frog Keychain tutorial suggests leaving long tails on each limb, which you will use to sew them onto the body. Positioning is key; place the legs so the frog looks like it’s ready to hop right off your palm!
Assembly is the part of the Crocheted Frog Keychain – Pattern that requires the most patience. Pin the limbs in place before sewing to ensure they are even. In this Crocheted Frog Keychain tutorial, we recommend sewing through both the limb and the body stitches multiple times to ensure the frog is “adventure-ready” and won’t lose a leg while being pulled in and out of a pocket or purse.
The final stage of the Crocheted Frog Keychain tutorial is attaching the hardware. Use a small scrap of the main yarn to loop through the top of the frog’s head and through the keychain ring. Knot it securely on the inside of the head before weaving in the end. Congratulations, you have successfully navigated the Crocheted Frog Keychain – Pattern and now have a handmade companion to take with you everywhere!
One of the best things about the Crocheted Frog Keychain – Pattern is how easy it is to customize. You can change the “species” of your frog just by changing the yarn color; use a bright red or blue for a “poison dart frog” look. This Crocheted Frog Keychain tutorial encourages color play, as variegated yarns can also create a mottled, camouflaged effect that looks very realistic and striking.
Adding accessories to your Crocheted Frog Keychain – Pattern is another way to make it stand out. You could crochet a tiny crown to make a “Frog Prince” or a small red mushroom to sit next to it. By using the base Crocheted Frog Keychain tutorial and adding these small details, you can create themed gifts for friends and family that feel much more personal and thoughtful than a store-bought item.
If you find that your Crocheted Frog Keychain – Pattern is coming out too large for your taste, try using embroidery floss instead of yarn. This “micro-crochet” version of the Crocheted Frog Keychain tutorial results in a tiny, delicate frog that is perfect for jewelry or highly detailed miniatures. It requires more focus and a very small hook (0.6mm to 1.0mm), but the results are absolutely stunning and highly sought after by collectors.
Texture is another element you can experiment with in your Crocheted Frog Keychain – Pattern. Using a fuzzy yarn can make a “mossy” frog, while a shiny mercerized cotton makes it look sleek and wet like a real frog in a pond. This Crocheted Frog Keychain tutorial is merely a foundation; the choice of fiber can completely change the tactile experience and visual appeal of your finished keychain.
For those who want to sell their work, packaging your Crocheted Frog Keychain – Pattern creations can add a professional touch. Attach the frog to a backing card with a “Lily Pad” design to enhance the theme. This Crocheted Frog Keychain tutorial isn’t just about the crochet; it’s about the joy of presentation. Small details like a “Handmade with Love” tag can make your work much more appealing to potential buyers at craft fairs.
Finally, remember that practice makes perfect when working with a Crocheted Frog Keychain – Pattern. Your first frog might have a slightly wonky eye or a crooked leg, but that just adds to its “handmade” charm. Each time you follow this Crocheted Frog Keychain tutorial, your stitches will become more even, your assembly faster, and your frogs more full of life. Keep experimenting, keep hooking, and enjoy the creative process!
Is the Crocheted Frog Keychain – Pattern suitable for kids?
Yes, but with one caveat: if the frog is for a child under 3, do not use plastic safety eyes. Instead, use black yarn to embroider the eyes. This modification to the Crocheted Frog Keychain tutorial ensures the toy is safe and free of small parts that could be swallowed.
How much yarn do I need for this Crocheted Frog Keychain tutorial?
Very little! You will need less than 20 grams of the main color. This makes the Crocheted Frog Keychain – Pattern one of the best ways to use up leftover yarn from larger projects, essentially making your keychains almost free to produce.
Can I wash my finished Crocheted Frog Keychain – Pattern?
Yes, as long as you used washable yarn and polyester stuffing. Place the frog in a mesh laundry bag and wash on a delicate cycle, then air dry. This is a great tip from our Crocheted Frog Keychain tutorial to keep your accessory looking fresh and clean.
What is the “Invisible Decrease” mentioned in the tutorial?
The invisible decrease is a technique where you only insert your hook into the front loops of the next two stitches before completing the single crochet. It is a vital part of a professional-looking Crocheted Frog Keychain – Pattern because it eliminates the bumps usually caused by standard decreases.
How do I make the frog’s cheeks pink?
In this Crocheted Frog Keychain tutorial, you can either use a small amount of pink yarn to stitch two horizontal lines under the eyes or use a tiny bit of actual cosmetic blush and a Q-tip to gently “paint” the cheeks for a soft, blended look.
My frog won’t stay on the keychain. What should I do?
Ensure you are sewing the loop through the actual stitches of the head, not just around a single strand of yarn. In the Crocheted Frog Keychain – Pattern, it is best to go through at least two layers of “fabric” to ensure the weight of the keys doesn’t tear the crochet.
In this comprehensive guide, we have journeyed through the creation of a Crocheted Frog Keychain – Pattern, covering everything from the necessary materials and basic stitches to assembly and customization tips.
We learned how to use a magic ring, how to place safety eyes for maximum cuteness, and how to securely attach the hardware to make your frog a functional accessory. This Crocheted Frog Keychain tutorial is more than just a set of instructions; it is an invitation to explore your creativity and master the art of amigurumi one stitch at a time.


