
Crochet Flower - Tutorial

The Crochet Hat with Cat Ears – Tutorial is your ultimate guide to creating one of the most charming and trendy accessories in the DIY fashion world. Whether you are looking to spice up your winter wardrobe or crafting a personalized gift for a friend, learning how to make a cat ear beanie is a rewarding project that combines utility with a touch of whimsical style. In this comprehensive guide, we will walk through every step of the process, ensuring that even beginners can achieve a professional-looking finish while mastering the art of handmade crochet apparel.
Choosing to follow a Crochet Hat with Cat Ears – Tutorial allows you to customize your headwear in ways that store-bought items simply cannot match. You have full control over the yarn texture, the stitch definition, and the specific color palette that suits your personality. Beyond being a fun fashion statement, these hats are incredibly functional, providing warmth and comfort during the colder months. This project is also a fantastic way to practice basic crochet stitches like the half double crochet (hdc) and the foundation chain, which are essential skills for any aspiring fiber artist.
As we dive into this Crochet Hat with Cat Ears – Tutorial, it is important to remember that the “cat ears” effect is often achieved through the clever geometry of the hat itself rather than complex shaping. By crocheting a simple rectangle and seaming it correctly, the corners naturally poke up to form adorable ears when worn. This “square hat” method is the secret behind the popular pussyhat project and various kawaii crochet designs. Throughout this article, we will explain the essential crochet terminology and provide tips for SEO-friendly crafting so you can share your finished work with the world.
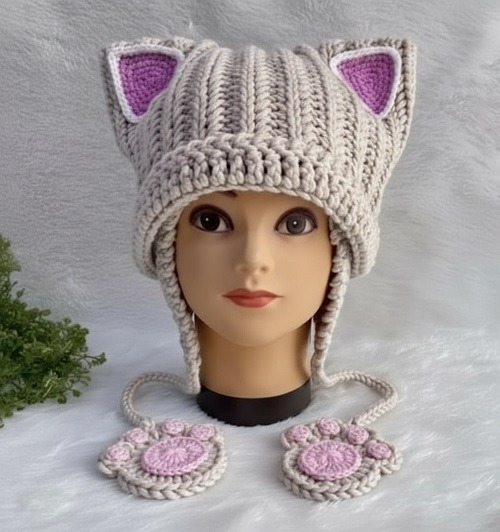
The Crochet Hat with Cat Ears – Tutorial begins with understanding the core concept of the “rectangle method.” Unlike traditional beanies that require decreasing stitches to create a rounded crown, this design stays wide at the top. When you put the hat on, your head fills the center, causing the top corners to protrude upward like cat ears.
To start your Crochet Hat with Cat Ears – Tutorial, you must first select the right yarn weight. Most crafters prefer a worsted weight yarn (Category 4) because it offers a perfect balance of warmth and stitch clarity. Using a 5.0mm (H) crochet hook is generally recommended to ensure the fabric is tight enough to hold its shape but soft enough to be comfortable.
A key element in any Crochet Hat with Cat Ears – Tutorial is the gauge swatch. This is a small sample you crochet to test how many stitches fit into a square inch. Ensuring your gauge matches the pattern is vital for garment sizing, as it prevents the hat from being too loose or too tight for the wearer’s head circumference.
The primary stitch used in this Crochet Hat with Cat Ears – Tutorial is often the half double crochet (hdc) worked in the back loops only (BLO). This specific technique creates a ribbed texture that mimics the look of knitting. The ribbed crochet texture provides excellent elasticity, allowing the hat to stretch and fit snugly over different head sizes.
Before jumping into the stitches, you should familiarize yourself with crochet abbreviations. Common terms include ch (chain), st (stitch), and sl st (slip stitch). Understanding these basics is the foundation of any DIY crochet pattern and will make following the instructions much smoother as you progress through the tutorial.
Finally, remember that the Crochet Hat with Cat Ears – Tutorial is highly adaptable. You can adjust the height of the rectangle to create a slouchy beanie look or keep it shorter for a classic fit. The versatility of this design is why it remains a top-trending search in handmade fashion communities and social media platforms like Pinterest and TikTok.
Every successful Crochet Hat with Cat Ears – Tutorial starts with a well-prepared craft bag. For this specific project, you will need approximately 150 to 200 yards of acrylic or wool blend yarn. These materials are preferred for crochet headwear because they are durable, easy to wash, and retain their vibrant colors over time.
Your crochet hook selection is the next critical step in this Crochet Hat with Cat Ears – Tutorial. While a size H/5mm hook is standard, you might want to switch to a larger hook if you are a “tight crocheter” or a smaller one if your stitches are naturally loose. Having a set of ergonomic crochet hooks can also prevent hand fatigue during long crafting sessions.
Don’t forget the small but essential notions for crocheting. You will need a tapestry needle (also known as a yarn needle) to weave in your ends and sew the top seam. A measuring tape is also indispensable for checking the width and height of your rectangle to ensure it matches the standard hat size charts.
Stitch markers are a lifesaver in any Crochet Hat with Cat Ears – Tutorial. They help you keep track of the beginning of your rows, especially when working with textured stitches. If you don’t have professional markers, a simple piece of contrasting scrap yarn or a safety pin can work just as effectively to mark your place.
For those looking to add a professional touch to their handmade cat ear hat, consider adding custom garment labels. These can be sewn onto the brim of the hat to give it a “boutique” feel. If you plan on selling your creations on platforms like Etsy, high-quality finishing techniques are what will set your work apart from the competition.
Lastly, ensure you have a sharp pair of craft scissors. Clean cuts prevent the yarn from fraying, which makes threading the tapestry needle much easier. With all these tools gathered, you are fully equipped to move forward with the Crochet Hat with Cat Ears – Tutorial and create a masterpiece that looks as good as it feels.
The first active step in the Crochet Hat with Cat Ears – Tutorial is creating the foundation chain. For an average adult size, you will typically chain enough to reach about 11 to 12 inches in length. This measurement determines the “height” of your hat, including the fold-over brim if you choose to have one.
Once the chain is ready, you will work rows of half double crochet across the length. The secret to the ribbed look in this Crochet Hat with Cat Ears – Tutorial is inserting your hook only into the back loop of the stitch from the previous row. Repeat this process until your piece of fabric is wide enough to wrap around your head comfortably.
After completing the main body of the hat, you will have a large ribbed rectangle. The next phase of the Crochet Hat with Cat Ears – Tutorial involves joining the two shorter sides. You can use a slip stitch join or the invisible mattress stitch to create a tube. This seam will eventually be positioned at the back of the hat for a clean look.
Now comes the “magic” part of the Crochet Hat with Cat Ears – Tutorial: closing the top. Instead of gathering the top into a circle, you will lay the tube flat and sew straight across the top edge. Use your tapestry needle and a whip stitch to close the gap securely. This creates a square-shaped bag.
When you turn the hat right-side out and place it on your head, the corners of the square will naturally point upward. In some versions of the Crochet Hat with Cat Ears – Tutorial, crafters like to add a small stitch across the base of the corners to further define the cat ear shape, though this is entirely optional depending on the look you want.
To finish your Crochet Hat with Cat Ears – Tutorial, you must weave in the yarn tails. Use your needle to weave the remaining thread through the stitches on the inside of the hat so they aren’t visible. This ensures your crochet accessory is durable and won’t unravel during use or washing, completing your DIY fashion project.
The beauty of the Crochet Hat with Cat Ears – Tutorial is that it serves as a blank canvas for your creativity. You can experiment with color blocking by changing yarn colors every few rows. This creates a striped effect that makes the cat ears stand out even more, especially if you use high-contrast colors like black and neon pink.
Another way to elevate your Crochet Hat with Cat Ears – Tutorial results is by adding embroidery. You can use a contrasting yarn to sew a small “nose” and “whiskers” onto the front of the beanie. This transforms the simple geometric shape into a full animal-themed crochet hat that is perfect for kids or costume parties.
If you prefer a more subtle look, try using variegated yarn. These yarns change color automatically as you work through the Crochet Hat with Cat Ears – Tutorial, creating a beautiful, multi-tonal fabric without the need to weave in dozens of extra ends. Self-striping yarns are particularly popular for this type of project.
Texture also plays a huge role in the final aesthetic. While the half double crochet is standard, you can use the Crochet Hat with Cat Ears – Tutorial framework with other stitches like the bean stitch or the waffle stitch. These add bulk and extra warmth, making the hat ideal for extreme winter conditions while maintaining the cute feline silhouette.
Styling your finished piece from the Crochet Hat with Cat Ears – Tutorial is easy. These beanies look great with oversized sweaters, denim jackets, or even as part of a grunge aesthetic outfit. Because they are hand-crafted items, they carry a unique charm that complements the “slow fashion” movement and sustainable clothing choices.
Finally, don’t forget to share your progress! The crochet community is vast and supportive. Posting photos of your finished project from this Crochet Hat with Cat Ears – Tutorial on social media with hashtags like #CrochetCatHat or #DIYBeanie is a great way to connect with fellow makers and find inspiration for your next fiber arts adventure.
FAQ
How long does it take to finish this Crochet Hat with Cat Ears – Tutorial?
For an intermediate crocheter, this project can usually be completed in 2 to 4 hours. Beginners might take a bit longer, perhaps an afternoon or two, as they get used to maintaining consistent tension and working in the back loops.
What is the best yarn for a Crochet Hat with Cat Ears – Tutorial?
A soft acrylic yarn or a wool-acrylic blend is best. Acrylic is affordable and holds its shape well, which is important for making sure the “ears” stay upright rather than flopping over.
Can I make this hat for a child using this Crochet Hat with Cat Ears – Tutorial?
Yes! To adjust the size, simply reduce the number of chains in your foundation row (for height) and work fewer rows (for width). You should measure the child’s head circumference and aim for the fabric to be about 1-2 inches smaller than that measurement for a snug fit.
Do I need to know how to knit to follow this tutorial?
Not at all. While the finished hat looks like it was knitted due to the ribbing technique, it is 100% crochet. This is one of the best projects for showing off how crochet can mimic the look of traditional knitwear.
Will the ears fall down over time?
If you use a sturdy yarn and a slightly smaller hook to create a dense fabric, the ears should stay upright on their own. If you find they are drooping, you can add a few reinforcement stitches at the base of the ear on the inside of the hat.
Is this Crochet Hat with Cat Ears – Tutorial beginner-friendly?
Absolutely. Because it involves crocheting a simple rectangle without any complex increasing or decreasing, it is widely considered one of the easiest “first garments” a beginner can tackle.
Conclusion
In this Crochet Hat with Cat Ears – Tutorial, we have covered everything from selecting the right crochet supplies to the final seaming techniques that create those iconic feline points. We explored the importance of gauge, the versatility of the back loop half double crochet, and various ways to customize your beanie with colors and textures.
This project is more than just a way to stay warm; it is an entry point into the world of creative crochet design and self-expression. By following these steps, you now have the skills to create a stylish, handmade accessory that is as unique as you are.


