
Patchwork Bird Tutorial

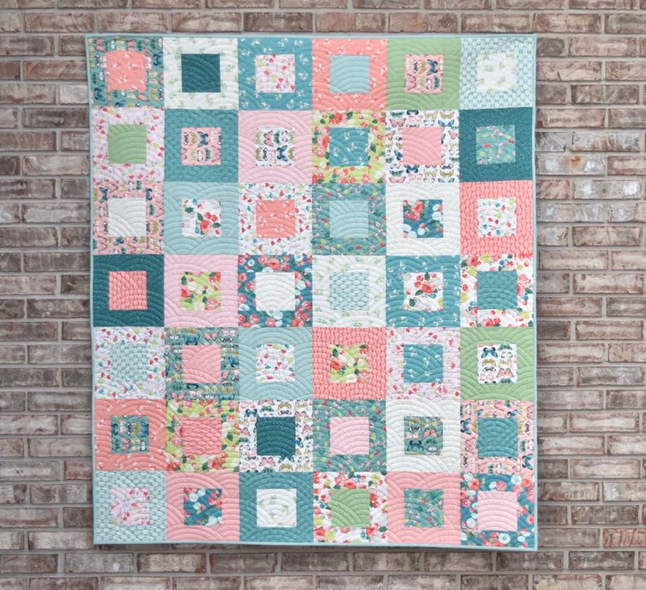
The Square Dance Quilt – Pattern is a timeless favorite in the quilting community, celebrated for its dynamic movement and the clever way it uses basic geometric shapes to create a complex visual effect. Whether you are a seasoned quilter or a curious beginner, embarking on a Square Dance Quilt – Pattern project offers a wonderful opportunity to play with color theory and fabric contrast. This specific design relies on the interaction of squares and rectangles to mimic the energetic “swing” of a traditional folk dance, bringing life and rhythm to any bedroom or living space it occupies.
When you decide to work with a Square Dance Quilt – Pattern, you are engaging with a piece of textile history that emphasizes precision cutting and creative block rotation. The beauty of this quilt design lies in its versatility; it can look incredibly modern with bold, solid colors or charmingly rustic with vintage florals. By mastering the Square Dance Quilt – Pattern, you develop essential skills in seam allowance management and quilt top assembly, ensuring that every corner aligns perfectly to maintain the illusion of motion.
In the world of patchwork quilting, finding a Square Dance Quilt – Pattern that speaks to your personal style is key to a successful finished product. Many quilters appreciate this sewing pattern because it is “fat-quarter friendly,” allowing you to use a wide variety of fabric scraps while maintaining a cohesive look. As we dive deeper into the specifics of the Square Dance Quilt – Pattern, we will explore the materials needed, the step-by-step construction of the quilt blocks, and the best ways to finish your masterpiece with professional-grade quilting techniques.
The Square Dance Quilt – Pattern is fundamentally based on a “disappearing” block technique where a simple layout is sliced and rearranged. This quilting method transforms basic four-patch or nine-patch units into intricate patterns that look much harder to sew than they actually are. By focusing on the Square Dance Quilt – Pattern structure, you can create a secondary design that emerges once all the blocks are sewn together.
To start your Square Dance Quilt – Pattern, you need to select high-quality 100% cotton fabric. The choice of fabric weight is crucial because it affects how the seams lay flat during the pressing stage. Most experts suggest using a mix of light, medium, and dark values to ensure the Square Dance Quilt – Pattern has enough depth and visual interest to “pop.”
One of the most appealing aspects of the Square Dance Quilt – Pattern is its scalability. You can easily adjust the size of your starting squares to create anything from a small wall hanging to a massive king-size bedspread. This flexibility makes the Square Dance Quilt – Pattern a go-to choice for gift-making, as you can customize the dimensions to suit the recipient’s needs.
Precision is your best friend when working on a Square Dance Quilt – Pattern. Using a rotary cutter, an acrylic ruler, and a self-healing mat will ensure that your fabric strips are straight and consistent. Because the Square Dance Quilt – Pattern involves several sub-cuts, even a small error in the beginning can lead to alignment issues later in the assembly process.
The “dance” in the Square Dance Quilt – Pattern comes from the way the blocks are rotated 90 degrees during the layout phase. This rotation creates a sense of interlocking circles or squares that seem to weave over and under each other. When you follow a Square Dance Quilt – Pattern guide, pay close attention to the diagrams to ensure your blocks are facing the correct direction.
Finally, the Square Dance Quilt – Pattern is an excellent project for practicing chain piecing. This time-saving quilting technique involves sewing multiple units one after another without cutting the thread in between. Chain piecing the Square Dance Quilt – Pattern units not only speeds up the process but also helps maintain a consistent 1/4 inch seam allowance.
Before you begin sewing your Square Dance Quilt – Pattern, gathering the right tools is essential for a frustration-free experience. You will need a variety of fabric prints—usually a combination of “focus fabrics” and “background fabrics”—to give the Square Dance Quilt – Pattern its signature look. Don’t forget to include a high-quality cotton thread that matches your background fabric for invisible seams.
The Square Dance Quilt – Pattern thrives on contrast, so consider using a design wall or a large floor space to audition your fabrics. Laying out your pre-cut squares allows you to see how the colors interact before you commit to sewing. This stage is vital for the Square Dance Quilt – Pattern because it helps you identify if two similar colors are touching, which might dull the overall effect.
In addition to fabric, your Square Dance Quilt – Pattern requires a reliable sewing machine capable of a straight stitch. A walking foot is highly recommended if you plan to do the final quilting layers yourself, as it helps feed the “quilt sandwich” evenly. For the Square Dance Quilt – Pattern blocks, a standard piecing foot will suffice for those tight, accurate seams.
Marking tools are another “must-have” for the Square Dance Quilt – Pattern. Whether you prefer a water-soluble pen or a chalk pencil, you may need to mark diagonal lines for certain block constructions. Accurate marking ensures that your Square Dance Quilt – Pattern maintains its geometric integrity throughout the various stages of cutting and re-sewing.
Ironing is just as important as sewing when it comes to the Square Dance Quilt – Pattern. A good steam iron and a flat ironing board will help you “press to the dark side,” a common phrase in quilting. This technique ensures that your seams are crisp and that no dark fabric shadows show through the lighter sections of your Square Dance Quilt – Pattern.
Lastly, don’t overlook the importance of a fresh sewing machine needle. Since the Square Dance Quilt – Pattern involves sewing through multiple layers of fabric, a sharp 80/12 or 90/14 needle will prevent skipped stitches. Keeping your equipment in top shape is the best way to ensure your Square Dance Quilt – Pattern looks professional and stays durable for years.
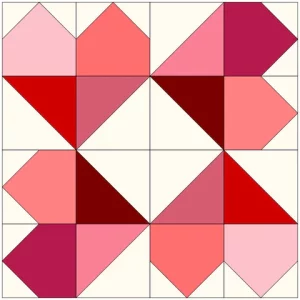
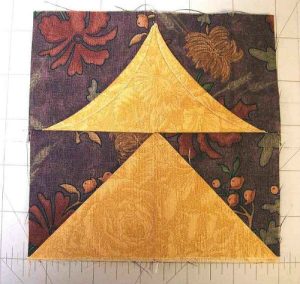
The first step in assembling the Square Dance Quilt – Pattern is creating your primary units, often called “Four-Patch” blocks. You will sew two squares together, then join those pairs to form a larger square. This foundational step of the Square Dance Quilt – Pattern is where you establish your color theme and ensure your seams are nested for a flat finish.
Once your primary blocks are ready, the “magic” of the Square Dance Quilt – Pattern begins with the disappearing act. You will take your completed squares and cut them vertically and horizontally at specific intervals dictated by your quilt pattern. This process creates several smaller units that will eventually be rearranged to form the Square Dance Quilt – Pattern motif.
After the cuts are made, the most exciting part of the Square Dance Quilt – Pattern is the reshuffling. You will flip and rotate the outer pieces while keeping the center stable. This creates the “steps” of the dance. Following a Square Dance Quilt – Pattern map is crucial here, as it’s easy to get turned around during this geometric transformation.
Now, it is time to sew these sub-units back together. As you reconstruct the Square Dance Quilt – Pattern block, use plenty of quilting pins to keep the intersections aligned. A successful Square Dance Quilt – Pattern depends on those “points” meeting perfectly. If your points are off, the “dance” will look a bit clumsy, so take your time with this stage.
Once all your blocks are reconstructed, you will arrange them into rows to form the quilt top. This is where the Square Dance Quilt – Pattern truly comes to life, as the individual blocks merge to create larger secondary patterns. It is often helpful to take a photo of your layout before sewing the rows, as it provides a reference for your Square Dance Quilt – Pattern progress.
The final stage of construction involves adding borders to your Square Dance Quilt – Pattern. Borders act as a frame, containing the movement of the central design and giving the eye a place to rest. Whether you choose a simple thin border or a wide, decorative one, it provides the perfect finishing touch to your Square Dance Quilt – Pattern project.
After the top of your Square Dance Quilt – Pattern is complete, you need to prepare the “quilt sandwich,” which consists of the top, the batting, and the backing fabric. Choosing the right batting—whether cotton, polyester, or a blend—will determine the “loft” and warmth of your Square Dance Quilt – Pattern. Make sure your backing is at least 4 inches larger than the top on all sides.
Basting is the process of temporarily joining the layers of your Square Dance Quilt – Pattern together. You can use safety pins, basting spray, or large hand stitches. For a Square Dance Quilt – Pattern, pin-basting every 4 to 6 inches is usually the most secure method, preventing the fabric from shifting while you perform the final machine quilting.
When it comes to the actual quilting design, you have several options for your Square Dance Quilt – Pattern. You could “stitch in the ditch,” which follows the existing seams, or try Free Motion Quilting (FMQ) to add swirls and curves that contrast with the straight lines of the Square Dance Quilt – Pattern. Modern quilters often prefer simple straight-line quilting to emphasize the geometry.
The binding is the fabric strip that covers the raw edges of your Square Dance Quilt – Pattern. This is a critical step for durability. Most quilters use a double-fold binding for extra strength. Matching the binding to one of the colors in your Square Dance Quilt – Pattern creates a cohesive look, while a striped or patterned binding adds a bit of whimsy.
Before you consider your Square Dance Quilt – Pattern finished, give it a final inspection and trim any loose threads. A gentle wash with a “color catcher” sheet can help soften the fabric and give the quilt that classic, crinkly look. This step also ensures that any excess dye from your Square Dance Quilt – Pattern fabrics doesn’t bleed during future washes.
Properly labeling your Square Dance Quilt – Pattern is the final touch of a true artisan. Include your name, the date, and the name of the pattern on a small fabric tag sewn into a corner of the back. This turns your Square Dance Quilt – Pattern into a cherished heirloom, documenting the hard work and creativity you poured into every single stitch.
Is the Square Dance Quilt – Pattern suitable for beginners? Yes! While it looks complex, the Square Dance Quilt – Pattern is essentially a series of straight lines and simple cuts. As long as you can maintain a consistent seam allowance, you can successfully create this beautiful quilt.
How much fabric do I need for a standard Square Dance Quilt – Pattern? Fabric requirements vary based on the desired size, but for a throw-size Square Dance Quilt – Pattern, you typically need about 3 to 4 yards of assorted prints and 2 yards of a neutral background fabric. Always check your specific pattern instructions for exact measurements.
Can I use pre-cut fabrics like Layer Cakes for this pattern? Absolutely! The Square Dance Quilt – Pattern is very “pre-cut friendly.” Using 10-inch squares (Layer Cakes) is a popular way to jumpstart the process, as it eliminates much of the initial cutting and ensures a coordinated color palette.
What is the “disappearing” technique in quilting? The disappearing technique, used in the Square Dance Quilt – Pattern, involves sewing a simple block, cutting it into smaller pieces, and then rearranging those pieces. This creates a much more intricate design than traditional piecing methods allow.
How do I prevent my corners from being “cut off” in the Square Dance Quilt – Pattern? The secret is the 1/4 inch seam allowance. If your seams are too wide, you will lose the points of your squares when you join the blocks. Using a specialized quilting foot on your machine can help maintain this precision.
What is the best way to wash a completed quilt? For a handmade Square Dance Quilt – Pattern, use cold water on a gentle cycle with a mild detergent. Air drying is best, but you can use a low-heat setting in the dryer if you want to achieve that soft, vintage texture quickly.
The Square Dance Quilt – Pattern is more than just a sewing project; it is a journey into the heart of creative quilting. By understanding the basic blocks, choosing the right materials, following a structured construction process, and applying professional finishing touches, you can create a stunning textile that captures the energy and rhythm of a dance.
This Square Dance Quilt – Pattern guide was designed to help you navigate the complexities of the design while keeping the process enjoyable and rewarding. We hope this article has inspired you to pick up your rotary cutter and start your own quilting adventure.


