
Patchwork Bird Tutorial

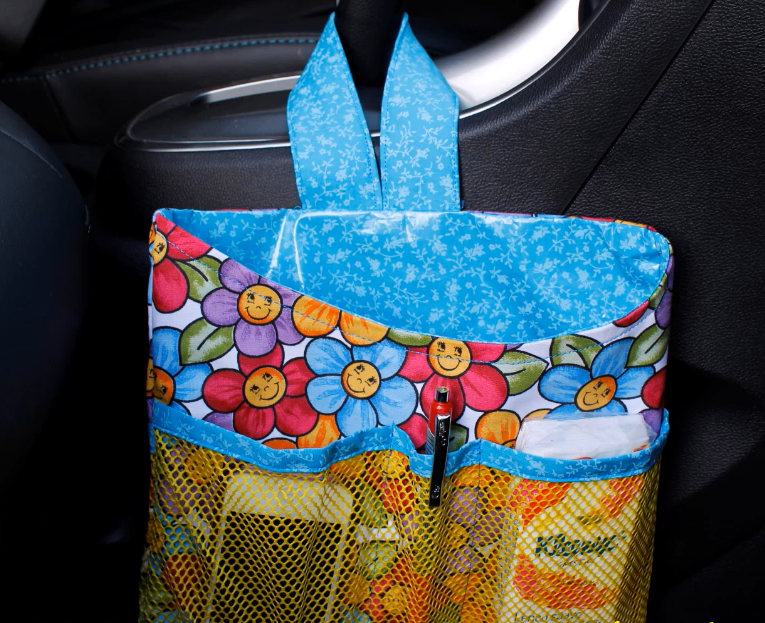
Finding the perfect Fabric Car Organizer- Pattern is the ultimate game-changer for anyone who spends a significant amount of time on the road, whether you are a busy parent, a frequent traveler, or a daily commuter. A car can quickly become a cluttered space filled with loose charging cables, water bottles, snacks, and miscellaneous documents that seem to vanish into the “crevice of no return” between the seats. By utilizing a custom-made storage solution, you can transform your vehicle’s interior into a streamlined, stress-free environment that promotes safety and organization.
When you decide to sew your own Fabric Car Organizer- Pattern, you gain the unique advantage of complete customization, allowing you to tailor the pocket sizes and overall dimensions to fit your specific needs and car model. Unlike store-bought plastic versions that often crack or sag over time, a fabric-based version offers a soft, durable, and washable alternative that feels more like an extension of your car’s upholstery. It is a fantastic weekend project for sewing enthusiasts who want to combine their love for textile crafts with practical, everyday utility.
In this comprehensive guide, we will explore the nuances of selecting and executing a high-quality Fabric Car Organizer- Pattern. From choosing the most resilient materials to mastering the assembly of reinforced pockets, we will cover every detail required to ensure your finished product is both beautiful and functional. Whether you are a beginner looking for a simple layout or an advanced maker aiming for a multi-compartment masterpiece, understanding the structural logic of this sewing pattern will help you achieve professional results that will last for years to come.
The foundation of a successful Fabric Car Organizer- Pattern starts with choosing the right weight and type of fabric. Since the organizer will be subjected to constant movement, varying temperatures, and the weight of various items, you should opt for heavy-duty materials like upholstery fabric, canvas, or denim. These fabrics provide the structural integrity needed to prevent the organizer from drooping when it is fully loaded with tablets, books, or heavy tools.
In addition to the exterior fabric, the choice of interfacing is critical for the success of your Fabric Car Organizer- Pattern. Because standard cotton isn’t stiff enough on its own, applying a heavy-weight fusible stabilizer or even a layer of foam batting can give the organizer a “store-bought” firmness. This ensures that the pockets remain open and accessible, rather than collapsing against the seat back, making it much easier to reach for items while you are focused on the road.
Don’t overlook the importance of the straps and attachment points when following your Fabric Car Organizer- Pattern. Most designs rely on nylon webbing or sturdy fabric ties that loop around the headrest and the bottom of the seat. Using high-quality buckles or industrial-strength Velcro ensures that the organizer stays flush against the seat, preventing it from swinging during sudden stops or sharp turns, which is vital for maintaining a safe driving environment.
Color and print selection for your Fabric Car Organizer- Pattern should ideally complement your car’s interior, but dark colors or busy patterns are often the most practical choice. Since the organizer will likely be kicked by passengers or touched by sticky fingers, a stain-resistant fabric or a dark charcoal canvas will hide wear and tear much better than light-colored alternatives. You can also consider using outdoor fabrics that have built-in UV resistance to prevent fading from sun exposure.
For the pockets of your Fabric Car Organizer- Pattern, incorporating a few sections made of heavy-duty mesh or clear vinyl can be incredibly helpful. Mesh allows for breathability—perfect for holding damp umbrellas or gym clothes—while vinyl allows you to see exactly what is inside a pocket without having to rummage around. These “window” elements add a layer of sophistication to your project and significantly improve its day-to-day usability.
Lastly, consider the “back” of the organizer that sits against the seat. Some quilters and sewers prefer to use a non-slip fabric or a rubberized mesh on the rear panel of their Fabric Car Organizer- Pattern. This extra step provides a grip that keeps the unit from sliding side-to-side, providing a stable and secure fit that feels integrated into the vehicle’s design rather than just hanging loosely.
The most important part of any Fabric Car Organizer- Pattern is the pocket assembly, as this is where all the stress and tension will occur. To ensure longevity, it is highly recommended to use double-stitching or a reinforced “box stitch” at the top corners of every pocket. These areas are prone to ripping over time as people pull items in and out, so taking the extra time to reinforce these points will prevent the seams from failing prematurely.
When cutting your pieces for the Fabric Car Organizer- Pattern, consider adding “bellows” or pleats to the larger pockets. A flat pocket can only hold very thin items like a notebook, but a pleated pocket expands to accommodate bulkier objects like water bottles or a first-aid kit. This architectural detail is what separates a basic organizer from a high-performance one, allowing you to maximize the storage capacity without increasing the overall footprint of the unit.
Elasticated tops are another fantastic feature to include in your Fabric Car Organizer- Pattern. By sewing a channel at the top of a pocket and threading a piece of braided elastic through it, you create a “self-closing” pocket that keeps items from falling out during bumpy rides. This is especially useful for upper pockets that might hold smaller electronics or sunglasses, providing a snug fit that keeps your valuables secure and protected.
If your Fabric Car Organizer- Pattern includes a dedicated space for a tablet or a small laptop, consider adding a layer of quilted padding or fleece lining to that specific compartment. This provides a soft barrier that protects screens from scratches and absorbs some of the vibration from the car. It transforms your organizer into a mobile entertainment hub, which is a lifesaver for keeping passengers occupied during long holiday road trips.
Organizational efficiency in a Fabric Car Organizer- Pattern can also be improved by adding smaller “pen loops” or narrow slots for charging cables. These small details prevent cords from tangling and ensure that you always have a writing utensil handy for quick notes or insurance information. Using grosgrain ribbon or small strips of leftover webbing is an easy and cost-effective way to integrate these high-value features into your design.
Finally, always remember to finish your raw edges. Whether you use a serger, a zigzag stitch, or bias tape, properly finishing the internal seams of your Fabric Car Organizer- Pattern prevents the fabric from fraying over time. Since the organizer will likely be washed or wiped down occasionally, a clean interior finish ensures that the structure remains intact and professional-looking for the duration of its life.
Every vehicle has a different seat configuration, so the most effective Fabric Car Organizer- Pattern is one that is adapted to its specific environment. For example, if you are making an organizer for a minivan or SUV with three rows, you might want a longer version that provides storage for passengers in the very back. Measuring the seat dimensions before you begin cutting your fabric is a crucial step that ensures a tailored, bespoke fit.
For those driving smaller compact cars, a “split” Fabric Car Organizer- Pattern might be more appropriate. Instead of one large panel, you can create two smaller units—one for each front seat. This prevents the back of the car from feeling cramped while still providing essential storage. Smaller organizers are also easier to remove and carry like a bag if you need to take your items with you into a hotel or office.
If you are a frequent camper or “van lifer,” you can adapt your Fabric Car Organizer- Pattern to include heavy-duty hooks or D-rings. These allow you to hang keys, flashlights, or even a small trash bag from the bottom of the organizer. This multi-functional design turns the back of a seat into a vertical tool shed, making it an indispensable part of your adventure gear and helping you stay organized in a small living space.
Parents of toddlers will find that the Fabric Car Organizer- Pattern works best when it includes a “kick plate” at the bottom. This is simply a reinforced section of durable, easy-to-clean fabric (like vinyl or oilcloth) that can withstand the constant scuffing of little shoes. Adding this feature ensures that your beautiful hand-sewn project doesn’t get ruined by mud and dirt within the first week of use.
For the front seat “passenger” version of the Fabric Car Organizer- Pattern, you might focus on accessibility for the driver. This version usually hangs on the front of the passenger seat and features pockets angled toward the driver’s reach. It’s perfect for holding maps, a toll pass, or a hands-free device, ensuring that the driver can access essential items without taking their eyes off the road for more than a second.
Consider the “headrest” attachment carefully. While many versions of the Fabric Car Organizer- Pattern use simple ties, using a contoured strap that follows the shape of the seat helps the organizer sit flat. Some modern cars have integrated headrests that don’t have bars; in this case, your pattern would need a “hood” or a larger loop that slips over the entire top of the seat to stay in place.
When it comes time to assemble your Fabric Car Organizer- Pattern, the order of operations is vital. You should always sew the pockets onto the front panel before you attach the backing or the straps. This allows you to hide all the “ugly” stitching on the inside of the unit. Using a walking foot on your sewing machine is highly recommended during this stage to help feed the multiple layers of thick fabric and interfacing through the machine evenly.
Topstitching is the secret to a high-end look for your Fabric Car Organizer- Pattern. By sewing a decorative line of stitching about an eighth of an inch from the edge of your pockets and main panels, you compress the seams and give the project a crisp, finished appearance. Using a contrasting thread color can make the pockets “pop” and highlight the craftsmanship that went into creating the organizer, turning a utility item into a piece of art.
If you find that your sewing machine is struggling with the thickness of the Fabric Car Organizer- Pattern, try using a “Denim” or “Leather” needle. These needles are designed to pierce through multiple layers of heavy canvas and stabilizer without breaking or skipping stitches. Additionally, using a heavy-duty polyester thread will provide the strength needed to hold the weight of the items you plan to store, as cotton thread may snap under high tension.
Adding a closure system to some of the pockets can improve the security of your Fabric Car Organizer- Pattern. Small magnets, snap buttons, or zippers are all great options for keeping private items out of sight. While zippers add a bit more complexity to the sewing process, they are the most secure way to ensure that nothing spills out if you ever need to remove the organizer and carry it by hand.
For a final touch of personalization, you can add a monogram or a custom label to your Fabric Car Organizer- Pattern. If you have an embroidery machine, adding the car’s name or the owner’s initials to the top panel adds a wonderful bespoke touch. Even a simple “Handmade by…” woven label tucked into a side seam gives the project a sense of pride and professional quality that you can’t get from a factory.
Once the sewing is finished, give your Fabric Car Organizer- Pattern a final press with a heavy iron. Steam the seams flat and check for any loose threads that need trimming. If you used a canvas or a natural fiber, applying a coat of fabric protector spray can help repel liquids and dust, keeping your organizer looking brand new even after months of use in the demanding environment of a vehicle.
1. Is this project suitable for a beginner?
Yes! While it involves multiple layers, most of the sewing consists of straight lines. If you take your time with the Fabric Car Organizer- Pattern and use the correct needle, it is a very manageable project for someone who has completed a few basic bags or pillows.
2. Can I wash my fabric car organizer?
If you use washable fabrics like canvas or denim and a sew-in (rather than cardboard) stabilizer, you can definitely wash it. We recommend a cold cycle and air drying to prevent the Fabric Car Organizer- Pattern from shrinking or losing its shape.
3. What can I use if I don’t have a heavy-duty sewing machine?
If your machine is a basic model, try to avoid the heaviest canvases. Instead, use a sturdy quilting cotton but reinforce it with a very high-quality fusible fleece. This provides structure without the extreme bulk that can stall a standard motor.
4. How do I make sure the organizer fits my specific car?
The best way is to take three measurements: the width of the seat back, the height from the headrest bars to the bottom of the seat, and the distance between the two headrest bars. You can then adjust the Fabric Car Organizer- Pattern dimensions to match these figures.
5. What is the best way to attach the bottom of the organizer?
Most people use a long piece of elastic or webbing that wraps around the base of the seat and clips together. This keeps the Fabric Car Organizer- Pattern from flapping around when the car is in motion.
6. Can I add a tissue box holder to the pattern?
Absolutely. Many people modify their Fabric Car Organizer- Pattern by adding a deep, rectangular pocket at the bottom with a slit in the front. This allows you to pull tissues out easily without removing the whole box from the pocket.
Creating a custom storage solution using a Fabric Car Organizer- Pattern is one of the most practical and satisfying sewing projects you can undertake.
Throughout this article, we have discussed the importance of choosing durable heavy-duty fabrics, the necessity of reinforced stitching for longevity, and how to customize the layout to fit everything from tablets to water bottles. By focusing on quality materials and precise assembly, you can create a tool that significantly improves your daily life on the road.


