
Patchwork Bird Tutorial

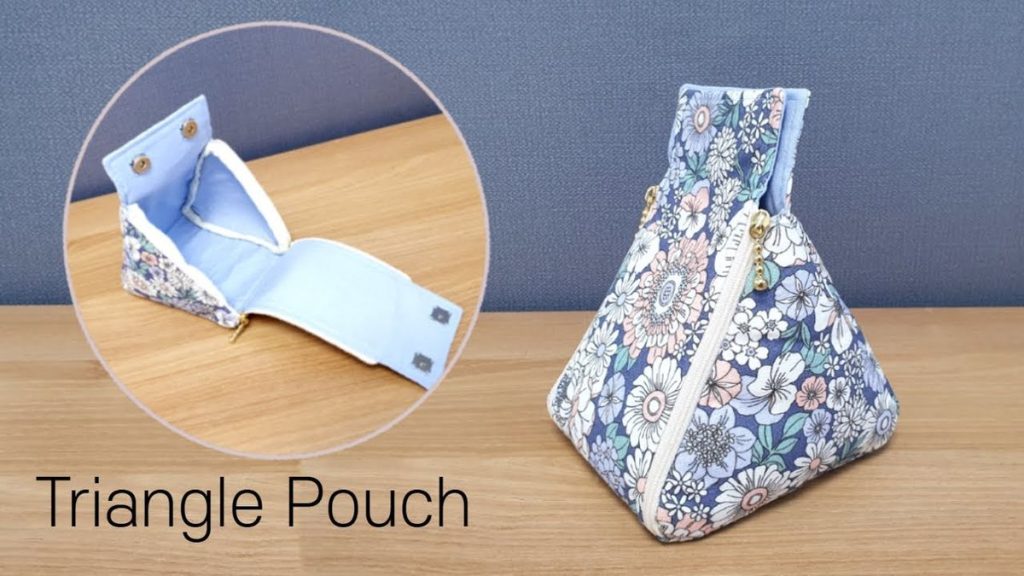
The Triangle Pouch – Pattern is one of the most versatile and charming projects you can undertake, whether you are a seasoned sewist or a curious beginner looking to dip your toes into the world of textiles. This unique geometric design offers a refreshing break from standard rectangular pouches, providing a tactile, three-dimensional shape that is as functional as it is aesthetically pleasing. By mastering this specific pattern, you unlock the ability to create customized gifts, organizational tools, and stylish accessories that stand out due to their clever construction and playful symmetry.
When you start working with a Triangle Pouch – Pattern, you quickly realize that the beauty lies in the simplicity of the math involved. Most designs rely on a specific ratio of length to width—usually a 2:1 ratio—which, when folded and zipped correctly, transforms a flat piece of fabric into a sturdy tetrahedron. This structural magic makes the Triangle Pouch a favorite in the DIY community because it requires minimal materials but yields a high-impact result that looks far more complex than it actually is to assemble.
Diving into this project means engaging with essential sewing concepts like seam allowances, zipper installation, and fabric structural integrity. Choosing the right Triangle Pouch – Pattern ensures that your finished product will be durable enough to hold coins, earphones, or even small craft supplies without losing its iconic shape. Throughout this guide, we will explore the nuances of this design, providing you with the insights needed to select the best fabrics, perfect your technique, and achieve a professional finish that rivals store-bought boutique items.
The core of a Triangle Pouch – Pattern is rooted in geometric precision. Unlike traditional bags, this design utilizes a single rectangular piece of fabric that is folded in a way that creates perpendicular seams. This orientation is what gives the pouch its “3D” or pyramidal look, making it a fascinating study in spatial awareness for makers.
To get started, you need to understand that the Triangle Pouch relies heavily on the placement of the zipper. In this pattern, the zipper acts as the main structural spine. When you sew the ends of the fabric together, one side is sewn flat while the other is pinched in the opposite direction, creating the triangular depth that defines the style.
Material selection is a critical component of any Triangle Pouch – Pattern. While lightweight cotton is excellent for beginners, using a bit of interfacing can provide the “body” necessary to keep the triangles crisp. Many creators prefer using faux leather, cork, or heavy canvas to ensure the pouch maintains its structural integrity even when empty.
Precision cutting is your best friend when following a Triangle Pouch – Pattern. Because the shape depends on the alignment of the corners, even a small deviation in your initial measurements can lead to a lopsided pyramid. Using a rotary cutter and a clear quilting ruler is highly recommended to keep your lines perfectly straight and your angles true.
The Triangle Pouch is often referred to as a “tetrahedron” pouch in high-end design circles. This mathematical term describes a solid with four triangular faces. When you are looking for a pattern, you might see these terms used interchangeably, but they all lead to the same stylish, compact storage solution that fits perfectly in the palm of your hand.
Finally, the Pattern often includes instructions for a small loop or a lobster clasp. Adding a hardware element to your Triangle Pouch transforms it from a simple container into a functional keychain or a clip-on accessory for a larger backpack. This small detail is a hallmark of a well-thought-out professional design.
The most important element of your supply list is the Triangle Pouch – Pattern itself, which serves as your roadmap. Beyond the paper instructions, you will need “fashion fabric” for the exterior and, optionally, a lining fabric. Choosing contrasting colors for the lining can add a “pop” of surprise every time the pouch is opened.
Zippers are the next vital component. For a standard Triangle Pouch – Pattern, a nylon coil zipper is usually preferred because it is easy to sew over and can be trimmed to size. The length of the zipper should match the width of your fabric rectangle, ensuring a seamless transition from the flat edge to the peaked top.
Interfacing is the “secret sauce” of a professional-looking Triangle Pouch. If you are using thin fabric, a fusible fleece or a mid-weight non-woven interfacing will give the pattern the necessary stiffness. This prevents the Triangle Pouch from collapsing or looking “sad” when it isn’t stuffed with items.
Thread choice might seem minor, but for a high-stress item like a pouch, a high-quality polyester thread is best. Since the corners of the Triangle Pouch – Pattern undergo significant tension when the bag is turned right-side out, you need a thread that won’t snap under pressure or during daily use.
Marking tools are indispensable when working with this specific pattern. You will need to mark the center points of your fabric and the “stop” points for your zipper. Using a water-soluble pen or tailor’s chalk ensures that your Triangle Pouch remains clean and free of permanent marks once the assembly is complete.
Lastly, consider your finishing touches. Many modern Triangle Pouch – Pattern enthusiasts like to add a leather pull-tab to the zipper or a small “handmade” label. These small bits of haberdashery elevate the project, making the final Triangle Pouch look like a designer item found in a trendy craft market.
The assembly of a Triangle Pouch – Pattern begins with the zipper installation. You will sandwich the zipper between the exterior fabric and the lining, sewing along the long edge. This “sandwich” method ensures that the raw edges of the zipper tape are hidden, resulting in a clean, professional interior for your pouch.
Once the zipper is attached to both sides of the fabric, you have a tube. The magic of the Triangle Pouch – Pattern happens during the final two seams. You must first sew one end of the tube flat, perpendicular to the zipper. This creates the first “base” line of your geometric shape.
For the second end, you do not sew it flat in the same direction. Instead, you “pinch” the fabric so the zipper sits in the center of the seam. This perpendicular shift is the defining step of the Triangle Pouch – Pattern. It is what pulls the fabric into three dimensions, creating the triangular faces.
Before sewing that final seam, there is one rule you must never forget: open the zipper at least halfway. If you sew the Triangle Pouch shut with the zipper closed, you will be unable to turn it right-side out. This is a common mistake for those new to this pattern, so always double-check before heading to the machine.
Clipping corners is another vital technique. Because the Triangle Pouch – Pattern results in several layers of fabric meeting at the points, you need to trim the bulk carefully. Cutting the corners at a 45-degree angle (without snipping the stitches) allows for much sharper points once the pouch is turned.
The final step is the “turn and press.” Turning the Triangle Pouch through the zipper opening requires a bit of patience. Use a point turner or a dull chopstick to gently push out the corners. A good steam press will set the shape, making your Triangle Pouch – Pattern project look crisp, professional, and ready for use.
One of the best things about a Triangle Pouch – Pattern is its scalability. You can take the basic 2:1 ratio and make a tiny version for airpods or a large version for a geometric toiletry bag. Simply doubling the measurements of the pattern allows you to create a nested set of pouches that look beautiful on a vanity.
Fabric manipulation can also change the entire vibe of the Triangle Pouch. You can use quilting techniques, such as “quilt-as-you-go,” to create a patchwork exterior before cutting out your pattern pieces. This adds texture and a unique artisanal touch to the standard Triangle Pouch silhouette.
Embellishments offer another layer of customization. Since the Triangle Pouch – Pattern has large, flat triangular surfaces, it is the perfect canvas for embroidery, iron-on vinyl, or fabric paint. You can even add “ears” or “tails” to the seams to turn the pouch into a cute animal-shaped character for children.
Hardware upgrades can significantly change the functionality of the pouch. Instead of a standard zipper, try using a metallic zipper for a luxury look. You can also incorporate a “D-ring” into one of the side seams of the Triangle Pouch – Pattern, allowing you to attach a wristlet strap or a decorative tassel.
For those who love organization, the Triangle Pouch – Pattern can be modified to include small interior dividers. While the shape is unconventional, adding a small mesh pocket on one of the interior walls can help keep tiny items like SIM cards or jewelry from rattling around inside the pouch.
Finally, consider the “theme” of your project. Using waterproof fabrics like PUL or laminated cotton turns the Triangle Pouch – Pattern into a perfect “wet bag” for swim goggles or a travel-sized soap container. The versatility of the design ensures that once you master the pattern, you will find a hundred different ways to use it.
What is the best fabric for a Triangle Pouch?
The best fabric is something with a bit of structure, like canvas, denim, or reinforced quilting cotton. If you use a lighter fabric, be sure to apply a firm fusible interfacing to help the Triangle Pouch – Pattern hold its shape.
Can a beginner sew a Triangle Pouch?
Absolutely! The Triangle Pouch – Pattern is considered an advanced beginner project. The most challenging part is the zipper, but since the seams are straight, it is a great way to practice spatial construction.
How do I calculate the size for my pattern?
The golden rule for a Triangle Pouch – Pattern is a 2:1 ratio. For example, if your rectangle is 10 inches long, it should be 5 inches wide. This ensures that when the fabric is folded and sewn, the resulting pyramid is perfectly symmetrical.
Do I need a special zipper for this?
No special zipper is required, but a nylon “all-purpose” zipper is easiest to work with. If your Triangle Pouch – Pattern is small, you can use a longer zipper and simply cut off the excess after sewing it into the seams.
Why are my corners not sharp?
This usually happens because there is too much fabric “bulk” inside the corner. Make sure to trim your seam allowances and use a point turner to gently push the fabric out. Proper pressing with an iron also makes a huge difference in the final look of the pouch.
Can I wash my Triangle Pouch?
This depends on the fabric and interfacing you used. If you used 100% cotton and washable interfacing, you can toss it in the machine. However, if you used leather or “stay-shape” stabilizers, it is better to spot clean the pouch to avoid ruining the structure.
In this guide, we have explored the fascinating world of the Triangle Pouch – Pattern, covering everything from the basic geometric principles to advanced customization techniques. We learned that the secret to a perfect Triangle Pouch lies in the 2:1 fabric ratio, the strategic placement of the zipper, and the perpendicular “pinch” that creates its 3D form.
We also discussed the importance of material choice, such as using interfacing for structure and nylon zippers for ease of use. Whether you are making a tiny keychain or a large storage bag, this pattern offers endless possibilities for creativity and organization.


