
Patchwork Bird Tutorial

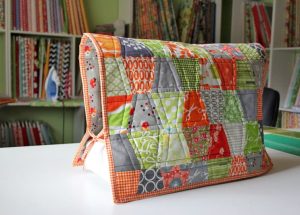
Finding a high-quality Fabric Scissors Holder – Pattern is a game-changer for any sewing enthusiast who values both organization and the longevity of their tools. If you have ever invested in a pair of professional-grade shears, you know that protecting the blades from dust, moisture, and accidental drops is essential for maintaining that razor-sharp edge. A Fabric Scissors Holder – Pattern provides a structured, stylish, and practical solution to keep your most important cutting tools safe while adding a touch of personalized flair to your sewing room or craft corner.
Creating your own scissors case using a dedicated Fabric Scissors Holder – Pattern allows you to customize the fit to your specific tool dimensions, whether you are storing small embroidery snips or large dressmaker shears. Beyond mere protection, these holders serve as a wonderful “scrap-busting” project, enabling you to use up beautiful leftover fabric pieces from larger quilts or garments. When you follow a well-designed sewing pattern, you ensure that the internal lining is smooth enough to prevent snags and the external padding is thick enough to cushion the metal against hard surfaces.
In this comprehensive guide, we will dive deep into everything you need to know about the Fabric Scissors Holder – Pattern, from selecting the right materials to mastering the assembly process. We will explore how to incorporate batting for extra structure and how to add closure elements like buttons or snaps to keep your scissors securely in place. By the end of this article, you will have all the knowledge required to transform a few pieces of cotton into a professional-grade Fabric Scissors Holder – Pattern that looks like it came straight from a high-end boutique.

The success of your Fabric Scissors Holder – Pattern depends heavily on the quality and weight of the fabric you select. For the outer shell, heavyweight cotton or canvas is often the preferred choice because it offers the durability needed to withstand the weight of metal scissors. Using a sturdy fabric ensures that the tips of your shears won’t poke through the material over time, which is a common issue with thinner, delicate fabrics used without reinforcement.
Inside the Fabric Scissors Holder – Pattern, you should prioritize a soft, smooth lining fabric such as high-thread-count cotton or even silk. This prevents any micro-scratches on the surface of your blades and allows the scissors to slide in and out with ease. If you want to get fancy, you can use a contrasting color or a fun print for the lining to give your handmade scissors case a pop of personality every time you open it.
Interfacing is the “secret ingredient” that gives your Fabric Scissors Holder – Pattern its professional, rigid structure. I highly recommend using a fusible fleece or a heavy-duty interfacing between the outer fabric and the lining. This adds a layer of shock absorption that protects your scissors if they happen to fall off your cutting table, ensuring the alignment of the blades remains perfect for years to come.
When it comes to the sewing thread, opt for a strong polyester or a cotton-poly blend that matches your primary fabric. Since a Fabric Scissors Holder – Pattern involves several layers of thick material, your thread needs to be strong enough to hold the seams together under tension. Using a slightly longer stitch length can also help when sewing through these multiple layers to prevent the machine from bunching up the fabric.
Don’t forget the closure hardware, which is a vital part of any Fabric Scissors Holder – Pattern. You can choose from magnetic snaps, decorative buttons, or even hook-and-loop fasteners (Velcro). Magnetic snaps provide a modern, sleek finish, while a vintage button with an elastic loop can give your holder a charming, traditional look that highlights your unique style as a maker.
Lastly, consider adding a small D-ring or a fabric loop to the back of your holder. This simple addition to the Fabric Scissors Holder – Pattern allows you to hang your scissors on a pegboard or attach them to a sewing machine bag for travel. Being able to see your tools at eye level not only saves space but also keeps your workspace organized and ready for your next big creative project.
Before you even touch your fabric with a blade, you must properly prepare the material to ensure the Fabric Scissors Holder – Pattern fits your tools perfectly. Always pre-wash and iron your cotton fabrics to remove any shrinkage that might occur later. There is nothing more frustrating than finishing a beautiful project only to have it warp or shrink the first time it gets a little damp or needs a light cleaning.
Once your fabric is flat and smooth, lay out your Fabric Scissors Holder – Pattern pieces according to the grainline. The grainline is the direction of the threads in the fabric, and following it ensures that your holder doesn’t stretch out of shape during use. Use fine sewing pins or pattern weights to hold the paper template in place while you prepare to cut, ensuring every edge is crisp and accurate.
Accuracy in cutting is paramount when working with a Fabric Scissors Holder – Pattern. Use a rotary cutter and a self-healing mat for the straight edges to get the cleanest possible lines. For the curved sections, such as the flap or the rounded bottom, a pair of sharp fabric shears will give you the control needed to follow the pattern’s contours without jagged edges or fraying.
After cutting the main fabric and lining, you must cut your interfacing and batting. A pro tip for the Fabric Scissors Holder – Pattern is to cut the interfacing slightly smaller than the fabric (about 1/4 inch less) to reduce bulk in the seam allowances. This “grading” technique makes it much easier to turn the project right-side out and results in a much flatter, more professional-looking seam.
Marking your notches and pivot points is the next critical step in the Fabric Scissors Holder – Pattern process. Use a water-soluble marking pen or tailor’s chalk to transfer all the symbols from the pattern onto the wrong side of your fabric. These marks will tell you exactly where to stop sewing, where to place your snaps, and how to align the front and back pieces for a perfect fit.
If you are making a multi-pocket scissors holder, make sure you label each piece as you cut it. It is easy to get confused between the different sizes of pockets in a complex Fabric Scissors Holder – Pattern. Using small sticky notes or numbered clips will keep you organized and ensure that the assembly phase goes smoothly without you having to re-measure everything halfway through the project.
The assembly of a Fabric Scissors Holder – Pattern usually begins with fusing the interfacing to the wrong side of your outer fabric pieces. Follow the manufacturer’s instructions for your iron settings, as too much heat can damage the glue or the fabric. This step is what transforms limp fabric into a sturdy “shell” that can support the weight of heavy metal dressmaking shears.
Next, you will likely sew the pockets onto the front panel of the Fabric Scissors Holder – Pattern. If your pattern features multiple slots, use a walking foot on your sewing machine to help feed the thick layers through evenly. Topstitching the edges of the pockets not only adds a decorative touch but also reinforces the areas that will experience the most “wear and tear” from sliding scissors in and out.
Joining the lining to the outer fabric is the most exciting part of the Fabric Scissors Holder – Pattern. You will usually sew them “right sides together,” leaving a small opening for turning. When sewing around the corners, remember to slow down and pivot with the needle down in the fabric to maintain a sharp, clean angle. This attention to detail is what makes a handmade item look truly high-end.
Before turning the Fabric Scissors Holder – Pattern right-side out, you must clip your curves and trim the corners. This removes excess bulk and allows the fabric to lay flat once it is turned. Be careful not to snip through your stitches! For rounded edges, cutting small ‘V’ shapes into the seam allowance will help the fabric stretch and curve smoothly without puckering.
Once turned, use a point turner or a dull chopstick to push out the corners of your Fabric Scissors Holder – Pattern gently. Give the entire project a very firm press with a steam iron. This “sets” the seams and gives the holder its final, crisp shape. At this stage, you can hand-sew the turning opening closed using a ladder stitch for an invisible finish that hides the raw edges.
The final construction step for the Fabric Scissors Holder – Pattern is the topstitching around the entire perimeter. This isn’t just for looks; it keeps the lining from rolling toward the front and adds one last layer of structural integrity. Use a coordinated or contrasting thread and a slightly longer stitch to create a beautiful frame for your newly finished, custom-made scissors protector.
One of the greatest benefits of using a Fabric Scissors Holder – Pattern is the ability to add decorative embellishments that reflect your personality. Consider adding machine embroidery, appliqué, or even hand-stitched sashiko patterns to the front flap. These artistic touches turn a functional tool into a piece of art that you will be proud to show off at sewing retreats or classes.
You can also adapt the Fabric Scissors Holder – Pattern to include extra features, such as a small loop for a measuring tape or a tiny pocket for a seam ripper. By “hacking” the original pattern, you can create a complete sewing tool kit that keeps all your essential cutting and measuring supplies in one compact, portable location. This makes it much easier to stay organized during complex projects.
If you are making these as gifts, you can use the Fabric Scissors Holder – Pattern to create themed sets. Imagine a holiday-themed holder for a friend who loves Christmas quilting, or a sleek, minimalist black leather version for a professional tailor. Because this project is relatively quick to complete, it makes an excellent handmade gift for any crafter in your life.
Maintenance is simple but important for a fabric-based tool holder. Since it will be sitting on your sewing desk, it may collect thread dust or lint over time. You can easily clean your Fabric Scissors Holder – Pattern by using a lint roller or a damp cloth. If it gets stained, most cotton-based holders can be spot-cleaned with mild detergent and air-dried to keep them looking fresh.
Over time, the interfacing in your Fabric Scissors Holder – Pattern might soften with use. If you notice the holder losing its “snap,” you can often revive it with a quick hit of steam from your iron to re-bond the fusible layers. This keeps the protective shell firm and ensures your fabric shears remain snugly tucked away when not in use.
Finally, remember to always store your scissors with the blades closed inside the Fabric Scissors Holder – Pattern. This protects the tips from being blunted and prevents accidental cuts when you reach into your bag or drawer. A well-made scissors holder is a sign of a craftsman who respects their tools, and with this pattern, you can ensure your equipment stays in peak condition for a lifetime of sewing.
1. Can I use this Fabric Scissors Holder – Pattern for rotary cutters?
Yes! While the shape is optimized for traditional shears, you can easily widen the pocket of the Fabric Scissors Holder – Pattern to accommodate the handle of a rotary cutter. Just measure your cutter’s width and add about an inch for ease and seam allowance.
2. Is this pattern suitable for beginners?
Absolutely. This project is considered beginner-friendly because it involves straight lines and basic assembly. It is an excellent way to practice sewing through multiple layers and learning how to apply interfacing correctly.
3. What is the best way to prevent the scissors from falling out?
The best way is to ensure your Fabric Scissors Holder – Pattern includes a secure closure, like a flap with a magnetic snap. You can also make the pocket slightly snugger so friction helps hold the shears in place.
4. Can I use leather instead of fabric for this pattern?
Yes, but you will need a heavy-duty needle (denim or leather needle) and possibly a Teflon foot for your sewing machine. Leather doesn’t require interfacing, but it provides excellent protection for the sharpest blades.
5. How much fabric do I need for one holder?
Most Fabric Scissors Holder – Patterns are very economical. You typically need less than a quarter yard (or a fat quarter) of both the outer fabric and the lining, making it a perfect project for using up your fabric stash.
6. Do I really need to use interfacing?
Yes, interfacing is highly recommended. Without it, the fabric will be too floppy to hold the weight of the scissors, and the sharp tips could eventually wear through the material. It provides the essential structure for a long-lasting holder.
In this article, we have explored the essential steps to creating a professional and protective Fabric Scissors Holder – Pattern. We covered the best materials to use, emphasizing the importance of heavyweight cotton and interfacing, and walked through the preparation and assembly techniques that ensure a perfect finish.
Whether you are a beginner or an expert, making your own scissors case is a rewarding way to protect your investments and keep your workspace organized and beautiful.


