
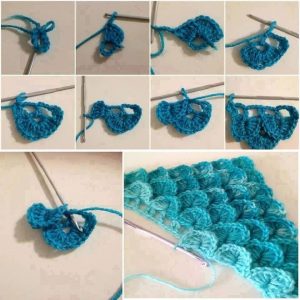
Patchwork Bird Tutorial

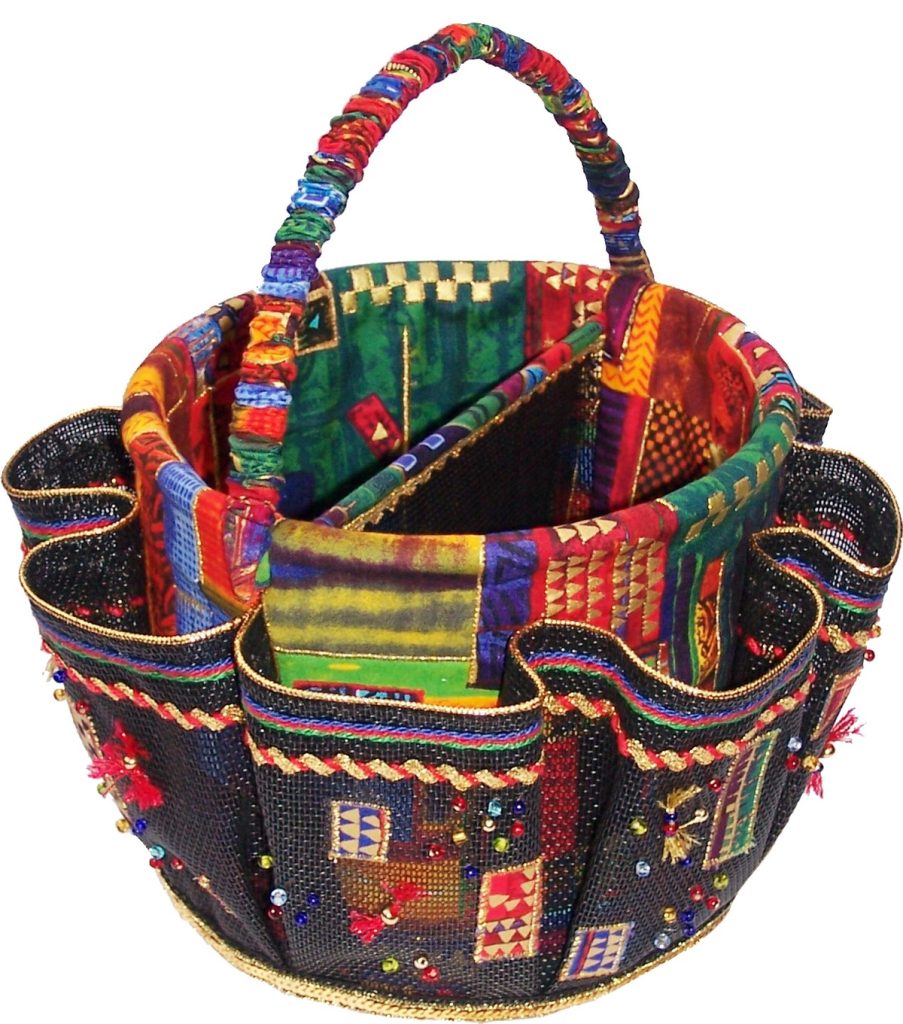
The Bucket and Bag Organizer – Pattern is the ultimate solution for anyone who has ever felt the frustration of digging through a bottomless pit of a tote or a cluttered utility bucket. Whether you are a dedicated crafter, a gardening enthusiast, or a busy parent, having a structured storage system allows you to keep your essential tools within arm’s reach while maintaining a sense of aesthetic order. This specific organizer pattern is designed to be versatile, fitting snugly inside a standard 5-gallon bucket or acting as a standalone insert for large handbags, ensuring that every small item has its own dedicated home.
When you begin working on a Bucket and Bag Organizer – Pattern, you are investing in a project that combines heavy-duty functionality with the charm of handmade creation. Most commercial organizers are made of thin, flimsy plastic that cracks over time, but by using a high-quality fabric pattern, you can choose durable materials like canvas, denim, or reinforced cotton that stand up to the wear and tear of daily use. This DIY organizer approach also allows you to customize the pocket sizes specifically for the items you carry most, whether those are crochet hooks, garden trowels, or baby wipes and bottles.
The beauty of the Bucket and Bag Organizer – Pattern lies in its ingenious engineering, featuring a series of tiered pockets that maximize vertical space without adding unnecessary bulk. By following a sewing or crochet pattern for your organizer, you gain the ability to add reinforced stitching at stress points, ensuring that the pockets don’t sag even when filled with heavier metal tools. In the following sections, we will explore the essential materials, the construction techniques, and the organizational strategies that will turn a simple piece of fabric into a life-changing utility organizer that keeps your life running smoothly.
The first step in successfully executing a Bucket and Bag Organizer – Pattern is selecting a “heavyweight” fabric that provides the necessary structural integrity. Since this organizer will likely be filled with various tools or personal items, you want a base material like duck canvas or a thick upholstery fabric. These materials are naturally stiff, which helps the organizer hold its shape even when it isn’t fully supported by the walls of a bag or bucket.
For the pockets of your Bucket and Bag Organizer – Pattern, you might consider using a slightly lighter but equally durable fabric to avoid making the overall piece too heavy. Reinforced cotton or even a sturdy mesh can work wonders for smaller pockets, allowing you to see exactly what is tucked inside without having to pull everything out. Using a contrasting color for the pocket lining can also help items “pop” against the background, making them easier to find in low-light conditions.
Hardware is another crucial component of a professional Bucket and Bag Organizer – Pattern. You will need high-quality all-purpose thread, preferably a heavy-duty polyester variety that can handle the tension of tight seams. If your version of the bag organizer includes closures, consider using industrial-strength Velcro, metal snaps, or heavy-duty zippers to ensure that your belongings stay secure regardless of how much you move the carrier around.
If you are following a crochet-based Bucket and Bag Organizer – Pattern, the choice of yarn is paramount. I highly recommend using a multi-strand cotton yarn or a t-shirt yarn (trapilho) because they offer minimal stretch and maximum durability. Standard acrylic yarn is often too soft and elastic for an organizer, which could lead to your tools drooping or falling out of the pockets over time as the fibers relax.
Interfacing is the “secret ingredient” that takes a Bucket and Bag Organizer – Pattern from amateur to professional. By applying a fusible fleece or stiff stabilizer to the main panels of your fabric, you give the organizer a “skeleton” that allows it to stand upright on its own. This is particularly important for the “bag” part of the design, where you want the insert to provide structure to a slouchy tote.
Finally, don’t forget about the “grip” factor when choosing materials for your Bucket and Bag Organizer – Pattern. If the organizer is intended for a plastic bucket, adding a layer of non-slip shelf liner or silicone dots to the back of the fabric can prevent the organizer from sliding around as you work. These small material considerations are what make a handmade pattern superior to mass-produced alternatives found in big-box stores.
The core of any effective Bucket and Bag Organizer – Pattern is the layout of the pockets, which should be planned before the first stitch is ever made. A common strategy is to create a “double-decker” system where the outer layer features deep pockets for long tools and the inner layer has smaller, shallower slots for items like pens, scissors, or keys. This tiered approach ensures that no space is wasted and every inch of the organizer pattern is functional.
When sewing the pockets for your Bucket and Bag Organizer – Pattern, it is essential to use pleats or bellows. Instead of sewing a flat piece of fabric directly onto the base, adding a small fold at the bottom of each pocket creates “volume,” allowing the pocket to expand outward to accommodate bulky items. Without these pleats, the pockets will be so tight that you will struggle to fit anything thicker than a ruler inside them.
Reinforcement is a major theme in a high-quality Bucket and Bag Organizer – Pattern. Every pocket opening should be finished with a backstitch or a bar tack at the top corners. These are the areas that experience the most stress when you are pulling tools in and out, and without this extra reinforcement, the seams of your utility bag are likely to rip within the first few weeks of heavy use.
The “bucket” portion of the Bucket and Bag Organizer – Pattern usually involves a large circular base attached to a long rectangular panel. To get the perfect fit, you must measure the circumference of your specific bucket or the interior length of your favorite bag. A well-fitted organizer insert should be snug; if it is too loose, it will collapse inward, and if it is too tight, it will distort the shape of the outer container.
For those using a crochet Bucket and Bag Organizer – Pattern, the construction often relies on the waistcoat stitch or the thermal stitch. These specific crochet stitches create a thick, dense fabric that mimics the look and feel of woven material. They are much sturdier than standard single crochets and provide the “armor-like” quality needed for an organizer that will hold sharp objects like garden shears or knitting needles.
Consider adding a “central divider” to your Bucket and Bag Organizer – Pattern if you are using it for a large tote bag. This divider can serve as a protected sleeve for a tablet or a notebook, keeping it separate from the smaller items in the side pockets. This level of internal organization is the primary reason why crafters seek out a specialized pattern rather than trying to make do with a generic store-bought pouch.
One of the greatest advantages of the Bucket and Bag Organizer – Pattern is its adaptability to specific niches, such as gardening. For a garden bucket organizer, you might add specialized loops for a hand trowel or a mesh pocket for seed packets. Using a water-resistant fabric like oilcloth or treated canvas for this version ensures that mud and moisture won’t ruin your hard work or the tools inside.
If you are a crafter, your Bucket and Bag Organizer – Pattern can be transformed into the ultimate yarn caddy. By adding small grommets to the tops of certain pockets, you can feed your yarn through the holes, allowing you to knit or crochet directly from the organizer without your yarn tangling or rolling across the floor. This makes the organizer pattern an indispensable tool for traveling crafters.
For the busy professional or student, the Bucket and Bag Organizer – Pattern functions as a “mobile office.” In this version, you can prioritize padded pockets for chargers, a specialized slot for a smartphone, and even a hidden zippered compartment for a wallet or passport. This turns any simple backpack or large purse into a highly organized tech bag that keeps you productive on the go.
Parents can utilize the Bucket and Bag Organizer – Pattern as a diaper bag insert. The ability to wash the organizer is a huge plus here, as spills are inevitable. By using a washable cotton pattern, you can easily pull the entire organizer out of the bag and toss it in the laundry. Specialized elastic loops can be added to hold baby bottles upright, preventing leaks that would otherwise ruin the interior of an expensive bag.
Art enthusiasts will find that the Bucket and Bag Organizer – Pattern is perfect for organizing brushes, tubes of paint, and sketchbooks. For this use case, you can vary the heights of the pockets significantly—tall, narrow slots for brushes and wide, flat pockets for palettes. Using a dark-colored fabric for an art organizer is a smart choice to hide the inevitable smudges of charcoal or paint.
Finally, the Bucket and Bag Organizer – Pattern is excellent for automotive organization. Keeping a bucket in the trunk with all your cleaning supplies—sponges, sprays, and microfiber cloths—contained in the organizer prevents them from rolling around while you drive. The sturdy handle of the bucket, combined with the organized pockets, makes it easy to carry all your car-detailing supplies out to the driveway in one trip.
To ensure your Bucket and Bag Organizer – Pattern lasts for years, you must pay attention to how you “finish” the edges. If you are sewing with fabric, using a serger or a zigzag stitch on all raw edges prevents fraying. For a crochet organizer, always weave in your ends securely using a sharp needle, passing the yarn through the stitches in several different directions to lock it in place.
Cleaning your Bucket and Bag Organizer – Pattern depends heavily on the materials used. If you used high-quality cotton or canvas, a gentle machine wash and air drying will usually suffice. However, if your organizer includes stabilizers or cardboard inserts for extra stiffness, you should stick to spot cleaning with a damp cloth and mild detergent to avoid warping the internal structure.
Over time, certain pockets in your Bucket and Bag Organizer – Pattern may begin to stretch if you constantly overfill them. To prevent this, you can sew a strip of twill tape or bias tape along the top edge of each pocket. This acts as a “non-stretch” border that maintains the original dimensions of the pocket, ensuring that your items stay snug and secure even after months of use.
If you find that the organizer is slipping down inside your bucket, you can add a simple “over-the-rim” flap to your Bucket and Bag Organizer – Pattern. By extending the top fabric panel and adding an elasticized edge, the organizer can hook over the lip of the bucket, keeping it perfectly suspended and preventing it from bunching up at the bottom.
Storing your Bucket and Bag Organizer – Pattern when not in use is easy because most fabric or crochet versions can be folded flat. However, if you have used heavy stabilizers, it is best to store the organizer inside the bucket or bag it was designed for to maintain its shape. Keeping it away from direct sunlight will also prevent the fabric colors from fading, especially if you used vibrant or dark shades.
Ultimately, the longevity of your Bucket and Bag Organizer – Pattern comes down to the quality of your craftsmanship. Taking the time to double-stitch your seams and choosing the right weight of fabric pays off in the long run. A well-made handmade organizer is not just a project; it is a durable tool that will save you time and stress every single day by keeping your world neatly tucked into its proper place.
1. What is the best bucket size for the Bucket and Bag Organizer – Pattern?
The most common size used for this organizer pattern is the standard 5-gallon utility bucket found at hardware stores. However, the pattern can easily be scaled down for 2-gallon buckets or even small desktop bins depending on your specific storage needs.
2. Can I make this organizer without a sewing machine?
While a sewing machine is faster and provides stronger seams for the Bucket and Bag Organizer – Pattern, it can certainly be sewn by hand using a strong backstitch. Alternatively, you can find crochet patterns for this organizer that require no sewing at all, other than weaving in the yarn ends.
3. How do I make the pockets stay upright and not sag?
The secret to non-sagging pockets in your Bucket and Bag Organizer – Pattern is using a combination of heavy fabric and interfacing. Additionally, sewing “vertical dividers” between pockets provides extra tension that helps the fabric stay taut and upright against the container walls.
4. Is this project suitable for beginners?
Yes! A basic Bucket and Bag Organizer – Pattern is mostly comprised of straight lines and simple shapes. It is an excellent project for a beginner to practice measuring, cutting, and basic assembly. The crochet version is also beginner-friendly as it mainly uses the single crochet stitch.
5. How much fabric do I need for a full bucket organizer?
Generally, you will need about 1.5 to 2 yards of heavy fabric for a standard Bucket and Bag Organizer – Pattern. This allows for the main body panels, the tiered pocket layers, and any additional straps or reinforcements you might want to add.
6. Can I use this pattern to organize my car’s interior?
Absolutely! The “bag” version of the Bucket and Bag Organizer – Pattern is perfect for car consoles or hanging on the back of a headrest. It keeps things like maps, chargers, snacks, and umbrellas organized and prevents them from cluttering the seats or floors.
In this article, we have explored the multifaceted world of the Bucket and Bag Organizer – Pattern, discussing how to choose the right heavy-duty fabrics, the strategy behind efficient pocket layout, and how to customize the design for various hobbies.
We’ve seen that whether you are organizing a garden bucket or a designer tote, a well-structured handmade organizer provides a level of customization and durability that commercial products simply cannot match. By focusing on reinforced seams, tiered storage, and the right stabilizers, you can create a functional masterpiece that brings order to your daily tasks.


