
Patchwork Bird Tutorial

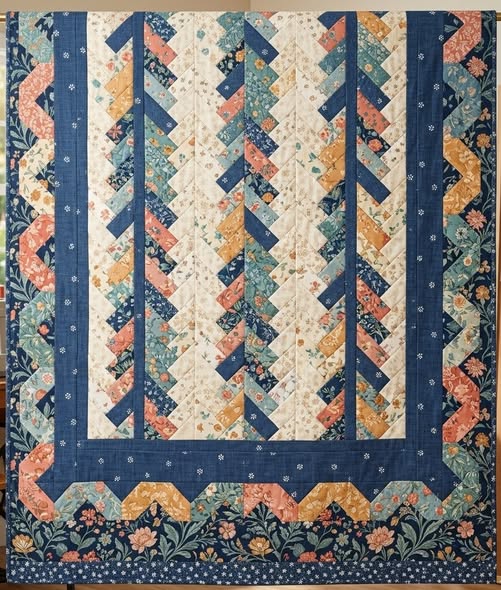
A French Braid Quilt- Tutorial is the perfect way to bring a sense of movement and sophisticated design to your sewing room without needing a degree in advanced geometry. This specific pattern mimics the intricate look of a hair braid, using fabric strips to create a cascading, “V-shaped” visual effect that flows beautifully across the bed or wall. If you have been looking for a project that utilizes your fabric stash while producing a professional-looking result, this French Braid Quilt- Tutorial will guide you through every snip and stitch required to master the technique.
The beauty of the French Braid Quilt- Tutorial lies in its versatility and the way it plays with color gradients. By selecting fabrics that range from light to dark, or by mixing vibrant prints with muted solids, you can create a 3D effect that appears much more complex than it actually is. Many quilters find this style meditative because once you understand the rhythm of adding the accent squares and the side strips, the quilt top grows surprisingly fast, making it a favorite for handmade gifts and home decor.
In this comprehensive French Braid Quilt- Tutorial, we are going to break down the essential steps to ensure your seams stay crisp and your “braids” stay straight. Precision is your best friend here, as the diagonal nature of the design can sometimes lead to stretching if not handled with care. Whether you are a seasoned pro or a curious beginner, following this guide will help you navigate the nuances of strip quilting, seam nesting, and color value to create a stunning masterpiece that stands the test of time.
To begin your French Braid Quilt- Tutorial, you first need to gather the right tools, including a rotary cutter, a self-healing mat, and a high-quality acrylic ruler. Having these tools ensures that every strip is cut to the exact same width, which is the secret to a braid that doesn’t wobble.
Selecting your fabric is perhaps the most creative part of the French Braid Quilt- Tutorial. Most quilters prefer using 2.5-inch strips, often found in pre-cut jelly rolls, which saves a massive amount of cutting time. However, using scraps can give your quilt a charming, “scrappy” personality.
The concept of color value is vital when choosing your palette. For the braid to “pop,” you should organize your fabrics in a sequence, such as moving from a pale cream to a deep navy. This transition creates the “braided” depth that makes the French Braid Quilt- Tutorial so visually striking.
Don’t forget the cornerstones or accent squares. These are the small squares (usually the same width as your strips) that sit at the center of the braid. Choosing a consistent neutral fabric for these squares helps ground the design and gives the eye a place to rest.
You will also need a high-quality cotton thread in a neutral color like gray or tan. Since you will be sewing many small seams, using a 50wt thread prevents the seam allowances from becoming too bulky, which helps the quilt top lie flat once it is finished.
Finally, ensure you have plenty of quilting pins or clips. Because the French Braid Quilt- Tutorial involves sewing strips at an angle, pinning is crucial to prevent the fabric from shifting. A well-pinned project leads to a symmetrical quilt that looks great from every angle.
The first technical step in this French Braid Quilt- Tutorial is cutting your fabric into uniform rectangles. If you are using a standard design, you might cut your strips into $2.5 \times 8.5$ inch pieces. Consistency is the primary rule of precision quilting to ensure the points align.
Once your strips are cut, you must prepare the starter block. Every braid needs a beginning, which is usually a square or a small triangle. In this French Braid Quilt- Tutorial, we recommend starting with a center square that matches the width of your strips to keep the math simple.
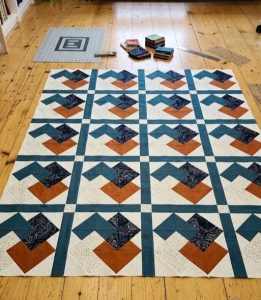
Organization is key during the preparation phase. Arrange your strips in the order you plan to sew them. Many experts in quilt design suggest laying them out on a design wall or a large table to visualize the color flow before the first stitch is even taken.
Remember to cut your accent squares (the cornerstones) at this stage as well. If your strips are 2.5 inches wide, your accent squares should be $2.5 \times 2.5$ inches. These small pieces act as the “anchor” for each layer of the braid in this French Braid Quilt- Tutorial.
Before sewing, it is a good habit to starch your fabric. Since the braid involves some bias edges, starching adds stiffness to the cotton, preventing the fabric from stretching out of shape. This is a pro-tip for any French Braid Quilt- Tutorial to maintain crisp lines.
Check your seam allowance settings on your sewing machine. This project relies on a scant 1/4 inch seam. If your seams are too wide or too narrow, the braid will begin to curve left or right rather than staying in a straight, vertical column.
Now we reach the heart of the French Braid Quilt- Tutorial. You start by sewing one strip to the side of your starter square. Then, you sew the next strip to the adjacent side, overlapping the end of the first strip. This alternating pattern creates the “fold-over” look of a braid.
After adding a pair of strips, you will sew your accent square to the end of the next strip before attaching it to the main body. This is a rhythmic process. In this French Braid Quilt- Tutorial, you are essentially building the quilt one “v-wing” at a time.
Pressing is just as important as sewing. Always press your seams toward the newest strip added. This keeps the front of the quilt looking smooth and prevents the darker fabrics from showing through the lighter ones, a common issue in quilt construction.
As the column grows longer, you will notice the ends look jagged. Don’t worry! This is normal for a French Braid Quilt- Tutorial. Once the column reaches your desired length (like 60 or 72 inches), you will use a long ruler to trim the sides into a perfectly straight line.
Repeat this process to create multiple columns. Depending on the size of your bed, you might need anywhere from five to ten columns. The French Braid Quilt- Tutorial focuses on these individual units, which are later joined by sashing strips to separate the braids.
The final step for the columns is adding the stay-stitching. Run a line of stitching 1/8 inch from the edge of the trimmed columns. This prevents the seams from popping open when you handle the heavy fabric during the final quilt assembly phase.
The penultimate phase of our French Braid Quilt- Tutorial involves joining your beautiful braided columns together. To make the braids stand out, we highly recommend adding sashing. A solid black or white sashing strip acts as a frame, highlighting the intricate work within the braids.
When pinning the columns to the sashing, match up any points if possible, though the nature of the French Braid Quilt- Tutorial is quite forgiving. Use plenty of pins to manage the length of the quilt, ensuring the weight of the fabric doesn’t cause uneven feeding through the machine.
Once the top is assembled, it is time for the quilt sandwich. Lay out your backing fabric, then your batting (cotton or wool works best), and finally your finished quilt top. Smooth out any wrinkles carefully to ensure a professional finish to your French Braid Quilt- Tutorial.
For the actual quilting pattern, you can choose “stitch-in-the-ditch” to hide the thread, or an “all-over” swirl pattern to add contrast to the straight lines. Many who follow this French Braid Quilt- Tutorial prefer simple diagonal lines that follow the direction of the braid itself.
Adding the binding is the final victory. Choose a fabric that complements the darkest color in your quilt. Machine-sewing the binding to the front and hand-stitching it to the back provides that classic, high-quality look that every French Braid Quilt- Tutorial deserves.
Finally, give your quilt a good steam press. This sets the stitches and allows the fibers to relax into their new shape. Your French Braid Quilt- Tutorial project is now a finished heirloom, ready to provide warmth and beauty to your home for years to come.
Is the French Braid Quilt suitable for beginners?
Yes! While it looks complicated, it is essentially just sewing rectangles together. If you can maintain a consistent seam allowance and follow a French Braid Quilt- Tutorial, you can successfully finish this project.
What size should the strips be?
The most common size is 2.5 inches wide by 8.5 inches long, but the French Braid Quilt- Tutorial can be adapted to any size. Just ensure all your strips are uniform to keep the braid symmetrical.
How do I prevent the columns from bowing or curving?
Bowing usually happens due to uneven seam allowances or stretching the fabric. Using starch and sewing columns in alternating directions (one from top-to-bottom, the next from bottom-to-top) can help keep the quilt top square.
Can I use a Jelly Roll for this project?
Absolutely. A Jelly Roll is perfect for a French Braid Quilt- Tutorial because the 2.5-inch width is already cut for you. You will just need to sub-cut the long strips into the shorter lengths required for the braid.
How much fabric do I need for a lap-sized quilt?
Generally, you will need about 2 to 3 yards of various colored fabrics for the braids, plus 1.5 yards for sashing and borders. Always check the specific requirements of your French Braid Quilt- Tutorial plan before purchasing.
Do I have to use accent squares (cornerstones)?
While not strictly mandatory, the accent squares are a hallmark of the French Braid Quilt- Tutorial. They help define the center of the braid and make the “braiding” effect much more obvious to the eye.
Mastering the French Braid Quilt- Tutorial is a rewarding journey that transforms simple strips of fabric into a dynamic work of art.
We have covered everything from selecting the right color values and tools to the rhythmic process of assembling columns and finishing the edges. This quilt style is a fantastic way to experiment with color theory and improve your precision sewing skills. By following this guide, you now have the foundation to create a quilt that looks like a complex masterpiece but was actually a joy to construct.


