
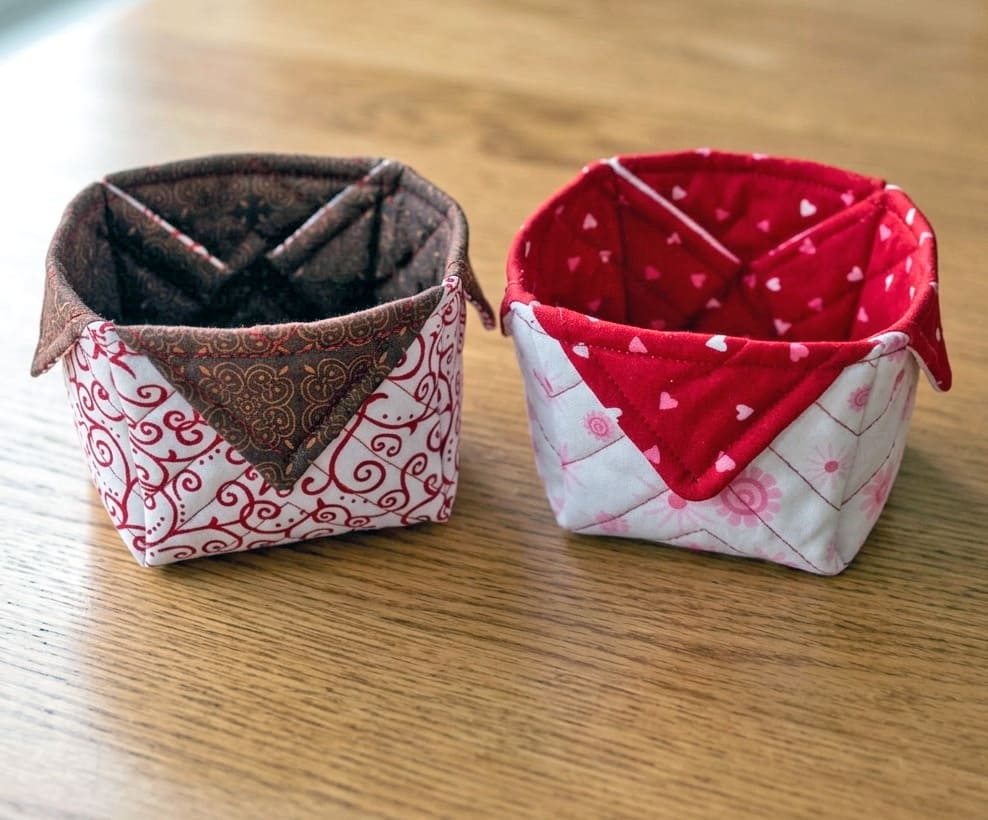
Patchwork Bird Tutorial

Fabric Box – Tutorial is the ultimate guide for anyone looking to organize their home with a personal, artistic touch while honing their sewing skills. Creating a fabric box is more than just a functional project; it is a way to breathe life into leftover textiles and transform a simple space into a curated environment. Whether you are an experienced seamstress or a beginner picking up a needle for the first time, this DIY fabric container project offers a rewarding experience that combines utility with aesthetic appeal.
In the world of creative sewing, the fabric box stands out because of its incredible versatility and the minimal tools required to achieve professional results. By following this step-by-step sewing guide, you will learn how to select the right interfacing, master the art of box corners, and create a sturdy structure that can hold everything from craft supplies to nursery essentials. The beauty of a handmade storage bin lies in the ability to customize every detail, from the vibrant cotton prints to the specific dimensions that fit your shelving perfectly.
This Fabric Box – Tutorial is designed to provide you with all the technical knowledge needed to produce high-quality, durable fabric bins that look like they were plucked from a boutique store. Throughout this article, we will explore the nuances of fabric stabilization, the importance of precise seam allowances, and how to finish your project with a clean, professional look. By focusing on these SEO-optimized sewing techniques, you are not just making a box; you are mastering a skill set that can be applied to countless other patchwork and home decor projects.
To start your Fabric Box – Tutorial, the first step is choosing the right base fabric. Medium to heavy-weight cotton canvas or linen works best for the exterior to ensure the box maintains its shape over time. If you prefer using lighter quilting cotton, you can still achieve great results by doubling up on the internal support.
The secret to a non-floppy DIY fabric organizer is high-quality fusible interfacing. This material is ironed onto the wrong side of your fabric to add stiffness and structure. For a truly rigid fabric box, many crafters recommend using Pellon Peltex or a similar heavy-weight stabilizer that mimics the feel of cardboard but remains flexible enough to sew.
You will also need to select a lining fabric that complements your exterior design. This is a great opportunity to use contrasting colors or playful patterns that peek out from the inside. Ensure both fabrics are pre-washed and ironed before you begin cutting to prevent any future shrinkage that could warp your sewing project.
In addition to your textiles, gather essential sewing notions such as a rotating cutting mat, a sharp rotary cutter, and an acrylic ruler. Precision is the foundation of a successful Fabric Box – Tutorial, as even a small discrepancy in measurements can lead to a lopsided container. Having these tools ready will streamline your workflow significantly.
Don’t forget to choose a high-strength polyester thread that matches your fabric. Since fabric boxes often hold weight, the stitching needs to be durable. A standard universal needle (size 80/12 or 90/14) is usually sufficient for most home decor fabrics, ensuring smooth penetration through multiple layers.
Lastly, consider adding decorative elements like handles made from leather straps or cotton webbing. These small additions not only make the handmade bin more functional but also elevate the overall design. Preparing all these components beforehand ensures that your fabric box construction remains an enjoyable and stress-free creative process.
Precision cutting is a vital part of this Fabric Box – Tutorial. You will typically need two rectangles for the exterior and two for the lining. If you want a perfectly square storage container, ensure your measurements are consistent across all pieces. Using an acrylic ruler helps in achieving those sharp 90-degree angles necessary for a professional finish.
Once your pieces are cut, it is time to apply the fusible stabilizer. Place the glue side of the interfacing against the wrong side of your exterior fabric. Using a hot iron with plenty of steam, press firmly for several seconds. This process, known as bonding, is what gives your fabric box its structural integrity and “stand-up” quality.
Some advanced sewing patterns suggest applying interfacing to the lining as well. This creates an even sturdier storage solution, which is ideal if you plan on storing heavier items like books or tools. If you choose this route, ensure your ironing board is clean to avoid any adhesive transfer onto your beautiful fashion fabrics.
After the pieces are fused, let them cool completely on a flat surface. Moving the fabric while it is still warm can cause the interfacing to ripple or peel away. This patience in the Fabric Box – Tutorial process ensures a smooth, professional-looking surface that is free from bubbles or creases.
Marking your box corners is the next technical step. On the bottom corners of your rectangles, you will cut out small squares (for example, 2×2 inches). The size of these cutouts determines the depth and width of your finished DIY container. Use a fabric marker or tailor’s chalk to ensure these marks are visible but won’t show on the final product.
Accuracy during this phase of the Fabric Box – Tutorial cannot be overstated. When you cut the corner squares, you are essentially defining the three-dimensional shape of the object. Take your time to measure twice and cut once, as this is the moment where your flat fabric panels begin their transformation into a functional 3D storage box.
Now we move into the assembly phase of our Fabric Box – Tutorial. Place your two exterior pieces right sides together and pin along the sides and the bottom edge. Using a 1/4-inch seam allowance, sew these three sides, making sure to backstitch at the beginning and end to secure the seams against future stress.
The magic happens when you “box” the corners. Pull the front and back fabric apart at the corner cutouts and match the side seam with the bottom seam. This creates a straight line across the opening. Pin this flat and sew across. This sewing technique is what gives the fabric box its flat bottom and allows it to stand upright.
Repeat this exact process for the lining fabric. However, there is a crucial “pro-tip” for this Fabric Box – Tutorial: leave a 3-4 inch opening in the bottom seam of the lining. This gap, often called a turning hole, is essential for reversing the box right side out once the exterior and lining are joined together.
When sewing the lining, some people prefer to use a slightly larger seam allowance. This makes the lining just a tiny bit smaller than the exterior, which prevents it from bunching up inside the finished handmade organizer. A snug lining is a hallmark of a high-quality DIY sewing project and provides a much cleaner interior look.
Once both the outer shell and the lining are prepped, it is time to nest them. Turn the exterior box right side out and keep the lining wrong side out. Slip the exterior box inside the lining so that the right sides of the fabric are touching. Align the top raw edges and the side seams perfectly, using sewing clips to hold them in place.
Sew all the way around the top circumference of the box. This step of the Fabric Box – Tutorial requires a bit of maneuvering around the arm of your sewing machine. Slow and steady wins the race here; ensuring a consistent distance from the edge will result in a perfectly level top rim for your custom fabric bin.
The final stage of the Fabric Box – Tutorial involves the “birth” of your box. Reach through the opening you left in the lining and gently pull the exterior fabric through. It might feel like a tight squeeze, especially with heavy-weight interfacing, but take your time to avoid ripping any stitches. Once turned, tuck the lining into the exterior.
Use a point turner or a blunt chopstick to push out the corners of the box. Sharp, well-defined corners are what separate a beginner’s fabric box from a professional-grade home accessory. Spend a few minutes smoothing out the seams and ensuring the lining sits flat against the bottom and sides.
Now, head back to the ironing station. Press the top edge of the box firmly, ensuring the lining doesn’t peek out over the top of the exterior fabric. A crisp, pressed edge makes the upcoming topstitching much easier and significantly improves the aesthetic quality of your sewing tutorial results.
Topstitching is the final secret to a high-end look. Sew a line of stitching about 1/8 inch from the top edge all the way around the box. This not only looks decorative but also secures the lining in place and adds one last layer of structural reinforcement to your Fabric Box – Tutorial project.
Before you consider the project finished, you must close the hole in the lining. You can do this quickly with a topstitch on your machine or use a ladder stitch (hand sewing) for an invisible finish. The ladder stitch is highly recommended for boutique-style crafts where you want every detail to look flawless.
Congratulations, you have completed the Fabric Box – Tutorial! You now have a beautiful, durable, and functional fabric container. Whether you use it to hold sewing thread, jewelry, or keys, you’ve mastered the essential skills of measuring, interfacing, boxing corners, and finishing. These versatile bins make excellent gifts and are a fantastic way to keep your home organized with handmade charm.
What is the best fabric for a fabric box?
For the best results in this Fabric Box – Tutorial, use medium-weight cotton canvas, duck cloth, or linen. These fabrics have the inherent strength to support the weight of the box. You can use lighter quilting cotton, but you must use a very stiff interfacing to prevent the box from collapsing.
How do I make my fabric box stand up straight?
The key to a standing box is interfacing. Without a heavy-weight stabilizer, the fabric will be too limp. Using products like Pellon 71F Peltex or even two layers of decor-bond will provide the “stiffness” required to keep the sides upright and the corners sharp.
Can I wash my handmade fabric box?
Yes, but it depends on the interfacing used. If you used sew-in stabilizer, it usually handles machine washing well. However, if you used fusible interfacing, frequent washing might cause the glue to de-bond, leading to wrinkles. Spot cleaning is generally recommended for handmade fabric bins.
What size should the corner cutouts be?
In a standard Fabric Box – Tutorial, a 2×2 inch square is common. The larger the square you cut out, the wider the base of your box will be, and the shorter the sides will become. You can experiment with different sizes to create “trays” (large cutouts) or “tall bins” (small cutouts).
Do I need a special sewing machine for this?
No, a standard domestic sewing machine can handle this project. However, since you will be sewing through multiple layers of fabric and thick interfacing, it is helpful to use a walking foot and a fresh, sharp denim needle to prevent skipped stitches or broken thread.
How can I make the box larger?
To scale up this Fabric Box – Tutorial, simply increase the size of your initial rectangles. Just remember that as a box gets larger, it needs even more structural support. For very large bins, some crafters insert a piece of plastic canvas or heavy cardboard between the lining and exterior for extra stability.
In this Fabric Box – Tutorial, we have covered every essential step to creating a professional-grade storage solution from scratch. We started by selecting high-quality textiles and the indispensable interfacing that provides the necessary structure.
We then moved through the technical phases of precision cutting, boxing corners, and nesting the lining to ensure a clean, durable finish. Finally, we emphasized the importance of topstitching and pressing to achieve that “store-bought” look with a handmade soul.


