
Patchwork Bird Tutorial

The Square-in-a-Square Quilt Block – Tutorial is a fundamental guide for any quilter looking to master the art of geometric precision and visual depth in their textile projects. This classic design, often referred to as a “diamond in a square,” serves as the backbone for countless traditional patterns and modern minimalist layouts alike. By learning the specific techniques involved in this Square-in-a-Square Quilt Block – Tutorial, you gain the ability to create dynamic secondary patterns that make your quilts look far more complex than they actually are to assemble.
Mastering the Square-in-a-Square Quilt Block – Tutorial requires a focus on accurate cutting and consistent seam allowances, which are the pillars of successful quilting. Many beginners find this block intimidating because of the on-point setting of the center square, but with the right approach, it becomes a fast and repetitive process that is perfect for chain piecing. This article will walk you through every nuance of the construction, ensuring your corners remain sharp and your proportions stay perfectly balanced throughout your creative journey.
As we dive into this Square-in-a-Square Quilt Block – Tutorial, remember that fabric selection plays a massive role in how the final block is perceived. Using high-contrast colors between the center square and the triangular corners can create a “popping” effect, while tonal variations offer a more subtle, sophisticated texture. Whether you are aiming for a rustic farmhouse aesthetic or a vibrant contemporary wall hanging, this tutorial provides the technical foundation needed to execute your vision with professional-grade results and SEO-optimized precision.
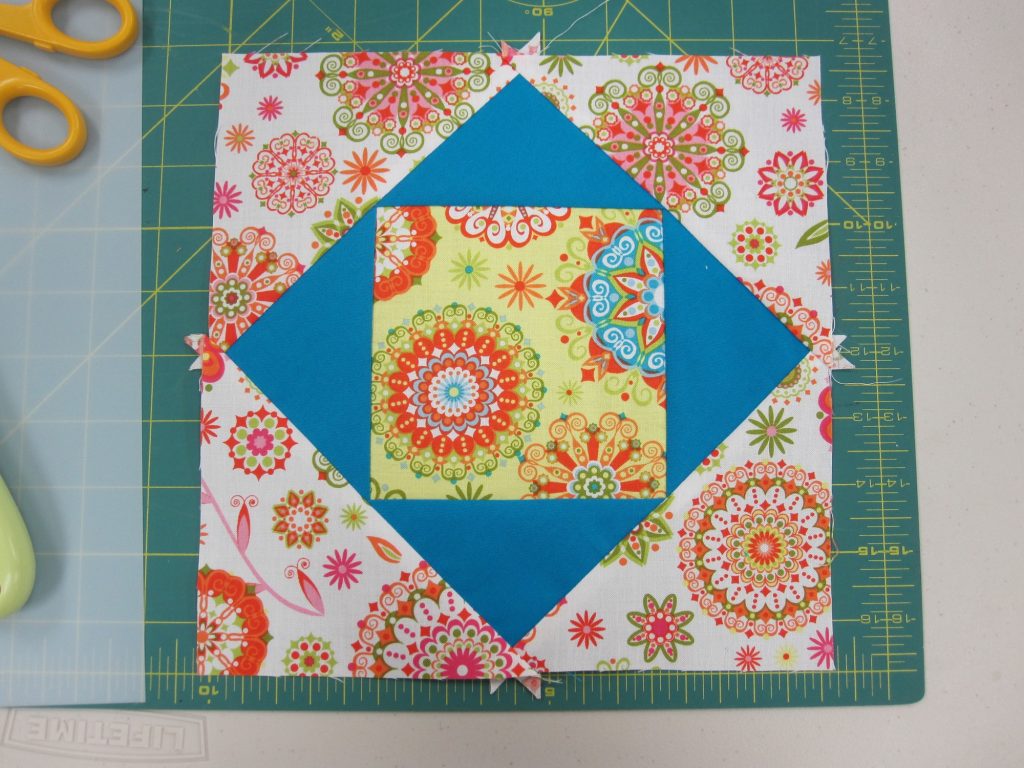
The Square-in-a-Square Quilt Block – Tutorial begins with understanding the geometry of the pieces involved. At its core, this block consists of one large central square surrounded by four half-square triangles or corner triangles. When these triangles are sewn onto the sides of the center, they transform a standard square into a diamond shape sitting perfectly within another square.
To achieve success in this Square-in-a-Square Quilt Block – Tutorial, you must understand the concept of the finished size versus the unfinished size. A finished size is what the block measures once it is sewn into the quilt top, while the unfinished size includes the quarter-inch seam allowance on all sides. Keeping these measurements straight is vital for a flat and functional quilt.
Precision is the most important keyword when discussing the Square-in-a-Square Quilt Block – Tutorial. If your center square is even a fraction of an inch off, the surrounding triangles will not align correctly, leading to “chopped off” points. This tutorial emphasizes using a rotary cutter and a nonslip quilting ruler to ensure every piece of fabric is squared up before the first stitch is ever taken.
Another key element of this Square-in-a-Square Quilt Block – Tutorial is managing the fabric grain. Because the corner triangles are often cut from squares sliced diagonally, you will encounter bias edges. Bias edges are stretchy and can easily warp under the heat of an iron or the pull of a sewing machine, so handling your fabric gently is a skill we prioritize here.
In this Square-in-a-Square Quilt Block – Tutorial, we also explore the mathematical formulas used to calculate the sizes of your starting pieces. Generally, to find the size of the corner squares that will be cut into triangles, you need to account for the seam allowance and the diagonal length of the center square. This ensures that the outer points of your diamond have exactly 1/4 inch of “floating” space.
Finally, the Square-in-a-Square Quilt Block – Tutorial highlights the importance of the fussy cutting technique. This is where you center a specific motif from your fabric—like a flower or a geometric shape—inside the middle square. Fussy cutting elevates the design, making the block look customized and high-end, which is a favorite trick among professional quilt designers and bloggers.
Before starting the sewing portion of the Square-in-a-Square Quilt Block – Tutorial, you must gather the right supplies to ensure a smooth workflow. High-quality 100% cotton quilting fabric is the gold standard for this project because it holds its shape well and presses beautifully. You will need at least two contrasting fabrics to make the Square-in-a-Square design clearly visible and aesthetically pleasing.
Preparation is a vital step in the Square-in-a-Square Quilt Block – Tutorial that many enthusiasts skip. We highly recommend pre-washing your fabric to check for color bleeding, especially if you are using dark reds or blues against a white background. After washing, use a fabric starch or alternative sizing spray to give the material extra crispness, which makes cutting much more accurate.
In terms of hardware, this Square-in-a-Square Quilt Block – Tutorial suggests using a size 80/12 universal needle or a 90/14 quilting needle in your sewing machine. Pair this with a high-quality 50wt cotton thread that matches your lighter fabric. Using a thin, strong thread reduces bulk in the seams, allowing the block to lay completely flat once it is fully assembled and pressed.
The Square-in-a-Square Quilt Block – Tutorial also requires a quarter-inch presser foot. This specific foot helps you maintain a consistent distance from the needle to the edge of the fabric. In quilting, a “scant” quarter-inch is often preferred, which is just a thread’s width narrower than a true quarter-inch, to account for the fold of the fabric when it is pressed open.
During this Square-in-a-Square Quilt Block – Tutorial, you will find that a rotating cutting mat is incredibly helpful. Since you need to trim the excess “dog ears” and square up the block after each set of triangles is added, being able to rotate the mat instead of the fabric prevents accidental shifts. This keeps your geometric alignment perfect and saves time during the construction process.
Lastly, the Square-in-a-Square Quilt Block – Tutorial emphasizes the role of the iron. You should always “set your seams” by pressing the stitching line while it is still closed, then gently pressing the seam toward the darker fabric. Never “iron” with a back-and-forth motion, as this stretches the bias; instead, “press” by lifting and lowering the iron vertically to lock the fibers in place.
The actual assembly phase of the Square-in-a-Square Quilt Block – Tutorial begins with cutting your center square and four smaller corner squares. For a standard 6-inch finished block, you might start with a 4.75-inch center square and four 3.5-inch squares for the corners. Cut each of the four smaller squares once diagonally to create a total of eight triangles, though you only need four per block.
In this stage of the Square-in-a-Square Quilt Block – Tutorial, you will fold the center square in half and lightly crease it to find the midpoint of each side. Do the same for the long edge (the hypotenuse) of your triangles. Matching these midpoint creases ensures that your triangle is centered on the square, preventing the block from becoming lopsided as you add the outer layers.
The Square-in-a-Square Quilt Block – Tutorial method involves sewing two opposite triangles first. Pin one triangle to the top edge and one to the bottom edge of your center square, right sides together. Sew using your consistent 1/4 inch seam. Once finished, press these triangles away from the center. You will notice that the tips of the triangles extend past the square; these are the “dog ears” we will trim later.
Continuing with the Square-in-a-Square Quilt Block – Tutorial, you will now repeat the process for the remaining two sides. Attach the triangles to the left and right edges, again matching the midpoints. It is crucial to ensure that the previously sewn triangles do not get folded over or caught in the new seam. This creates the primary diamond shape that defines the beauty of the entire quilt block.
A critical tip in the Square-in-a-Square Quilt Block – Tutorial is to check your point intersections. When you look at the back of the block, the seams should cross exactly 1/4 inch from the raw edge. This intersection is the “sweet spot.” If you sew directly through that cross-point, your diamond points will be perfectly sharp on the front side of the block once it is joined to other units.
To wrap up this part of the Square-in-a-Square Quilt Block – Tutorial, you must perform the squaring up process. Use a square quilting ruler and align the 45-degree line with the seams of your block. Trim away the excess fabric to reach your desired unfinished size. This step is non-negotiable for anyone wanting a professional finish, as it corrects any minor shifting that occurred during the sewing process.
Once you have mastered the basic Square-in-a-Square Quilt Block – Tutorial, the creative possibilities are endless. You can “stack” the effect by adding a second or even third round of triangles around the existing square. This is often called an Economy Block. Each new round increases the size of the block and adds layers of color, making it look like a radiating star or a nested geometric flower.
In this Square-in-a-Square Quilt Block – Tutorial, we also suggest experimenting with color value. Value refers to how light or dark a fabric is. By using a very dark center and very light corners, the diamond stands out sharply. Alternatively, using fabrics with similar values but different patterns creates a “low volume” look that is very popular in modern shabby chic or minimalist quilting circles.
The Square-in-a-Square Quilt Block – Tutorial can be integrated into larger patterns like the Storm at Sea or the Pineapple Quilt. These advanced designs use the Square-in-a-Square as a component within a more complex grid. Understanding how to scale the block up or down allows you to customize any pattern to fit the specific dimensions of a baby quilt, a throw, or a king-sized bedspread.
Another interesting variation discussed in this Square-in-a-Square Quilt Block – Tutorial is the use of fussy cutting for themes. If you are making a quilt for a child, you can put a different animal character in the center of each square. The surrounding triangles then act as a frame, highlighting the character while keeping the overall quilt design cohesive and structured through the repetitive geometry of the blocks.
Modern quilters often use the Square-in-a-Square Quilt Block – Tutorial to create “negative space” designs. By making the corner triangles the same color as the quilt’s background fabric, the center diamonds appear to “float” across the surface of the quilt without any visible connecting lines. This creates a sophisticated, clean look that is frequently featured in high-end design magazines and textile art galleries.
Finally, the Square-in-a-Square Quilt Block – Tutorial is perfect for scrap quilting. Since the corner triangles are relatively small, you can use up your “scrap bin” to make the corners while keeping the center squares uniform. This is an eco-friendly way to quilt that results in a colorful, “planned-out” look. By mastering this one block, you unlock a lifetime of design potential in the world of fiber arts.
How do I prevent my points from being cut off?
To keep your points sharp, always ensure there is a 1/4 inch of fabric between the tip of the diamond and the edge of the block. When sewing blocks together, aim your needle to go exactly through the intersection of the previous seams visible on the back of the fabric.
What is the best way to press the seams?
In this tutorial, it is generally recommended to press the seams toward the triangles (away from the center). This helps the center square “pop” slightly and reduces bulk in the middle of the block. However, if you are nesting seams with other blocks, you may need to press toward the center.
Can I use the “Snowball” method instead of cutting triangles?
Yes, the snowball method involves placing small squares on the corners of a large square, sewing diagonally, and trimming the excess. While this is easier for some, it uses more fabric and can result in slightly more bulk than the traditional triangle method taught in this tutorial.
What fabric works best for the Square-in-a-Square block?
High-quality quilting cotton is best. Avoid stretchy fabrics like jersey or slippery fabrics like silk until you are very experienced, as the bias edges in this block are prone to stretching and distortion.
How do I calculate the size for an Economy Block?
For an Economy Block (two rounds of triangles), your first center square should be the finished size divided by 1.414, plus seam allowances. Most quilters prefer using a printed chart or a specialized ruler to avoid complex math.
Is this block suitable for beginners?
Absolutely! While it requires attention to detail, it only involves straight seams. It is an excellent project for a beginner to practice accuracy and learn about fabric grain and bias.
In this Square-in-a-Square Quilt Block – Tutorial, we have covered everything from the basic geometric principles and tool selection to the step-by-step assembly and creative design variations.
You have learned how to prepare your fabric, manage bias edges, and achieve perfect points through careful stitching and pressing techniques. This block is a versatile tool in your quilting arsenal, capable of producing both traditional and modern masterpieces.


