
Patchwork Bird Tutorial

3D Buildings Quilt – Tutorial is an exceptional project for quilters who want to take their craftsmanship to the next level by adding depth and architectural intrigue to their textile art. If you have ever looked at a skyline and thought about how to translate those geometric shapes into fabric, this guide is specifically designed for you. Creating a three-dimensional effect on a flat surface requires a blend of color theory, precise cutting, and a bit of creative vision, making the 3D Buildings Quilt – Tutorial a rewarding journey for both intermediate and advanced sewists.
The beauty of a 3D Buildings Quilt – Tutorial lies in its versatility, as it allows you to play with light and shadow through the strategic placement of fabric tones. By selecting contrasting shades for the “front” and “side” of your quilted skyscrapers, you can trick the eye into seeing volume where there is only cotton and batting. This technique, often referred to as “optical illusion quilting,” transforms a traditional blanket into a modern masterpiece that looks like a miniature city captured in thread.
Embarking on a 3D Buildings Quilt – Tutorial journey means mastering the art of the Y-seam or utilizing clever foundation paper piecing methods to ensure every corner is sharp and every roofline is straight. In the following sections, we will break down the essential components of this project, from fabric selection to the final assembly. Whether you are aiming for a realistic cityscape or a whimsical, colorful neighborhood, following this 3D Buildings Quilt – Tutorial will provide you with the technical foundation needed to succeed.

The core secret of any successful 3D Buildings Quilt – Tutorial is the selection of fabric values. To create a realistic three-dimensional effect, you must choose at least three distinct shades for each building: a light value for the side facing the “sun,” a medium value for the front, and a dark value for the shadowed side. This triad of colors is what gives the 3D Buildings Quilt – Tutorial its life and architectural realism.
When browsing for materials for your 3D Buildings Quilt – Tutorial, consider using solid fabrics or low-volume prints. Solids are particularly effective because they don’t have distracting patterns that might break the illusion of a solid wall. If you prefer prints, look for textured batiks or tone-on-tone fabrics that mimic the look of concrete, brick, or glass without overwhelming the viewer’s eye.
Don’t forget the importance of the background fabric in your 3D Buildings Quilt – Tutorial. A dark navy or black fabric can represent a night sky, making the “windows” of your buildings pop, while a pale blue or soft grey can simulate a bright morning. The contrast between your skyscrapers and the sky is a vital SEO-friendly tip for making your quilt design stand out visually and artistically.
Integrating metallic threads or shimmery fabrics can also enhance the windows of your 3D Buildings Quilt – Tutorial. Small squares of yellow or white fabric can act as “lit” windows, suggesting life inside your textile city. This attention to detail is what separates a standard quilt from a professional-grade 3D Buildings Quilt – Tutorial project that captures everyone’s attention.
The weight of the fabric is another technical aspect to keep in mind during this 3D Buildings Quilt – Tutorial. Using 100% quilting cotton is highly recommended because it holds its shape well during the precise cutting and piecing required for geometric shapes. Avoid stretchy fabrics, as they can distort the straight lines of your buildings and ruin the architectural 3D illusion.
Lastly, always perform a fabric bleed test before starting your 3D Buildings Quilt – Tutorial. Since you will likely be using high-contrast colors—like dark charcoal against a bright white sky—ensuring that the dyes won’t run during the first wash is essential. Taking this extra step ensures that your hard work on the 3D Buildings Quilt – Tutorial remains crisp and beautiful for many years to come.
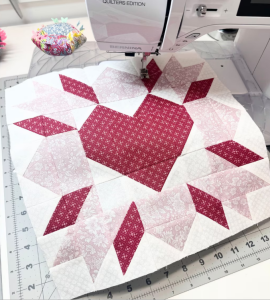
Precision is the most important skill you will utilize in this 3D Buildings Quilt – Tutorial. Unlike organic “improv” quilting, architectural designs require exact measurements to ensure that the angles of your roofs and walls align perfectly. A high-quality rotary cutter and a non-slip quilting ruler are the primary tools you will need to achieve the sharp edges characteristic of a 3D Buildings Quilt – Tutorial.
Before making your first cut, it is helpful to draw a quilt layout on graph paper. Planning the height and width of each structure in your 3D Buildings Quilt – Tutorial allows you to calculate the yardage needed and prevents fabric waste. You can vary the heights of the buildings to create a more dynamic and realistic cityscape silhouette, which adds a professional touch to your finished work.
Many quilters find that Foundation Paper Piecing (FPP) is the best method for a 3D Buildings Quilt – Tutorial. FPP involves sewing fabric directly onto a paper pattern, which guarantees perfectly straight lines and accurate points. This technique is particularly useful for the complex angles found in modern skyscrapers or the gables of classic houses featured in your 3D Buildings Quilt – Tutorial.
If you choose traditional piecing for your 3D Buildings Quilt – Tutorial, remember to use a scant 1/4 inch seam allowance. Even a tiny deviation in seam width can add up across a row of buildings, causing your quilt top to become wavy or misaligned. Consistent sewing is the “secret sauce” that makes the 3D Buildings Quilt – Tutorial look clean and professionally manufactured.
Organization is key when handling the many small pieces involved in a 3D Buildings Quilt – Tutorial. Use labeled trays or design boards to keep the “light,” “medium,” and “dark” pieces for each building together. This prevents confusion during the assembly phase and ensures that the 3D effect remains consistent across the entire surface of the quilt.
As you cut the pieces for your 3D Buildings Quilt – Tutorial, take note of the fabric grain. Cutting along the straight grain will help prevent the pieces from stretching as you sew them together. This technical detail is a staple of any high-quality quilt tutorial and is especially relevant when dealing with the vertical lines of tall buildings in this specific project.
Once your pieces are cut, it is time to start the assembly phase of the 3D Buildings Quilt – Tutorial. You will typically sew each building as an individual block before joining them into rows. Start by joining the “front” and “side” panels of a building to establish the vertical perspective that is the hallmark of the 3D Buildings Quilt – Tutorial style.
Pressing your seams correctly is a vital step in this 3D Buildings Quilt – Tutorial that many beginners overlook. To reduce bulk at the intersections, try pressing seams open or using the nesting seams technique. This ensures that your quilt top lies flat, which makes the subsequent longarm quilting or free-motion quilting process much smoother and more enjoyable.
The roofline is often the trickiest part of the 3D Buildings Quilt – Tutorial. Whether you are creating flat roofs for a metropolitan look or pointed roofs for a cozy village, ensure that your points are not “chopped off” when you sew the sky background to the building. Using fine silk pins can help hold these critical intersections in place as you navigate the sewing machine.
In this 3D Buildings Quilt – Tutorial, you might encounter Y-seams if your design involves complex interlocking shapes. While they can be intimidating, the key is to stop your stitching exactly at the seam line and backstitch. This allows the fabric to pivot, creating a clean junction that enhances the three-dimensional appearance of your architectural quilt blocks.
As you finish each block for your 3D Buildings Quilt – Tutorial, take a moment to square up the blocks. Using a large square ruler to trim any excess fabric ensures that every building is perfectly rectangular (or the intended shape). This step is essential for the “final fit,” allowing your rows to come together without any frustrating tugging or stretching of the fabric.
Building a city in your 3D Buildings Quilt – Tutorial is a marathon, not a sprint. Take your time with the assembly of each row, checking your progress against your original graph paper design. Seeing the urban landscape emerge from your sewing machine is the most exciting part of the 3D Buildings Quilt – Tutorial, as the flat pieces of fabric finally begin to look like a tangible, deep environment.
The final stage of the 3D Buildings Quilt – Tutorial involves the actual “quilting”—sewing the three layers (top, batting, and backing) together. For an architectural quilt, straight-line quilting is highly effective. By echoing the lines of the buildings, you reinforce the geometric structure and add to the overall modern aesthetic of your 3D Buildings Quilt – Tutorial.
You can also use the quilting stage to add architectural details that weren’t pieced. For example, you can quilt horizontal lines to represent siding on a house or a grid pattern to simulate window panes on a skyscraper. These small additions provide a layer of “hidden” detail that makes your 3D Buildings Quilt – Tutorial a piece of art that people will want to examine closely.
Choosing the right quilt batting is important for the final look of your 3D Buildings Quilt – Tutorial. A low-loft cotton batting will keep the quilt flat and crisp, emphasizing the sharp lines of the buildings. If you want a more “puffy” look that makes the buildings stand out even more, a wool or polyester blend can provide more definition and “quilt relief.”
The binding serves as the frame for your 3D Buildings Quilt – Tutorial. A solid dark binding can act like a frame for a painting, while a “scrappy” binding made from the leftover building fabrics can add a fun, eclectic touch. Ensure your binding is sewn securely to protect the edges of your architectural masterpiece for a lifetime of use.
For those looking to optimize their 3D Buildings Quilt – Tutorial for display, consider adding a hanging sleeve to the back. Many 3D quilts are used as wall hangings rather than bed covers because their visual impact is so strong. Hanging the quilt allows light to hit the surface at different angles, further enhancing the optical illusion of depth.
Finally, don’t forget to label your quilt. Include your name, the date, and the fact that it was made using this 3D Buildings Quilt – Tutorial. Quilt labeling is an important tradition that helps preserve the history of your work. Congratulations on completing your city—you have successfully turned simple fabric into a stunning, multi-dimensional urban landscape!
What is a 3D Buildings Quilt?
It is a quilting style that uses geometric shapes and color values (light, medium, and dark) to create the optical illusion of three-dimensional architecture on a flat fabric surface.
Is this project suitable for beginners?
While a beginner can certainly try it, this 3D Buildings Quilt – Tutorial is best suited for those with some experience in accurate cutting and seam allowance, as precision is vital for the 3D effect.
What is the best fabric for a 3D effect?
Solid cotton fabrics are usually best because they allow the “shadows” and “highlights” created by different colors to be the main focus without being distracted by patterns.
Do I need a special sewing machine?
No, a standard sewing machine is perfectly fine. However, a 1/4 inch foot and a walking foot for the final quilting stage will make the process much easier.
How do I choose the “shadow” colors?
Look at your main fabric and find a shade that is two or three steps darker on the color wheel. This will act as the shadowed side of your building in the 3D Buildings Quilt – Tutorial.
Can I make a 3D Buildings Quilt using scraps?
Absolutely! Upcycling fabric or using scraps is a great way to make a colorful, eclectic city, as long as you maintain the “light, medium, dark” rule for each individual building.
Conclusion
In this 3D Buildings Quilt – Tutorial, we have explored the fascinating process of creating an architectural cityscape through fabric. We covered the importance of fabric value selection, the necessity of precise cutting, the technical steps of block assembly, and the creative possibilities of texture quilting.
By mastering these techniques, you can transform simple scraps of cotton into a sophisticated urban landscape that plays with light and shadow. We hope this guide inspires you to build your own textile skyline and experiment with the endless possibilities of geometric design. Please leave your sincere opinion below and share your suggestions for future patterns or techniques you would like to see!


