
Patchwork Bird Tutorial

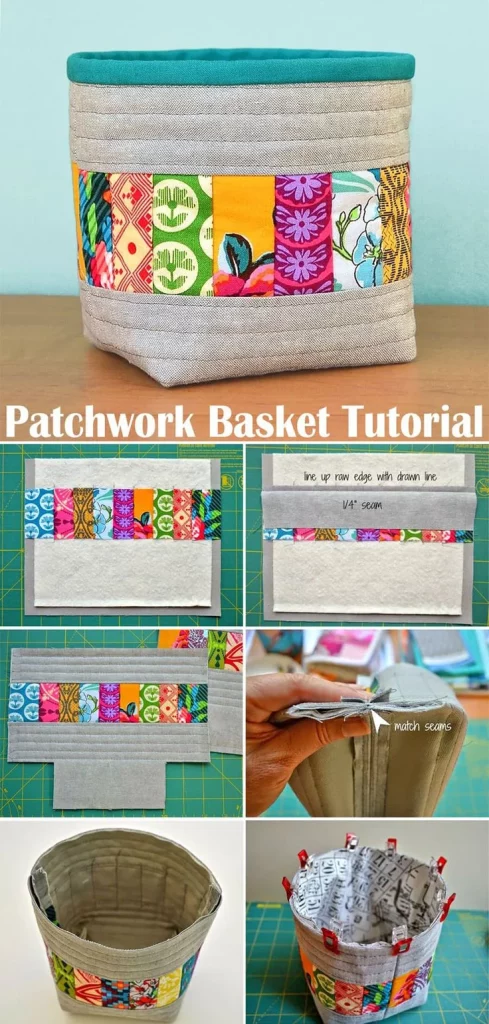
This Patchwork Storage Basket Tutorial – Pattern is the ultimate solution for crafters looking to combine home organization with the artistic flair of quilting. There is something deeply satisfying about taking small, mismatched scraps of fabric and transforming them into a sturdy, functional container that can hold anything from knitting supplies to children’s toys. By following a structured Patchwork Storage Basket Tutorial – Pattern, you not only clear out your “scrap bin” but also create a custom piece of decor that reflects your personal style and sewing journey.
The beauty of engaging with a Patchwork Storage Basket Tutorial – Pattern is that it bridges the gap between traditional patchwork quilting and 3D structural sewing. Unlike a flat quilt, a storage basket requires specific internal reinforcements to ensure it stays upright and maintains its shape under the weight of its contents. This Patchwork Storage Basket Tutorial – Pattern will guide you through the process of selecting the right stabilizers and construction methods to ensure your finished product is as durable as it is beautiful.
In the following sections, we will dive deep into the technical requirements of the Patchwork Storage Basket Tutorial – Pattern, including fabric preparation, the importance of seam nesting, and the final assembly of the basket’s lining. Whether you are a beginner looking for your first dimensional project or an experienced sewist wanting to refine your technique, this Patchwork Storage Basket Tutorial – Pattern offers a comprehensive roadmap. Let’s explore how to turn fabric remnants into a professional-looking storage solution that adds warmth and order to any room in your house.
The foundation of a successful Patchwork Storage Basket Tutorial – Pattern begins with the quality of your fabric selection. For the exterior patchwork panels, it is best to use 100% quilting cotton as it is easy to press and manipulate. Because the basket will likely be handled frequently, choosing high-quality textiles ensures that the vibrant colors of your Patchwork Storage Basket Tutorial – Pattern don’t fade after the first few washes.
When we talk about the “Patchwork” aspect of this Patchwork Storage Basket Tutorial – Pattern, we are referring to the creative arrangement of squares or strips. You can choose a monochromatic theme or a wild, “scrappy” look that utilizes every color in the rainbow. The key is to cut your pieces with a rotary cutter and a ruler to ensure every unit in the Patchwork Storage Basket Tutorial – Pattern is perfectly square before you begin sewing.
The most vital “hidden” ingredient in this Patchwork Storage Basket Tutorial – Pattern is the interfacing or stabilizer. To prevent the basket from collapsing, you will need a heavy-duty fusible fleece or a stiff foam stabilizer like ByAnnie’s Soft and Stable. Applying this to the back of your finished patchwork panels gives the Patchwork Storage Basket Tutorial – Pattern the structural “skeleton” it needs to stand proudly on a shelf.
Your choice of “Pattern” also dictates the size of the basket you will produce. If you are making a small desk organizer, you might use 2-inch squares; for a large laundry-style basket, 5-inch charms might be more appropriate. This Patchwork Storage Basket Tutorial – Pattern is easily scalable, meaning you can adjust the dimensions of the base and the height of the walls to suit your specific storage needs.
Don’t overlook the importance of the lining fabric for your Patchwork Storage Basket Tutorial – Pattern. Since the interior of the basket will often be hidden, you can use a solid-colored cotton or a smooth canvas. A smooth lining makes it easier to slide items in and out of the finished Patchwork Storage Basket Tutorial – Pattern without the fabric bunching up or catching on the objects inside.
Finally, gather your essential sewing notions: a 90/14 sewing machine needle, heavy-duty polyester thread, and plenty of wonder clips. Because you will eventually be sewing through multiple layers of fabric and foam, clips are much more effective than pins for this Patchwork Storage Basket Tutorial – Pattern. Having these tools ready will make the construction of your Patchwork Storage Basket Tutorial – Pattern a smooth and enjoyable experience.
The first active step in the Patchwork Storage Basket Tutorial – Pattern is piecing the exterior walls. You will sew your fabric squares into rows, and then sew the rows together to form a large rectangular panel. To achieve those crisp corners where the squares meet, this Patchwork Storage Basket Tutorial – Pattern recommends “nesting” your seams—pressing the seam allowances of adjacent rows in opposite directions so they lock together.
Once your patchwork panel is assembled, you must fuse it to your stabilizer. This is a critical moment in the Patchwork Storage Basket Tutorial – Pattern because it turns a flimsy piece of cloth into a structural component. Use a hot iron and plenty of steam to ensure the bond is permanent. If the fabric bubbles, the final Patchwork Storage Basket Tutorial – Pattern will look messy, so take your time during this fusion process.
Quilting the layers together is a fantastic way to add extra detail to your Patchwork Storage Basket Tutorial – Pattern. You can follow the seams of your patchwork (known as “stitching in the ditch”) or create a decorative diamond grid across the surface. Quilting not only looks beautiful but also adds an extra layer of stiffness to the Patchwork Storage Basket Tutorial – Pattern, helping it retain its shape over years of use.
The term Pattern also involves the “box corner” technique, which is what gives the basket its flat bottom. After sewing the side seams of your stabilized patchwork, you will pinch the corners at the bottom and sew across them. This creates the 3D volume of the Patchwork Storage Basket Tutorial – Pattern. The wider the box corner you sew, the wider and shorter your finished basket will be.
Repeat the construction process for the lining of your Patchwork Storage Basket Tutorial – Pattern, but without the heavy stabilizer. The lining should be slightly smaller than the exterior to prevent it from bunching up inside. A well-fitted lining is the hallmark of a high-quality Patchwork Storage Basket Tutorial – Pattern, giving the interior a clean and professional appearance that mimics store-bought organizers.
If you want to add handles to your Patchwork Storage Basket Tutorial – Pattern, now is the time to prepare them. You can use sturdy cotton webbing or make your own “fabric sausages” from matching patchwork scraps. Securely basting the handles to the top edge of the exterior panel before the final assembly is a pro-tip for this Patchwork Storage Basket Tutorial – Pattern to ensure they don’t shift during the final rounds of sewing.
The final assembly of the Patchwork Storage Basket Tutorial – Pattern is often called the “bag-in-bag” method. You will place the exterior basket and the lining basket right-sides together, so the “pretty” sides are touching. This stage of the Patchwork Storage Basket Tutorial – Pattern can feel bulky at the sewing machine, so go slowly and use a walking foot if you have one to help feed the thick layers through.
As you sew around the top perimeter of the Patchwork Storage Basket Tutorial – Pattern, remember to leave a 4-inch gap for “turning.” This is the opening that allows you to pull the basket through itself so the right sides end up on the outside. It feels a bit like a magic trick, and it is the most exciting part of following the Patchwork Storage Basket Tutorial – Pattern as the final shape is revealed for the first time.
Once the basket is turned right-side out, you will need to spend some time at the ironing board. Pushing out the corners and pressing the top edge of the Patchwork Storage Basket Tutorial – Pattern is essential for a crisp finish. A well-pressed top edge makes the final topstitching much easier and ensures the lining stays tucked neatly inside where it belongs.
Topstitching is the final row of stitches around the top rim of your Patchwork Storage Basket Tutorial – Pattern. This isn’t just for decoration; it closes the turning gap and provides a reinforced edge that keeps the basket’s opening wide and accessible. For this Patchwork Storage Basket Tutorial – Pattern, a topstitch about 1/8 of an inch from the edge gives a professional, tailored look that highlights the patchwork design.
If your sewing machine struggles with the thickness of the Patchwork Storage Basket Tutorial – Pattern at the side seams, try using a “hump jumper” or a folded piece of cardboard to level the presser foot. This prevents skipped stitches and ensures the structural integrity of the Patchwork Storage Basket Tutorial – Pattern. Attention to these small mechanical details is what separates a homemade project from a handcrafted masterpiece.
After the topstitching is complete, give the entire Patchwork Storage Basket Tutorial – Pattern a final blast of steam. This helps the stabilizer “settle” into its new 3D shape. Your basket is now ready to be filled! Whether you use it for holding yarn or as a stylish plant pot cover, the techniques you learned in this Patchwork Storage Basket Tutorial – Pattern will serve you well in all your future structural sewing projects.
Once you have the basic Patchwork Storage Basket Tutorial – Pattern down, the possibilities for customization are endless. You can add external pockets to the sides of your basket to hold smaller tools like scissors or measuring tapes. This turns a simple Patchwork Storage Basket Tutorial – Pattern into a highly specialized craft caddy that is perfectly tuned to your specific workflow and organizational needs.
Another fun way to modify the Patchwork Storage Basket Tutorial – Pattern is to use different patchwork styles, such as “Half-Square Triangles” or “Flying Geese.” These advanced quilting motifs can be integrated into the basket walls to create stunning geometric patterns. Using a Patchwork Storage Basket Tutorial – Pattern as a canvas for complex quilting is a great way to practice new skills on a small, manageable scale.
For a rustic look, you can incorporate different textures like linen or denim into your Patchwork Storage Basket Tutorial – Pattern. Denim from old jeans is particularly durable and adds a great deal of stiffness to the walls of the basket. Mixing and matching fibers in your Patchwork Storage Basket Tutorial – Pattern creates a tactile experience that is much more interesting than a standard, single-fabric storage container.
Care for your finished Patchwork Storage Basket Tutorial – Pattern is relatively simple. If the basket gets dusty, a quick vacuum or a lint roller will usually do the trick. If it becomes soiled, most baskets made with this Patchwork Storage Basket Tutorial – Pattern can be spot-cleaned with a damp cloth and mild soap. Avoid machine washing if you used a rigid foam stabilizer, as the agitation can cause the foam to lose its “memory.”
If the basket ever loses its shape or becomes “slouchy,” you can usually revive it with a hot steam iron. Stuffing the basket with towels to hold its shape while you steam the exterior panels can help “reset” the stabilizer. This maintenance ensures that your Patchwork Storage Basket Tutorial – Pattern remains a beautiful and functional part of your home for many years to come.
Ultimately, the Patchwork Storage Basket Tutorial – Pattern is about more than just storage; it’s about the joy of making. It’s a project that celebrates the history of patchwork while embracing the modern need for organization. We hope this Patchwork Storage Basket Tutorial – Pattern inspires you to look at your fabric scraps in a whole new light and start building a more colorful, organized life, one stitch at a time.
1. What is the best interfacing for a Patchwork Storage Basket Tutorial – Pattern?
For a basket that stands on its own, Pellon 71F Peltex or Soft and Stable by Annie are the best options. They provide the necessary rigidity to prevent the Patchwork Storage Basket Tutorial – Pattern from sagging or collapsing over time.
2. Can I make this Patchwork Storage Basket Tutorial – Pattern with a regular sewing machine?
Yes! While the layers can get thick, a standard domestic machine can handle this Patchwork Storage Basket Tutorial – Pattern if you use a heavy-duty needle (90/14 or 100/16) and go slowly over the side seams.
3. How do I calculate the size of the base for this Pattern?
The width of your “box corner” stitch determines the depth of the base. For example, if you sew a 4-inch line across the corner, your Patchwork Storage Basket Tutorial – Pattern will have a 4-inch deep base.
4. Is this Patchwork Storage Basket Tutorial – Pattern beginner-friendly?
Absolutely. If you can sew a straight line and follow basic measurements, you can complete this Patchwork Storage Basket Tutorial – Pattern. It is a great “next step” project after you’ve mastered flat quilting.
5. How much fabric do I need for a medium-sized basket?
You can usually make a medium basket (about 10 inches wide) using two fat quarters for the lining and a handful of 5-inch scraps for the patchwork exterior. It is a very economical project!
6. Can I add a lid to my Patchwork Storage Basket Tutorial – Pattern?
Yes, you can sew a separate padded circle or rectangle to act as a lid. Simply attach it to the back edge of the Patchwork Storage Basket Tutorial – Pattern with a small fabric hinge or leave it as a removable “cap.”
In this comprehensive guide, we have explored the intricate details of the Patchwork Storage Basket Tutorial – Pattern, from the initial selection of vibrant quilting cottons and structural stabilizers to the final, satisfying topstitching.
We learned that the secret to a professional finish lies in the precision of the patchwork, the nesting of seams, and the careful application of the “box corner” technique to create volume. We also discussed how to customize your Patchwork Storage Basket Tutorial – Pattern with handles and external pockets, as well as how to care for your finished product to ensure it remains a durable part of your home decor.


