
Crochet Flower - Tutorial

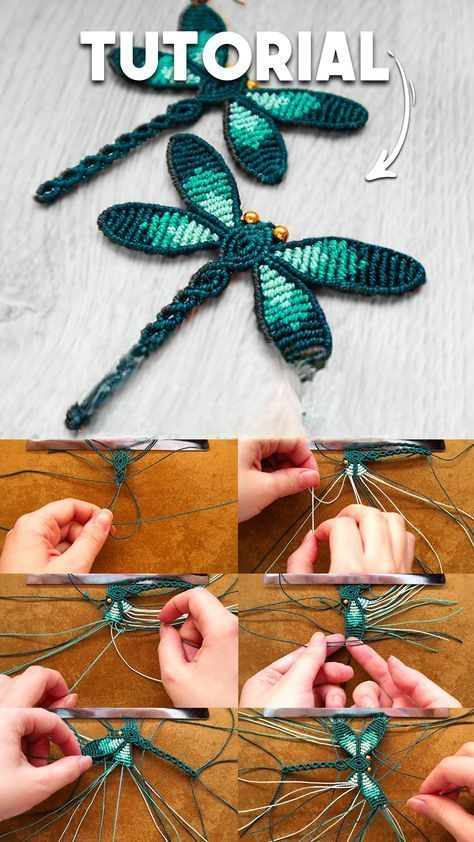
This Crocheted Macrame Dragonfly – Tutorial offers a unique way to combine two beloved fiber arts into one delicate and whimsical project. Dragonflies are symbols of transformation and adaptability, making them a popular choice for home decor, garden ornaments, and even personalized jewelry. By blending the structured loops of crochet with the geometric beauty of macrame knots, you can create a three-dimensional piece of art that captures the essence of this ethereal insect.
In this comprehensive Crocheted Macrame Dragonfly – Tutorial, we focus on the harmony between the hook and the hand. Many crafters are looking for ways to expand their skills, and a hybrid fiber art project like this is the perfect challenge. We will guide you through the process of selecting the right cord, mastering the square knot for the body, and using a crochet hook to build lace-like wings that appear light enough to fly.
The beauty of following a Crocheted Macrame Dragonfly – Tutorial lies in the versatility of the finished product. These little creatures can be attached to keychains, used as curtain tie-backs, or hung as mobile elements in a nursery. Because the design relies on textured stitches and strong knots, the result is durable yet intricate. Whether you are a fan of boho-chic aesthetics or just love a creative DIY, this guide will provide all the steps needed to bring your yarn to life.
To start your Crocheted Macrame Dragonfly – Tutorial, the choice of material is the most important decision. For a true macrame feel, a 3-ply cotton cord or a nylon macrame string is ideal. These materials have the rigidity needed to hold the shape of the dragonfly’s body without sagging. If you prefer a softer look, a mercerized cotton yarn in a DK weight can also work, as it offers the stitch definition required for the delicate wing patterns.
The “crocheted” part of this Crocheted Macrame Dragonfly – Tutorial requires a hook that matches your cord thickness. Generally, a 3.5mm or 4.0mm crochet hook is perfect for standard macrame string. You want the stitches to be tight and crisp, so if you are a loose crocheter, consider sizing down your hook. A smaller hook ensures that the wing structure remains firm and doesn’t lose its shape when the dragonfly is hanging.
Color selection plays a huge role in the visual impact of your dragonfly. Many people choose iridescent yarns or metallic-infused threads to mimic the natural shimmer of a dragonfly’s wings. For the body, earthy tones like deep copper, forest green, or midnight blue provide a stunning contrast to lighter, more transparent wing colors. This creative color blending is what makes each handmade dragonfly unique and personalized.
In addition to your primary cord, you will need some basic notions to complete the Crocheted Macrame Dragonfly – Tutorial. A pair of sharp fabric scissors is essential for clean cuts, especially when fraying the tail if you choose a bohemian finish. You will also need a darning needle with a large eye to weave in the ends of the cord, as macrame string can be significantly thicker than standard wool.
Some crafters like to incorporate wooden beads or glass crystals into the head of the dragonfly. If you choose to do this, ensure the hole in the bead is large enough for your cord to pass through twice. This adds a “jewelry-like” quality to the crochet project, making it suitable for high-end gifts or craft fair items. Preparation is key to ensuring your dragonfly tutorial proceeds smoothly from start to finish.
Lastly, consider having a macrame board or a piece of cork and some T-pins nearby. Since the body of the insect is made using macrame knotting techniques, having a surface to pin your work down will keep your tension even. Even tension is the difference between a professional-looking fiber art piece and one that looks uneven. Once your materials are gathered, you are ready to begin the knotting phase.
The body of our Crocheted Macrame Dragonfly – Tutorial is created using a series of square knots. To begin, cut a long length of cord and fold it over a central “anchor” cord. This anchor will serve as the spine of the dragonfly. The head is usually formed by a large loop or a bead, followed by the first few knots that define the thorax, where the wings will eventually be attached.
As you move down the spine in this Crocheted Macrame Dragonfly – Tutorial, you will perform a sequence of half-hitch knots or continuous square knots. To create the tapering effect of a real dragonfly’s abdomen, you can slightly increase the tension of your knots as you move toward the tail. This tapering technique gives the insect a more realistic and graceful silhouette, moving from a thicker chest to a slender, elegant tail.
One of the unique aspects of a hybrid macrame tutorial is the ability to leave “picots” or small loops on the sides of the body. In this Crocheted Macrame Dragonfly – Tutorial, these small loops serve as the foundation points where we will later join the crocheted wings. This integration ensures that the wings are physically part of the body’s structure rather than just being sewn on at the end.
If you find that your knots are twisting, you might be performing spiral knots instead of square knots. In a Crocheted Macrame Dragonfly – Tutorial, a flat body is usually preferred so it can lay flush against a wall or garment. To keep it flat, ensure you are alternating the side you start your knot on—left over right, then right over left. This symmetry is vital for a balanced crochet design.
For the tail, some people prefer a long, flowing “fringe” finish. You can achieve this by leaving the remaining cord ends long and using a fine-tooth comb to brush out the fibers. This creates a soft, feathery look that contrasts beautifully with the hard, geometric knots of the body. This mixed-texture approach is a hallmark of modern fiber arts and is highly popular on social media platforms.
The final step of the body assembly in our Crocheted Macrame Dragonfly – Tutorial is securing the tail knot. A drop of fabric glue or a hidden stitch with matching thread can prevent the knots from loosening over time. Once the body is complete and stable, you have a sturdy “chassis” upon which you will build the intricate, airy wings that characterize this beautiful insect.
The wings are the highlight of the Crocheted Macrame Dragonfly – Tutorial. Unlike the body, the wings are worked using a crochet hook to create a mesh-like fabric. You will join your yarn to the loops left during the knotting phase. Typically, a dragonfly has four wings—two larger ones at the top and two slightly smaller ones below, mimicking the natural anatomy of the Odonata family.
To create the “lace” effect, we use a combination of chain stitches and double crochets. In this Crocheted Macrame Dragonfly – Tutorial, a common pattern involves creating “shells” or “fans” that expand outward from the body. By increasing the number of stitches in the center of the wing and decreasing them toward the tips, you create a beautiful leaf-shaped wing that looks organic and light.
For those who want a more complex look, you can incorporate picot stitches along the edges of the wings. These tiny decorative bumps mimic the veins and irregularities found in real dragonfly wings. This level of detail is what makes the Crocheted Macrame Dragonfly – Tutorial an excellent project for intermediate crocheters who want to practice shaping and lace-work in a small-scale format.
Consistency in your stitch count is essential for the wings. If the left and right wings are not identical, the dragonfly will look unbalanced. We recommend crocheting the two top wings first, then the two bottom wings, counting every stitch to ensure perfect symmetry. This attention to detail is a key SEO-optimized crafting practice that leads to a much more satisfying final result.
If your wings feel too floppy, you can incorporate a thin jewelry wire into the final round of crochet. By crocheting over the wire, you give the wings a “poseable” quality, allowing you to bend them upward as if the dragonfly is in mid-flight. This mixed-media technique is a great addition to the Crocheted Macrame Dragonfly – Tutorial, making the piece more dynamic and professional.
Finally, when the wings are complete, use a slip stitch to finish the edges. This provides a clean border and prevents the lace from stretching out of shape. The transition from the heavy macrame body to the light crocheted wings creates a stunning visual tension that is the core appeal of this Crocheted Macrame Dragonfly – Tutorial. Now, your dragonfly is almost ready to take flight!
The final stage of the Crocheted Macrame Dragonfly – Tutorial is the finishing and “dressing” of the piece. Use your darning needle to weave in all yarn tails hidden inside the macrame knots. If you used wire in the wings, now is the time to gently shape them. A slight curve in the wings can add a sense of movement that makes the dragonfly look much more lifelike and artistic.
For those who want their dragonfly to be extra stiff, you can use a fabric stiffener spray or a mixture of water and white glue. Lay your project flat on a piece of plastic wrap, spray the wings, and pin them into the exact shape you want. Once dry, your Crocheted Macrame Dragonfly will hold its shape perfectly, even in humid environments, which is great for garden decorations.
Customization is the fun part of this Crocheted Macrame Dragonfly – Tutorial. You can sew on small sequins to represent the shimmering “eyes” of the wings or add a few seed beads along the spine for extra sparkle. Some crafters even add a small clip to the bottom of the body so the dragonfly can be “perched” on a lampshade, a bouquet of flowers, or a Christmas tree.
If you are making these as handmade gifts, consider the presentation. Mounting a crocheted dragonfly on a piece of cardstock with a printed inspirational quote about change and growth makes for a very thoughtful present. Because of the unique combination of techniques in this tutorial, recipients will be impressed by the complexity and beauty of the piece.
Another popular way to use the result of this Crocheted Macrame Dragonfly – Tutorial is in jewelry making. By using embroidery floss and a very small crochet hook (1.0mm), you can make miniature versions of this pattern to create stunning boho earrings or a statement necklace. The technical steps remain the same, just scaled down for a more delicate, wearable art piece.
Whether you display your dragonfly in a shadow box or use it as a focal point in a macrame wall hanging, the skills you’ve learned here are transferable to many other projects. This Crocheted Macrame Dragonfly – Tutorial is a bridge between two worlds, proving that when we combine different crafts, the creative possibilities are truly infinite. Enjoy your new fiber friend and the magic it brings to your space!
1. Can I use regular wool yarn for the whole dragonfly?
While you can, the body may lack the “stiffness” of traditional macrame. If using wool, we recommend using a stiffening spray at the end or incorporating wire into the body to ensure it doesn’t fold or droop over time.
2. How long does the Crocheted Macrame Dragonfly – Tutorial take to complete?
A single dragonfly usually takes between 1.5 to 3 hours, depending on your familiarity with square knots and lace crochet. It is a perfect afternoon project for those looking for quick and satisfying results.
3. Is this project suitable for children?
Older children (10+) with some basic crochet experience can definitely follow this Crocheted Macrame Dragonfly – Tutorial. It is a great way to introduce them to macrame knots without the commitment of a large wall hanging.
4. What is the best way to clean my handmade dragonfly?
Since it is a delicate item with potentially many “tails” and knots, we recommend spot cleaning with a damp cloth. If it is made of cotton, avoid soaking it, as the internal stabilizer or glue might be affected.
5. Can I make this dragonfly without a crochet hook?
You can create the wings using macrame hitching techniques, but it won’t have the same “lace” look as the Crocheted Macrame Dragonfly – Tutorial. Crochet allows for more intricate, rounded shapes that are harder to achieve with knots alone.
6. What are the best colors for a realistic look?
Look for multi-tonal blue, green, and gold yarns. Real dragonflies often have a “petrol” or “oil slick” shimmer, so yarns with a slight sheen or metallic thread will give you the most authentic and eye-catching result.
In this Crocheted Macrame Dragonfly – Tutorial, we have explored the beautiful intersection of two distinct fiber arts. We’ve learned how to select the right macrame cord for a sturdy body, how to execute precise square knots for a realistic abdomen, and how to use crochet techniques to create ethereal, lace-like wings.
This project is a wonderful example of how combining different skills—knotting and hooking—can produce a result that is far more than the sum of its parts. By following the steps of this handmade dragonfly guide, you have created a piece of decor that is filled with meaning, texture, and personality.


