
Crochet Flower - Tutorial

The String Bag With Floral Motif – Tutorial is your ultimate guide to creating a functional, eco-friendly accessory that blends vintage charm with modern utility. In today’s world, where sustainability meets personal expression, crafting your own crochet market bag is more than just a hobby; it is a statement of conscious living. This step-by-step crochet guide focuses on the intricate floral patterns that elevate a simple mesh design into a piece of wearable art, perfect for farmer’s markets, beach days, or casual city strolls.
Choosing to follow a String Bag With Floral Motif – Tutorial allows you to customize your gear using organic cotton yarn or recycled materials, ensuring that your reusable shopping bag is both durable and stylish. The beauty of the floral motif lies in its versatility, as you can experiment with vibrant colors or stick to a minimalist aesthetic. Whether you are a seasoned pro or a curious beginner, this project offers a rewarding experience that results in a high-quality, handmade accessory you’ll be proud to carry everywhere.
Before we dive into the technical details of this String Bag With Floral Motif – Tutorial, it is essential to understand the core components of the design. We will be focusing on the bottom-up construction method, ensuring a sturdy base that can handle the weight of groceries or daily essentials. By mastering the double crochet stitches and the chain spaces required for the mesh, you will create a flexible structure that expands when filled. Let’s gather our ergonomic crochet hooks and favorite yarns to begin this creative journey together.
Selecting the right crochet supplies is the first step toward a successful project. For a high-quality floral string bag, I highly recommend using 100% mercerized cotton yarn. This specific type of thread offers excellent stitch definition and minimizes stretching, which is crucial for a bag intended to carry weight without losing its original shape over time.
A size 4.0mm (G) crochet hook is generally the “sweet spot” for most medium-weight cotton yarns used in this String Bag With Floral Motif – Tutorial. If you tend to crochet very tightly, you might consider moving up to a 4.5mm hook to ensure the mesh remains fluid and soft. Comfort is key, so an ergonomic handle will save your hands during longer crafting sessions.
The floral motif part of this project often requires multiple colors to make the petals pop. You will need at least three shades: one for the flower center, one for the petals, and a primary color for the mesh body of the bag. Using high-contrast colors can give your handmade tote a bold, bohemian look that stands out in a crowd.
Don’t forget the small but vital notions and tools. You will need a tapestry needle for weaving in ends, stitch markers to keep track of your rounds, and a sharp pair of scissors. Having these organized before you start the String Bag With Floral Motif – Tutorial prevents interruptions and keeps your creative flow steady and enjoyable.
Proper yarn tension is a skill we will emphasize throughout this guide. Since the string bag relies on an open-work pattern, keeping your tension consistent ensures that the “holes” in the mesh are uniform. This not only improves the visual appeal of the crochet floral design but also ensures the structural integrity of the entire finished piece.
Lastly, consider the environment by choosing eco-friendly yarn options. Many brands now offer recycled cotton made from garment industry scraps. By following this String Bag With Floral Motif – Tutorial with sustainable materials, you are doubling down on the “green” benefits of moving away from single-use plastic bags in your daily routine.
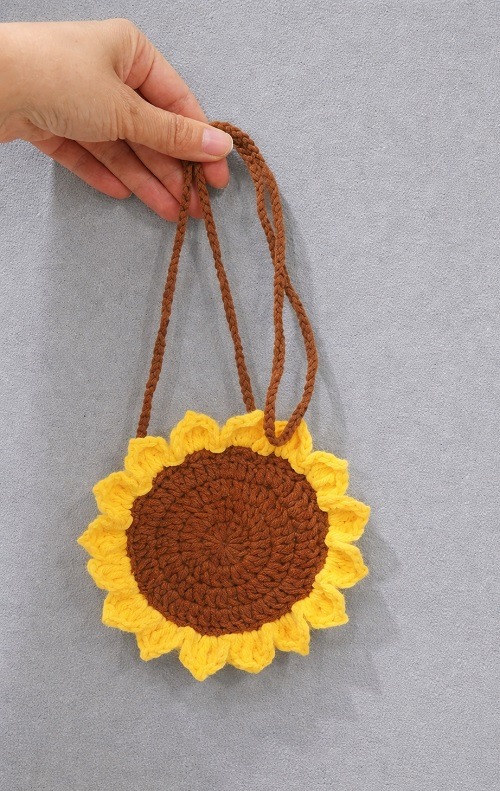
The heart of the String Bag With Floral Motif – Tutorial begins with the decorative base. Most traditional string bags start with a plain circle, but we are adding a flower granny square or a circular floral medallion at the very bottom. This adds a layer of sophistication and reinforces the base, preventing smaller items from falling through the mesh gaps.
To start the floral motif, you will likely begin with a magic ring or a small chain loop. This technique allows you to pull the center tight, creating a clean look. From there, we work in rounds, using puff stitches or popcorn stitches to give the flower petals a three-dimensional texture that looks stunning against the flat mesh.
As you expand the floral design, you will transition from the decorative petals into a solid circular base. This transition is vital for the String Bag With Floral Motif – Tutorial because it provides the “anchor” for the rest of the bag. We typically use increments of single crochet or half-double crochet to create a flat, sturdy disc before moving to the sides.
Once the base reaches your desired diameter—usually around 8 to 10 inches—it’s time to shift gears. This is where the String Bag With Floral Motif – Tutorial introduces the v-stitch or simple chain loops. These open stitches create the “string” effect, allowing the bag to be incredibly lightweight while possessing a surprisingly large carrying capacity.
During this stage, pay close attention to the stitch count. Even though the mesh looks random, it follows a specific mathematical rhythm. Losing a stitch in the foundation round can lead to an asymmetrical bag. Using stitch markers at the start of each round will help you navigate this crochet pattern with total confidence and ease.
The beauty of this floral motif is that it serves as a “secret” detail. While people see a standard string bag from the side, the bottom reveals a beautiful, intricate flower. It’s these artisan details that distinguish a store-bought item from a piece created through a dedicated String Bag With Floral Motif – Tutorial like this one.
In this section of the String Bag With Floral Motif – Tutorial, we focus on the vertical growth of the bag. The mesh body is created by alternating chains and anchor stitches. This construction allows the bag to collapse into a tiny ball when empty but expand significantly when you drop in your fresh produce or beach towel.
Height is a personal preference, but a standard crochet market bag usually stands about 12 to 15 inches tall. As you work through the rounds, you will notice the floral motif at the bottom becoming the weight that pulls the mesh into a beautiful teardrop shape. Consistency in your chain lengths is what creates that professional, high-end look.
One pro-tip for this String Bag With Floral Motif – Tutorial is to “stagger” your stitches. Instead of placing your anchor stitch directly on top of the one below, you place it in the chain space. This creates a honeycomb effect that is much stronger than a grid pattern and gives the floral string bag a more organic, fluid movement.
If you want to add more visual interest, you can repeat the floral motif on the sides of the bag. Simply substitute a section of the mesh for a crochet flower. However, for beginners following this String Bag With Floral Motif – Tutorial, sticking to a solid mesh body with the floral base is the best way to ensure the bag remains functional and easy to finish.
As you reach the top of the body, we transition back to solid crochet rounds. This “rim” or “border” is essential for stability. We usually work 3 to 5 rounds of single crochet to create a firm edge. This prevents the mesh from over-stretching at the mouth of the bag and provides a solid foundation for the handles.
Remember to check your work frequently. Lay the bag flat to see if it is growing evenly. If you notice one side is leaning, you may have missed a chain space. Correcting it early is the hallmark of a great crafter. This String Bag With Floral Motif – Tutorial aims to help you build a piece that lasts for years of heavy usage.
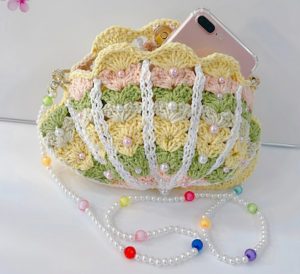
The final stage of the String Bag With Floral Motif – Tutorial involves the handles. A common mistake in DIY crochet bags is making handles that are too thin or too long. Because crochet fabric stretches, a handle that looks perfect now might reach your knees once the bag is filled with heavy oranges or books.
To combat stretching, I recommend the thermal stitch or simply working several rows of slip stitches over a base of single crochets. This creates a dense, strap-like feel. In this String Bag With Floral Motif – Tutorial, we integrate the handles directly into the final rounds of the border to ensure they never detach under pressure.
You can choose between a single shoulder strap or two shorter handles for a “tote” style. If you prefer the shoulder style, make sure the strap is wide enough (at least an inch) so it doesn’t dig into your shoulder. This floral motif theme can even be extended to the handles by adding small micro-flowers as embellishments at the attachment points.
Before you consider the String Bag With Floral Motif – Tutorial complete, you must properly secure your yarn. Use your tapestry needle to weave the tails back and forth through the solid stitches of the border. In a mesh bag, there are fewer places to hide yarn ends, so the solid border is your best friend for a clean, professional finish.
Blocking your crochet is a final, optional step that can make a huge difference. By wetting the bag slightly and pinning it to shape, you allow the floral motif and the mesh to “set.” This results in a much more polished look, making your handmade string bag look like it came straight from a high-end boutique.
Congratulations! You have successfully followed the String Bag With Floral Motif – Tutorial. You now possess a beautiful, functional, and sustainable accessory. Not only have you learned a new skill, but you’ve also created something that reduces plastic waste while showcasing your unique creative crochet style to the world.
1. What is the best yarn for a String Bag With Floral Motif?
The best choice is 100% cotton yarn. Cotton does not stretch as much as acrylic or wool, which is vital for a bag that will carry weight. Look for “mercerized” cotton for a shiny finish and extra strength.
2. Can a beginner follow this String Bag With Floral Motif – Tutorial?
Yes! While the floral motif requires knowledge of basic stitches like the double crochet and magic ring, the mesh body is very repetitive and beginner-friendly. It’s a great project to level up your skills.
3. How do I wash my crochet floral string bag?
Since it is made of cotton, you can usually machine wash it on a delicate cycle inside a laundry bag. However, hand washing and laying it flat to dry is the best way to preserve the shape of the floral motif and prevent snagging.
4. How long does it take to complete this tutorial?
For an intermediate crocheter, this bag can be finished in a weekend (about 6-8 hours of active work). Beginners might take a bit longer as they master the mesh stitch consistency.
5. How do I stop the handles from stretching too much?
The trick is to crochet the handles slightly shorter than you think you need. You can also “reinforce” them by sewing a piece of cotton fabric ribbon to the underside of the strap to provide a non-stretch backing.
6. Is this pattern customizable for different sizes?
Absolutely. To make the bag larger, simply continue the increase rounds on the floral base before starting the mesh sides. For a smaller “produce bag,” start the mesh sooner.
In this String Bag With Floral Motif – Tutorial, we have covered everything from selecting the perfect cotton yarn to mastering the decorative floral base and the functional mesh body. This project is a wonderful blend of aesthetics and utility, proving that eco-friendly living can be incredibly stylish.
By creating your own crochet bag, you are participating in a slow-fashion movement that values quality over quantity and craftsmanship over mass production.


