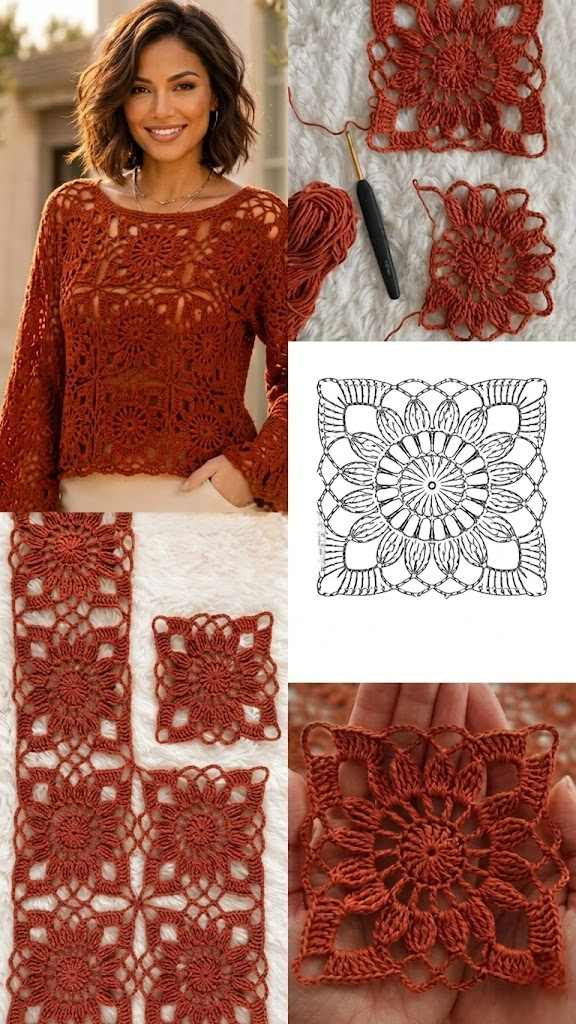
Crochet Blouse - Tutorial

Crochet Blouse – Tutorial is the ultimate guide you need to create a stunning, handmade wardrobe staple that never goes out of style. Crafting your own clothing is one of the most rewarding experiences a maker can have, allowing you to customize the fit, color, and texture to match your personal style perfectly. Whether you are an experienced crocheter looking for your next fashion project or a determined beginner ready to step up your skills, this comprehensive guide will walk you through every single step of the journey.
The beauty of a handmade garment lies in its versatility and uniqueness. By following this detailed Crochet Blouse – Tutorial, you will discover how simple geometric shapes and basic stitches can transform into a sophisticated, wearable piece of art. Garment making can sometimes feel intimidating, but breaking the process down into manageable sections makes it incredibly approachable, fun, and deeply satisfying.
In this article, we are going to explore everything from selecting the perfect yarn and understanding the essential tools to mastering the stitch patterns and assembling your final piece. We will ensure your project meets professional standards while keeping the instructions clear, engaging, and easy to follow. Get your hooks ready, find a comfortable spot, and let’s dive into this wonderful creative process together.
Selecting the right yarn is the foundation of any successful garment project. For a lightweight, breathable summer top, a cotton or bamboo blend is highly recommended because of its beautiful drape and stitch definition. If you prefer a cozier, autumn-ready garment, a lightweight acrylic or wool blend will provide the warmth and softness you desire.
Your hook size must complement the yarn weight you choose for this Crochet Blouse – Tutorial. Always check the yarn label for the manufacturer’s recommendation, but do not be afraid to adjust. If you tend to crochet tightly, switching to a slightly larger hook can help achieve a softer, more fluid drape that is perfect for clothing.
Beyond the hook and yarn, a few essential notions will make your crafting experience much smoother. You will need a set of stitch markers to keep track of your rounds, increases, and garment panels. A sharp pair of scissors and a sturdy yarn needle are also crucial for weaving in those loose ends cleanly at the end.
Before diving into the main panels, it is vital to talk about the gauge swatch. Crocheting a small four-by-four-inch square using your chosen stitch pattern ensures your final blouse will actually fit. If your swatch turns out smaller than the pattern indicates, your blouse will be too tight; if it is larger, the garment will be oversized.
Taking the time to measure your body accurately ensures a flattering silhouette. Grab a flexible measuring tape and record your bust, waist, and desired blouse length measurements. Compare these numbers with the pattern layout to decide which size will give you the most comfortable and confident fit.
Proper preparation saves hours of potential frustration and unraveling later on. Investing time in selecting quality materials and checking your gauge sets you up for absolute success. Once you have gathered your tools and confirmed your measurements, you are completely ready to begin the actual construction.
Every great garment begins with a solid foundation chain that is worked loosely to prevent the bottom edge from puckering. For this specific Crochet Blouse – Tutorial, we will use a combination of fundamental stitches that create a beautiful, slightly lace-like texture. This approach ensures the fabric is breathable yet structured enough to hold its shape well.
The main body of this design relies heavily on the double crochet stitch, which builds fabric quickly and elegantly. Combined with strategic chain spaces, it creates a classic mesh variation that looks modern and stylish. Mastering the rhythm of this stitch pattern will make the rows fly by effortlessly as you work.
To maintain perfectly straight edges along your panels, pay close attention to your turning chains. Typically, a turning chain of three counts as your first double crochet stitch of the new row. Making sure you insert your hook into the correct stitch at the end of each row prevents accidental increasing or decreasing.
As you work through the rows, consistency in your yarn tension is key to achieving a professional finish. Try to keep your hands relaxed and maintain a steady rhythm throughout the entire making process. If you notice your stitches getting tighter when you are tired, it might be a good sign to take a short break.
This pattern is highly customizable, meaning you can easily adjust the length of the torso. If you prefer a trendy cropped look, you can simply stop crocheting rows once the panel reaches your waistline. For a more traditional, longer fit, keep adding rows until you achieve the coverage you feel most comfortable wearing.
Remember to count your stitches regularly at the end of every few rows to ensure you stay on track. It is much easier to catch a minor mistake early on than to discover a missing stitch after completing an entire panel. Keep your focus, enjoy the soothing repetition, and watch your gorgeous fabric grow.
Shaping is where your flat panels begin to transform into a real, wearable garment. To create a comfortable neckline, we will divide the front panel into two separate sections to work the shoulders individually. This technique creates a clean opening for the head while maintaining the overall structure of the blouse.
Decreasing stitches gradually allows for a smooth, sloped neckline rather than a harsh, jagged edge. By using the double crochet two together method, you can gently reduce the stitch count at the inner edge of each row. This creates a beautiful frame for the collarbone that looks incredibly professional.
The back panel requires much less shaping, usually remaining relatively straight across the top with just a slight dip for comfort. This balance between a shaped front and a sturdy back ensures the blouse sits perfectly on your shoulders without sliding around when you move.
For the sleeves of this Crochet Blouse – Tutorial, you can choose between a sleeveless vest style, short cap sleeves, or elegant long sleeves. If you opt for sleeves, we will attach the yarn directly to the armhole openings and work in continuous rounds. This seamless method eliminates the need for extra sewing later on.
When working the sleeves, gradual decreases down the arm will create a tapered, tailored fit that moves naturally with your body. If you prefer a bohemian, wide-sleeve look, you can completely skip the decreases and work straight down to the cuff. The choice is entirely yours based on your style goals.
Take your time during the shaping process and make sure to replicate the exact same number of rows and decreases for both sides. Symmetry is what gives a handmade clothing piece its high-quality, boutique-level appearance. Once your shaping rows are complete, you are ready for the exciting assembly phase.
Before joining your panels together, blocking your finished crochet pieces is a step you should never skip. Wet blocking relaxes the fibers, opens up the stitch pattern, and sets the final dimensions of your work. Pin your panels gently to a blocking mat, mist them with water, and let them dry completely.
Once dry, align the front and back panels with their right sides facing together. We will use the mattress stitch or a slip stitch join to seam the shoulders and sides securely. The mattress stitch is fantastic because it creates an almost invisible seam from the outside, keeping your work looking flawless.
When seaming the sides, remember to leave the designated openings for your arms completely open. Use your stitch markers to lock the panels in place before you start sewing so the rows match up perfectly. This prevents uneven alignment and ensures a comfortable, symmetrical fit around the torso.
With the main structure assembled, it is time to add the final finishing touches to the edges. Adding a simple single crochet border around the neckline, bottom hem, and cuffs clean up any raw edges beautifully. This simple step gives the entire Crochet Blouse – Tutorial project a polished, retail-ready look.
For a touch of elegance, you can choose a more decorative border, such as a delicate shell stitch or a ribbed texture. A ribbed border made with alternating front and back post double crochets adds a classic, stretchy finish to the waist and sleeves. Experiment to see which style matches your aesthetic best.
Finally, use your yarn needle to weave in all remaining loose yarn tails securely along the inside seams. Cut the excess yarn closely, turn your brand-new blouse right side out, and give it one final gentle steam. You have successfully transformed simple yarn into a gorgeous, custom-fitted garment to wear proudly.
What is the best yarn weight for a summer blouse?
The best choice is a lightweight yarn, such as Sport weight (Category 2) or DK weight (Category 3). Cotton, bamboo, and linen blends are ideal because they are breathable, absorb moisture well, and offer an elegant drape that looks beautiful on the body.
How do I know if my blouse will fit properly before finishing?
The most reliable method is to create a gauge swatch before you begin the actual pattern. Measure your body accurately, check your swatch against the pattern specifications, and try holding the panels up to your body as you work to verify the sizing.
Can a beginner make this blouse successfully?
Yes, absolutely. While making a garment requires some patience, this project uses foundational stitches like the chain and double crochet. By following the steps sequentially and managing your tension, a determined beginner can achieve great results.
How should I wash and care for my handmade crochet blouse?
To maximize the lifespan of your garment, hand washing in cold water with a gentle detergent is highly recommended. Avoid wringing the fabric; instead, press out excess water with a towel and lay the blouse flat on a clean surface to dry.
Is blocking really necessary for this project?
Yes, blocking is highly recommended for garments. It relaxes the yarn fibers, corrects minor tension inconsistencies, evens out the edges, and ensures that the beautiful stitch pattern opens up completely to achieve the intended drape.
How can I adjust this pattern to make it longer or shorter?
You can easily adjust the length by adding or subtracting rows in the main body section before you begin the neckline and armhole shaping. Keep track of the row count so that your front and back panels match perfectly.
This Crochet Blouse – Tutorial has guided you through the entire creative journey of making a beautiful, custom garment from scratch.
We explored the importance of selecting the right materials, checking your gauge, mastering the fundamental stitch patterns, shaping the silhouette, and finishing with professional assembly techniques. With these skills, you can now confidently create a wardrobe filled with unique, handmade fashion pieces that fit you perfectly.