Crochet Butterflies - Tutorial

Crochet butterflies are among the most delightful, versatile, and rewarding projects you can undertake as a crafter. Whether you are looking to embellish a sun hat, create a whimsical mobile for a nursery, or simply practice your stitches, learning how to make these delicate winged creatures is a fantastic milestone. This comprehensive crochet butterflies tutorial will guide you through the entire process, ensuring you master the techniques required to create beautiful, lifelike fabric insects. By focusing on a clear, step-by-step approach, you will find that working on a crochet butterflies pattern is not only relaxing but also incredibly satisfying.
The beauty of a yarn butterfly lies in its adaptability, allowing you to use up small scraps of material from your stash while experimenting with vibrant color combinations. In this easy crochet butterfly guide, we will explore the essential materials, foundational stitches, and assembly methods that elevate a simple project into a work of art. Many beginners worry that the intricate wings might be too complex, but this step-by-step crochet breakdown ensures that anyone with basic knowledge can succeed. From choosing the perfect crochet thread to mastering the final shaping, every detail is designed to boost your confidence.
As you dive into this handmade butterfly tutorial, you will discover how minor adjustments in stitch height and yarn weight can completely transform the final look of your piece. We will cover everything from the magic ring to the final antenna placement, making this the ultimate resource for DIY crochet ornaments. Crafting these little wonders is an excellent way to practice shaping techniques that you can later apply to larger garments or amigurumi projects. Gather your favorite colorful yarn, select the correct hook size, and let us begin this creative journey together.
Selecting the right supplies is the foundational step for achieving a stunning result with your crochet butterflies tutorial. The weight of your yarn will directly dictate the size and drape of your finished insect. For a delicate, lace-like appearance, a high-quality cotton crochet thread size 10 is ideal, as it provides excellent stitch definition. If you prefer a larger, sturdier motif, a standard worsted weight yarn or double-knitting (DK) yarn will work perfectly for your handmade embellishments.
Your choice of crochet hook must correspond precisely to the thickness of the yarn you select to keep the stitches neat. A smaller hook, such as a 2.5mm crochet hook for lightweight yarn or a 3.5mm hook for thicker options, helps maintain tension. When your tension is consistent, the wings of your yarn butterfly will hold their shape beautifully without drooping. It is always a good idea to check the yarn label for recommended hook sizes before you begin your project.
In addition to the basics, you will need a few essential notions to finish your work professionally. A sharp pair of craft scissors is necessary for clean cuts, avoiding frayed edges that can ruin your weaving. A blunt-ended yarn needle or tapestry needle is vital for weaving in those loose ends securely so your work never unravels. Having these tools ready by your side ensures a smooth, uninterrupted crafting session.
For those looking to add an extra touch of realism, consider keeping some contrast yarn on hand for the body. A dark brown, black, or cream yarn can make the center of your easy crochet butterfly stand out against bright wings. Some crafters also like to use flexible floral wire or pipe cleaners to reinforce the antennae, giving them a playful, poseable quality. Gathering these materials beforehand sets you up for absolute success.
Starch or fabric stiffener is another optional but highly recommended item for your DIY crochet ornaments toolkit. If you plan to use these butterflies as bookmarks, magnets, or wall decor, a little stiffener helps the wings stay flat. Applying a light mist of spray starch after blocking ensures your creative yarn crafts retain their gorgeous shape over time. It transforms a floppy piece of fabric into a crisp, professional-grade embellishment.
Lastly, never underestimate the power of good lighting and a comfortable workspace when practicing a new step-by-step crochet project. Working with intricate stitches can sometimes strain the eyes, especially when using darker yarn colors for the butterfly body. Ensure you have a clear, well-lit surface and perhaps a few stitch markers to keep track of your rounds. With your workspace optimized and your materials ready, you are fully prepared to master the craft.
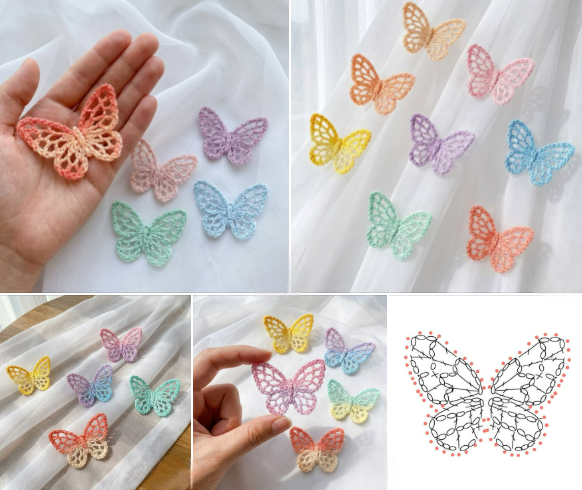
The core of this crochet butterflies tutorial revolves around constructing the upper and lower wings using a series of escalating stitch heights. To begin your easy crochet butterfly, you will start by creating a magic ring (or magic circle), which allows you to pull the center completely closed. Inside this loop, you will work a base chain and a series of clusters that will form the framework for your wings. Working into a central ring ensures that all four wings radiate outward symmetrically.
Once your base round is established, you will transition into creating the distinct shapes of the upper, larger wings. To achieve the dramatic flare of a yarn butterfly, you will use a combination of double crochet (dc) and treble crochet (tr) stitches. By stacking these taller stitches into a single chain space, you force the fabric to expand outward, creating a beautiful rounded tip. Adding a small chain-two space at the peak creates a delicate, pointy finish known as a picot stitch.
The lower wings require a slightly different approach, as they need to be smaller and more compact than the upper set. For these, you will primarily use half double crochet (hdc) and standard double crochet stitches to reduce the height. This intentional variation in stitch sizes gives your handmade butterfly tutorial an authentic, organic look that mimics nature. Maintaining even tension during these transitions is key to keeping the wings perfectly balanced on both sides.
As you work your way around the circle, you will use slip stitches (sl st) to anchor the yarn between the wings. These slip stitches act as natural indentations, clearly separating the upper wing from the lower wing without needing to cut the thread. This continuous-loop method is highly favored in modern crochet patterns because it minimizes the number of loose ends you have to weave in later. It makes the entire process incredibly fluid and fast.
If you wish to create a vibrant, multi-colored effect, this round is the perfect place to introduce a second shade of yarn. Changing colors on the final outer border of the wings creates a stunning trimmed effect that defines the shape. A simple border of single crochet (sc) stitches in a contrasting color can make your crochet butterflies pattern pop visually. This technique adds depth and a professional finish to your handmade applique.
Once all four wings are fully formed, you will complete the round by fastening off your yarn with a long tail. Pull the magic ring tail firmly to close any remaining gap in the very center of your work. Take a moment to smooth out the stitches with your fingers, gently stretching the fabric to check the symmetry. Your wings are now complete, and you are ready to move on to the structural body of the creature.
With the wings beautifully stitched, the next phase of our crochet butterflies tutorial involves creating a defined central body. The body holds the entire structure together, giving the yarn butterfly its signature three-dimensional, lifelike appearance. There are two popular methods to achieve this: crocheting a separate flat strip or wrapping a strand of yarn directly around the center. For this guide, we will focus on the wrapping and chain method, which is perfect for an easy crochet butterfly.
To create the body using the chain method, attach your chosen body color to your hook with a slip knot. Chain a total of eight to ten stitches, depending on the overall size of your finished wings. This chain will form the central spine of your handmade butterfly tutorial project. Turn your work and slip stitch back down the chain to give the body a slightly thicker, more substantial presence.
Next, you will position this crocheted strip vertically right over the center gap where your wings meet. Wrap the remaining yarn tails around the middle of the wings two or three times, pulling snugly to pinch the wings together slightly. This pinching action causes the wings to flare outward naturally, giving your DIY crochet ornaments a wonderful sense of movement. Secure the yarn at the back with a firm, hidden knot using your tapestry needle.
Now, we can form the playful antennae that bring so much personality to your crochet butterflies pattern. Leave the two top yarn tails from your body strip uncut, extending upward from the top of the head. Tie a simple overhand knot at the desired height on each strand, approximately one inch away from the head. Trim the excess yarn just above these knots to create neat, rounded tips that look exactly like real antennae.
If you prefer a more rigid look, you can substitute the yarn antennae with a small piece of dark embroidery floss or metallic wire. Passing a thin wire through the head allows you to bend and curve the antennae into whimsical shapes. This variation is highly recommended if you are creating pieces for a creative yarn crafts display or a festive garland. It adds an unexpected touch of mixed-media artistry to your crochet work.
Finally, use your yarn needle to weave all remaining loose ends securely into the dense stitches of the butterfly’s body. Double-check that your knots are tight and completely invisible from the front side of the motif. Give the wings one last gentle tug to ensure they sit symmetrically on either side of the newly formed spine. Your beautiful accent piece is now fully assembled and structurally sound.
Now that you have completed the core crochet butterflies tutorial, it is time to explore how to use these creations. These versatile motifs make wonderful handmade embellishments for a wide variety of clothing items and home accessories. Stitching a vibrant butterfly onto the corner of a plain denim jacket or a canvas tote bag instantly adds a custom, bohemian flair. They are also fantastic for covering up small accidental holes or stains on children’s clothing.
In the realm of home decor, these pieces shine brightly when grouped together to form a beautiful wall display. You can attach several colorful pieces to a rustic wooden hoop to create a stunning crochet butterfly mobile for a nursery. The lightweight nature of the yarn butterfly means it will dance and spin gently with the slightest breeze. It provides a soothing, handmade visual element to any room in your household.
For avid readers, these small fabric insects can easily be transformed into delightful, functional page markers. Simply attach your finished motif to the top of a jumbo paperclip, an elastic band, or a long crocheted chain. A butterfly bookmark makes a thoughtful, inexpensive gift for friends, teachers, or members of your local book club. It is a wonderful way to spread the joy of creative yarn crafts with minimal effort.
Seasonal decorating is another fantastic avenue to explore with your new skill set. By stringing multiple butterflies together along a long strand of green yarn, you can create a gorgeous spring garland. Hang this festive bunting across a fireplace mantel, a window frame, or a party dessert table to celebrate warm weather. These DIY crochet ornaments add instant cheerfulness and warmth wherever they are placed.
If you enjoy making greeting cards, these small motifs can be glued directly onto heavy cardstock for a beautiful 3D effect. A handmade card featuring a delicate easy crochet butterfly is perfect for birthdays, Mother’s Day, or thank-you notes. Recipients will appreciate the extra time and love poured into the tactile, keepsakes quality of the card. It elevates a simple message into a meaningful gift.
Lastly, you can easily convert these pieces into wearable accessories by attaching them to hair clips, headbands, or brooch pins. Kids and adults alike love sporting these colorful accents in their hair during spring and summer outings. By varying your yarn types, colors, and textures, you can create an endless collection of unique fashion statements. The possibilities are truly limitless when you know how to master this simple design.
What is the best yarn weight to use for a crochet butterflies tutorial?
The best yarn weight depends entirely on your desired final size and project goals. For small, intricate, and delicate appliques, a lightweight cotton crochet thread (size 10) works beautifully. If you want a quicker project that is larger and holds its shape well, a worsted weight yarn or medium-weight acrylic yarn is highly recommended.
How do I prevent the wings of my yarn butterfly from curling up?
If your wings are curling excessively, it is usually a result of tight stitch tension or the natural behavior of certain fibers. To fix this, you can perform a process called blocking, where you dampen the butterfly, pin it flat on a foam mat, and let it dry completely. Applying a light mist of fabric starch or stiffener during this process also helps keep the wings perfectly flat.
Can a complete beginner succeed with an easy crochet butterfly pattern?
Absolutely! While the finished product looks intricate, a good step-by-step crochet guide breaks it down into simple, foundational stitches. If you know how to make a chain, a single crochet, and a double crochet, you have all the skills needed. The magic ring might take a couple of tries to master, but it becomes second nature with a little patience.
How many yards of yarn do I need to make one motif?
One of the best things about this project is that it is a phenomenal scrap-busting craft. A single butterfly typically requires less than 5 to 10 yards of yarn in total. This means you can create dozens of colorful insects using the leftover yarn tails from your previous, larger knitting or crocheting projects.
Can I wash items that have these handmade embellishments attached to them?
Yes, you can wash them, provided you choose a washable fiber like cotton or easy-care acrylic for your butterfly. If you attach the butterfly to a garment, it is best to wash the item on a gentle cycle inside a mesh laundry bag, or hand wash it completely. Avoid using high heat in the dryer to keep the delicate wing shape from distorting.
In this crochet butterflies tutorial, we have journeyed through the entire creative process of transforming simple yarn into an enchanting, winged masterpiece. We explored the ideal materials to select, followed a detailed step-by-step crochet guide for building symmetrical wings, and learned how to assemble a sturdy central body with neat antennae.
Finally, we looked at a myriad of inspiring ways to apply these DIY crochet ornaments to fashion, home decor, and heartfelt gifts. With these foundational techniques in your crafting repertoire, you can now confidently produce a whole kaleidoscope of colorful, unique butterflies.
