
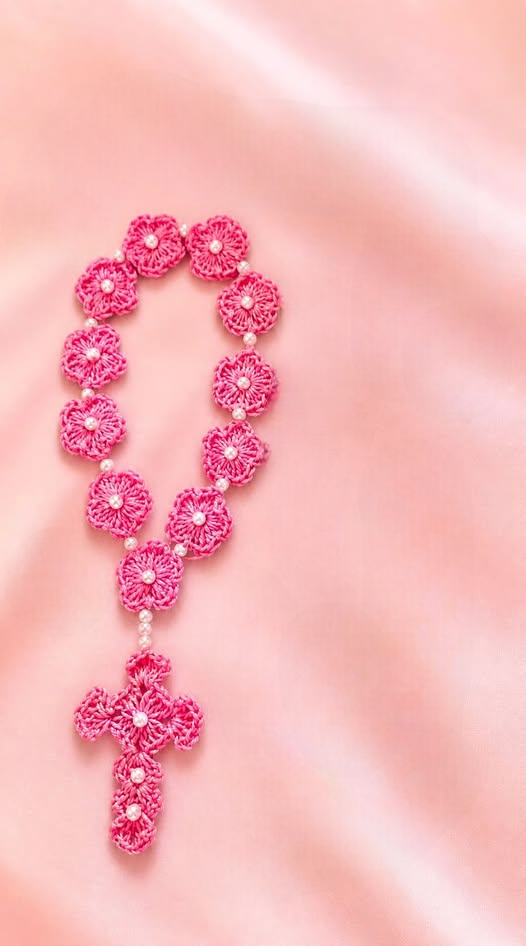
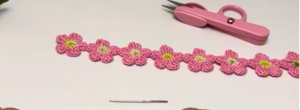
Crochet Flower - Tutorial

Creating a Crochet Rosary – Tutorial is a beautiful way to combine spiritual devotion with the therapeutic art of handmade crafts. Whether you are looking to create a meaningful gift for a First Communion, a wedding, or simply want a portable spiritual tool for personal use, learning how to make a crochet rosary is a rewarding project for any skill level. This step-by-step guide will walk you through the essential techniques, materials, and stitch patterns needed to produce a high-quality, durable, and aesthetically pleasing piece of religious art.
The beauty of a Crochet Rosary – Tutorial lies in its versatility and the tactile comfort that yarn provides compared to traditional plastic or wood beads. By using high-quality cotton thread and a precise crochet hook, you can craft a lightweight rosary that fits perfectly in a pocket or a small pouch. This project is also an excellent way to practice consistent tension and the puff stitch or popcorn stitch, which are commonly used to represent the individual prayer beads in the design.
In this comprehensive Crochet Rosary – Tutorial, we focus on creating a design that is both respectful of tradition and modern in its execution. We will explore how to select the right mercerized cotton, how to structure the five decades, and the best methods for attaching a crocheted crucifix and a centerpiece. By following these SEO-optimized instructions, you will not only improve your crochet skills but also create a lasting heirloom that carries deep personal and spiritual significance for the recipient.
To begin your Crochet Rosary – Tutorial, you must first select the appropriate yarn weight and hook size. Most crafters prefer a Size 10 crochet thread or a fingering weight cotton yarn because these materials offer the definition needed for small, intricate beads. A 1.5mm or 2.0mm steel crochet hook is typically the best choice to ensure your stitches remain tight and the stuffing (if used) does not show through.
Choosing the right color is also a vital part of the crochet process. While traditional white or cream is popular for baptism gifts, many people enjoy using variegated yarn or soft pastels to give the handmade rosary a unique look. Ensure you have sharp embroidery scissors and a tapestry needle nearby, as you will have several ends to weave in to keep the structure secure and professional.
Another key component is deciding on the “bead” style. In a Crochet Rosary – Tutorial, the beads are usually formed using bobble stitches, puff stitches, or even small crocheted balls. If you prefer a flatter design, tightly worked chains and slip stitches can represent the spacers between the decades. Having a clear plan for your stitch markers will help you keep track of the Hail Mary and Our Father beads.
Before you make your first slip knot, consider the durability of your finished piece. Since a rosary is often handled frequently during prayer, using a synthetic blend or a mercerized cotton will prevent the yarn from fraying over time. It is also helpful to have a small amount of polyester fiberfill if you plan on making 3D spherical beads for a more traditional tactile experience.
Preparation also involves understanding the anatomy of a rosary. A standard Dominican Rosary consists of a crucifix, a shorter section of beads, a centerpiece, and then the large loop containing five decades. Familiarizing yourself with this layout ensures that your Crochet Rosary – Tutorial results in a functionally correct liturgical item that follows the proper counting sequence.
Finally, set up a comfortable workspace with good lighting. Working with fine threads can be taxing on the eyes, so a dedicated craft lamp is recommended. Once your materials are organized and you have a basic understanding of the stitch counts, you are ready to move on to the core construction of this spiritual crochet project, ensuring every loop is crafted with intention.
The heart of any Crochet Rosary – Tutorial is the creation of the ten Hail Mary beads that make up each decade. To create a defined, raised bead, the popcorn stitch is highly effective. To do this, work 4 or 5 double crochets into the same stitch, drop the loop from your hook, insert the hook into the first double crochet, and pull the dropped loop through to create a rounded “pop” effect.
Spacing is crucial for a balanced crochet design. Between each bead, it is common to work two or three chain stitches. This allows the rosary to remain flexible and easy to fold. In this Crochet Rosary – Tutorial, we recommend keeping the tension consistent so that each of the five decades is the same length, providing a symmetrical and professional finish to the entire loop.
The Our Father beads should be slightly different from the Hail Mary beads to provide a tactile distinction. You can achieve this by using a different stitch pattern, such as a larger puff stitch, or by changing the yarn color for those specific points. This helps the person using the crocheted rosary to navigate the prayers without needing to look at the beads constantly.
Connecting the decades requires a seamless join. Many crochet patterns suggest working the entire loop in one continuous piece of crochet thread. This minimizes the number of knots and increases the overall strength of the handmade item. If you are following this Crochet Rosary – Tutorial as a beginner, take your time with the slip stitches that join the final decade back to the centerpiece.
The centerpiece itself can be a simple crocheted circle or a small heart-shaped motif. This serves as the junction where the main loop meets the “pendant” section of the rosary. You can work single crochet stitches around a small plastic ring to give the centerpiece more stability, or simply crochet a flat disc using a magic ring technique to start.
As you progress through the Crochet Rosary – Tutorial, remember to count your stitches frequently. It is very easy to accidentally add an extra chain or miss a bead when working on repetitive sections. A standard rosary must have exactly 53 Hail Mary beads and 6 Our Father beads. Double-checking your work after every decade will save you from having to “frog” or rip out your stitches later.
No Crochet Rosary – Tutorial is complete without a beautifully detailed crucifix. You can create a simple cross by working a long strip of stitches for the vertical bar and a shorter strip for the horizontal bar, then sewing them together. Alternatively, a more advanced lace crochet cross can be made in one piece by using increases and decreases to create the traditional flared ends of a Celtic or Roman cross.
For a sturdier crocheted crucifix, consider working two identical cross shapes and joining them with single crochet around the edges. You can insert a small piece of plastic or stiffened fabric between the layers to ensure the cross holds its shape. This Crochet Rosary – Tutorial emphasizes that the crucifix is the focal point of the piece, so take extra care with your finishing techniques.
Once the cross is finished, use a tapestry needle and a strong thread to attach it to the bottom of the shorter bead section. The connection must be very secure, as this is the part of the rosary that often experiences the most tension. Using a double knot hidden inside the stitches and weaving the ends back through the beads will ensure the crucifix never detaches.
Assembly also involves checking the drape of the yarn. If your Crochet Rosary – Tutorial feels too stiff, you can lightly steam the piece with an iron (do not touch the iron to the yarn if it is synthetic). This “blocking” process helps the chains relax and allows the crocheted beads to sit more naturally. It makes a significant difference in the professional quality of the final product.
In this Crochet Rosary – Tutorial, we also suggest adding a personal touch during assembly. You might want to thread a small metal charm or a miraculous medal onto the centerpiece. Combining crochet with traditional jewelry components creates a “mixed media” look that is very popular in the modern crafting community and adds a layer of authenticity to the religious gift.
The final pargraphs of our Crochet Rosary – Tutorial assembly focus on the weaving of ends. This is the most tedious part but also the most important for longevity. Use a sharp needle to pull the yarn tails through the center of the beads for at least two inches before trimming. This prevents the stitches from unraveling even with heavy daily use or if the rosary is washed.
One of the best parts of following a Crochet Rosary – Tutorial is the ability to customize the size. For children, you can use a slightly thicker worsted weight yarn to create a “Chubby Rosary” that is easier for small hands to hold. These are often called soft rosaries and are perfect for teaching toddlers the basics of the Catholic faith in a safe and tactile way.
For those who enjoy a more bohemian style, adding small wooden beads inside the crocheted shells can add weight and a pleasant sound to the piece. This Crochet Rosary – Tutorial encourages experimentation with bead encapsulation, where you crochet around a physical bead. This technique provides the look of yarn with the structural integrity of a traditional beaded rosary.
Marketing your work is another aspect to consider if you are using this Crochet Rosary – Tutorial for a business. These items sell wonderfully on platforms like Etsy or at church craft fairs. Using keywords like Personalized Rosary, Handmade Prayer Beads, and Custom Crochet Gift in your listings will help your SEO and attract buyers looking for unique, religious items.
Packaging is the final step in the Crochet Rosary – Tutorial process. Placing the handmade rosary in a small linen drawstring bag or a crocheted pouch adds value and protects the delicate thread from snagging. Including a small card that explains the handmade nature of the item and perhaps a prayer card makes the gift feel even more special and complete.
If you are making these for charity, consider using soft acrylic yarn. Many hospitals and nursing homes appreciate crocheted rosaries because they are soft against the skin and easy to clean. This Crochet Rosary – Tutorial can be adapted for comfort ministries, providing a sense of peace and a tactile prayer tool to those who are going through difficult times.
Lastly, remember that a Crochet Rosary – Tutorial is just the beginning. Once you master the basic string of beads, you can apply these skills to make crocheted chaplets, prayer ropes, or even jewelry. The repetitive nature of crochet is itself a form of meditation, making the process of creating a rosary just as spiritual and rewarding as the final product itself.
Can I wash a crochet rosary?
Yes, if you use cotton thread or acrylic yarn, you can hand wash the rosary in cool water with mild soap. Lay it flat on a towel to dry to maintain the shape of the beads and the crucifix.
How long does it take to complete this Crochet Rosary – Tutorial?
For an intermediate crafter, it typically takes between 2 to 4 hours to complete the entire rosary, including the crucifix and assembly. Beginners may need a bit more time to master the bead stitches.
What is the best stitch for the beads?
The popcorn stitch is generally considered the best for a Crochet Rosary – Tutorial because it creates a distinct, firm bump that feels most like a traditional bead. Puff stitches are a softer alternative.
Do I need to be an expert to follow this tutorial?
Not at all! As long as you know the basic stitches like chain, single crochet, and double crochet, you can successfully follow this Crochet Rosary – Tutorial. The popcorn stitch is the only “special” stitch you’ll need to learn.
Is a crochet rosary “official” for prayer?
Absolutely. In the Catholic tradition, a rosary is a tool for counting prayers. The material (wood, plastic, or yarn) does not change its spiritual validity. Many people even have their crochet rosaries blessed by a priest.
What yarn should I avoid for this project?
Avoid fuzzy yarns or mohair, as they hide the definition of the beads. You want a smooth yarn like mercerized cotton so that each prayer bead is clearly felt by the fingers.
In this Crochet Rosary – Tutorial, we have covered everything from selecting the finest mercerized cotton thread to mastering the popcorn stitch for tactile beads and constructing a durable crocheted crucifix.
We learned that the secret to a professional-looking handmade rosary lies in consistent tension, proper spacing of the decades, and secure assembly techniques. By following these steps, you now have the skills to create a beautiful, personalized spiritual tool that serves as a perfect gift for religious milestones or personal devotion.


