
Crochet Flower - Tutorial

Crochet Bag – Tutorial is one of the most rewarding projects you can undertake if you are looking to combine functional fashion with the meditative art of needlework. Whether you are a seasoned fiber artist or a curious beginner picking up a hook for the first time, creating your own accessory allows for a level of personalization that store-bought items simply cannot match. In this comprehensive guide, we will explore the essential techniques and creative steps required to construct a durable, stylish, and high-quality bag from scratch.
Modern fashion has seen a massive resurgence in handmade aesthetics, making the Crochet Bag – Tutorial a trending topic for eco-conscious creators. Beyond the style factor, making your own crochet bag is a fantastic way to practice sustainable fashion and reduce your reliance on mass-produced plastic alternatives. By choosing specific yarn weights and stitch patterns, you can design everything from a lightweight summer tote to a heavy-duty market bag that will last for years to come.
As we dive into this Crochet Bag – Tutorial, keep in mind that the beauty of crocheting lies in the details. Throughout this article, we will discuss how to select the right crochet hooks, the importance of gauge, and how to master the basic crochet stitches like the single crochet, double crochet, and the slip stitch. By following these structured steps and SEO-friendly tips, you will not only improve your crafting skills but also understand the technical side of creating a professional-grade accessory.
Selecting the perfect yarn is the foundational step of any Crochet Bag – Tutorial. For a bag that needs to hold weight, like a market bag or a handbag, it is highly recommended to use cotton yarn or mercerized cotton. These fibers are less stretchy than wool or acrylic, ensuring that your finished crochet project maintains its shape even when filled with your daily essentials.
The weight of the yarn significantly impacts the final look and durability of your piece. Most Crochet Bag – Tutorial guides suggest using medium weight yarn (worsted) or bulky yarn for beginners. Thicker yarns allow you to see your stitches more clearly and help the project work up much faster, which is great for maintaining motivation during your first few attempts at a DIY bag.
In addition to the yarn, your choice of crochet hook size is critical for achieving the right tension. For a sturdy crochet bag, you often want a tighter fabric so that small items don’t fall through the gaps between stitches. Using a hook that is slightly smaller than what the yarn label recommends can create a dense, “bulletproof” fabric that adds a professional touch to your handmade accessory.
Don’t forget the essential notions that make the finishing process much smoother. You will need a sharp pair of craft scissors, a tapestry needle for weaving in your ends, and stitch markers. Stitch markers are especially vital in a Crochet Bag – Tutorial because they help you keep track of the beginning of your rounds, preventing lopsided designs or accidental increases.
If you want to elevate your crochet bag to a boutique level, consider incorporating non-crochet elements. Adding leather handles, a magnetic snap closure, or a fabric lining can transform a simple crochet project into a high-end fashion statement. These additions not only look great but also provide structural reinforcement, making your crochet tote much more functional for heavy use.
Finally, always check your gauge before starting the main body of the bag. While a slightly different size might not matter as much for a scarf, it can drastically change the proportions of a crochet bag. Taking ten minutes to crochet a gauge swatch ensures that your pattern will turn out exactly as intended, saving you the frustration of having to “frog” or rip out your hard work later.
The most common stitch used in a Crochet Bag – Tutorial is the single crochet (sc). This stitch creates a tight, thick fabric that is perfect for the bottom and sides of a bag. Because the single crochet stitch is compact, it provides the structural integrity needed to prevent the bag from sagging excessively when you put your phone or wallet inside.
Another popular choice for adding texture is the half double crochet (hdc). This stitch is a “goldilocks” option—it is taller than a single crochet but denser than a double crochet. Many designers use the hdc in a Crochet Bag – Tutorial to create beautiful ribbed effects or to speed up the construction of the bag’s body without sacrificing too much of the fabric’s opacity.
When you want to add a bit of flair or a “lace” look to a summer beach bag, the double crochet (dc) or treble crochet (tr) are your best friends. These stitches are taller and create more open space, which works beautifully for mesh-style market bags. In this Crochet Bag – Tutorial, we often combine these taller stitches with chains to create breathable, stretchy designs that are perfect for carrying produce.
Working in the continuous round versus joined rounds is a technical decision you must make early on. Most crochet bag patterns prefer working in a spiral (continuous) to avoid a visible seam running up the side of the bag. This technique requires a stitch marker to identify the first stitch of each row, ensuring your crochet bag remains perfectly symmetrical and aesthetically pleasing.
Increasing and decreasing are the “shaping” tools of the Crochet Bag – Tutorial. To create a flat base, you will use increases, which means placing two stitches into a single stitch from the previous row. Mastering the math of a flat circle or an oval base is essential for ensuring your bag sits upright and provides enough internal volume for your belongings.
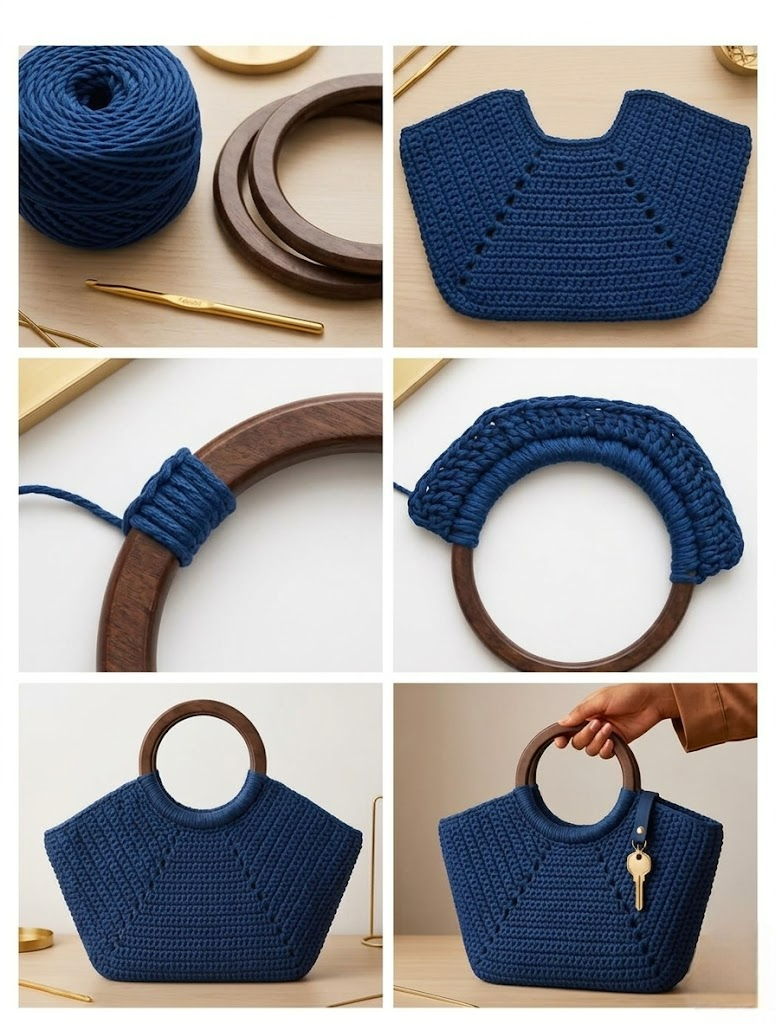
Lastly, finishing techniques like the slip stitch (sl st) surface crochet can be used to add decorative borders or to reinforce the bag handles. The handles are the point of highest stress, so reinforcing them with a row of slip stitches or using a thermal stitch can prevent the yarn from stretching out over time. A well-constructed handle is the hallmark of a high-quality Crochet Bag – Tutorial.
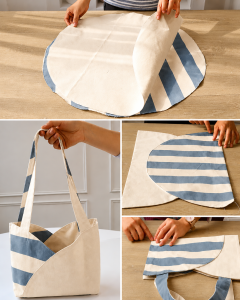
The first phase of the actual construction in this Crochet Bag – Tutorial usually starts at the base. You can choose between a rectangular base, which is made by crocheting rows back and forth, or a circular base worked in rounds. A rectangular base is often easier for beginners, as it allows you to practice keeping your edges straight before moving on to the complexities of circular math.
Once the base reaches your desired dimensions, you will transition to the sides of the bag. This is usually done by crocheting into the back loops only (BLO) for one round. This simple trick creates a “ridge” that acts as a folding point, allowing the sides of your crochet bag to stand up vertically. It is a small detail that makes a massive difference in the professional appearance of your handicraft.
The body of the crochet bag is where you can let your creativity shine by playing with color changes or stitch patterns. You can use variegated yarn for a self-striping effect or practice tapestry crochet to create geometric shapes and logos. In this Crochet Bag – Tutorial, we emphasize that the body is the largest surface area, so pick a pattern that you enjoy repeating.
Consistency is key during the body construction. Ensure your tension remains even throughout the project; if you start crocheting more loosely as you relax, the top of the bag will be wider than the bottom. Regularly measuring your work against a ruler helps keep the Crochet Bag – Tutorial on track and ensures that your finished project matches the initial design specifications.
As you reach the top of the bag, you may want to create a drawstring closure or space for a zipper. For a drawstring, you simply create a row of eyelets by alternating double crochet stitches and chain spaces. This is a very popular feature in a Crochet Bag – Tutorial for boho-style backpacks or small pouches, as it is both functional and decorative.
Before moving to the handles, it is often wise to add a border of single crochet or crab stitch (reverse single crochet). This finishes the top edge of the bag, making it look polished and preventing the top row of stitches from stretching out. A clean edge is a vital step in any Crochet Bag – Tutorial that aims for a high-end, retail-ready look for your handmade gift.
The handles are arguably the most important part of any Crochet Bag – Tutorial because they determine how the bag feels when worn. You can crochet the handles directly onto the bag or make them separately and sew them on later. For maximum strength, many crafters prefer the I-cord technique or a wide strap made of multiple rows of single crochet, which distributes the weight better on the shoulder.
Attachment points must be reinforced. When you sew the handles to the body of the crochet bag, use a cross-stitch pattern (an “X” inside a square) with your tapestry needle. This ensures that the weight of the bag’s contents doesn’t pull the stitches apart. In this Crochet Bag – Tutorial, we recommend using a doubled strand of yarn for this part to provide extra security.
Blocking your finished piece is a step that many beginners skip, but it is highly recommended in this Crochet Bag – Tutorial. Blocking involves wetting your crochet work and pinning it to a specific shape until it dries. This process “sets” the stitches, evens out the tension, and gives your crochet bag a much more professional, finished look that is free from wonky edges or curls.
Adding a lining is a game-changer for durability. Even the tightest crochet stitches can stretch over time. By sewing a simple fabric bag and inserting it inside your crochet creation, you provide a structural skeleton that prevents sagging. It also allows you to add internal pockets for your keys or phone, which adds immense value to your DIY crochet bag.
Embellishments are the final “cherry on top.” You can add crochet flowers, tassels, or pompoms to give your bag a unique personality. If you followed this Crochet Bag – Tutorial to make a gift, adding a personalized “Handmade with Love” tag can make the recipient feel truly special and appreciate the hours of labor that went into the gift.
Finally, take a moment to inspect your work and weave in all loose ends securely. Use your tapestry needle to weave the yarn tails through several stitches in different directions so they don’t pop out later. Now that you have completed this Crochet Bag – Tutorial, you have a beautiful, functional piece of art that showcases your skills and creativity to the world.
What is the best yarn for a crochet bag?
The best yarn for a crochet bag is usually cotton or a cotton blend. Cotton is durable, has very little stretch, and shows off stitch definition beautifully. Avoid 100% animal fibers like wool unless you plan on felting the bag, as they will stretch significantly under the weight of your items.
How do I prevent my crochet bag from stretching?
To prevent stretching, you can use a smaller hook size to create a tighter fabric, choose non-stretchy yarn, or add a fabric lining. Using specific stitches like the thermal stitch or waistcoat stitch also creates a much denser, sturdier material that resists pulling.
Is it hard to add a zipper to a crochet bag?
Adding a zipper is easier than it looks! You can hand-sew a zipper to the top edge using a backstitch and regular sewing thread that matches your yarn color. Alternatively, you can crochet directly into the zipper tape if you prep it first with a sharp needle or a rotary cutter with a skip blade.
How much yarn do I need for a standard tote bag?
Most medium-sized crochet tote bags require between 400 and 800 yards of worsted weight yarn. This usually equates to 2 to 4 standard skeins. Always buy an extra skein just in case, especially if you plan on adding long handles or decorative tassels.
Can a beginner finish this Crochet Bag – Tutorial?
Absolutely! This Crochet Bag – Tutorial is designed to be accessible. By using basic stitches like the single crochet and following the steps for a rectangular base, a beginner can successfully complete their first bag in just a few days of consistent work.
How do I wash my handmade crochet bag?
If you used cotton yarn, most bags can be hand-washed in cool water with a mild detergent. Lay the bag flat on a towel to air dry. Avoid the dryer, as the heat can shrink the cotton or cause the stitches to lose their shape. If your bag has leather handles, be sure to remove them or avoid getting them wet.
This Crochet Bag – Tutorial has covered everything from initial material selection to the final finishing touches. We have learned that the key to a successful crochet bag lies in choosing the right cotton yarn, mastering sturdy stitches, and reinforcing the handles for long-term use.
By following these steps, you have transformed a simple ball of string into a functional, stylish, and sustainable accessory that reflects your personal style.


