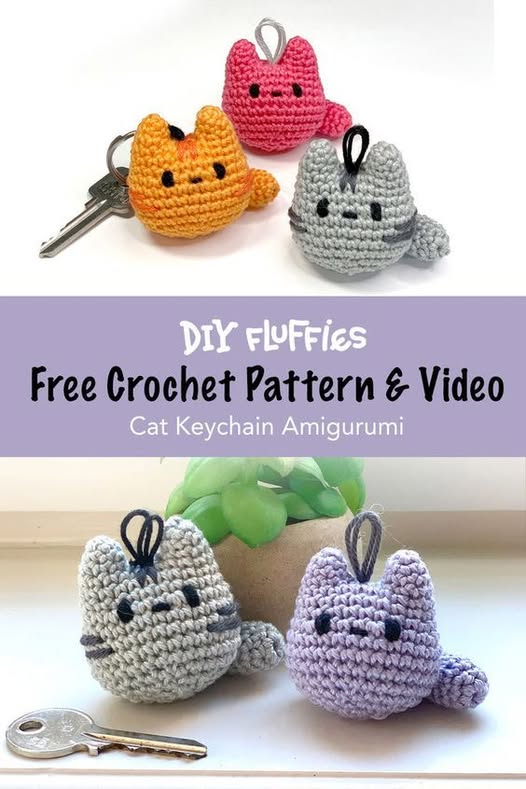
If you’re looking for a fun and adorable crochet project that’s small, quick, and filled with personality, then this Cat Keychain Amigurumi – Pattern is the perfect choice. Not only does it make for a cute handmade accessory, but it also works as a thoughtful gift for cat lovers and crochet fans alike. Whether you’re new to amigurumi or a seasoned crocheter, this project brings joy with every stitch.
The charm of amigurumi lies in its ability to turn simple yarn into expressive characters. With this Cat Keychain Amigurumi – Pattern, you can create miniature cats that can be clipped to backpacks, purses, keys, or even used as party favors. Best of all, these small items require very little yarn and minimal time—making them ideal for using leftover scraps from other projects.
Advertising
In this article, we’ll guide you through everything you need to know about making your own Cat Keychain Amigurumi, including materials, step-by-step instructions, customization ideas, and a helpful FAQ. Let’s dive in and bring your little yarn cat to life!
Image From Pinterest
1. What is Cat Keychain Amigurumi and Why Make One?
Cat Keychain Amigurumi is a mini crochet stuffed cat made with soft yarn and usually attached to a metal keyring or clip. It is designed to be portable, cute, and fun to make, giving a personal and crafty touch to everyday items.
Perfect for Beginners and Quick Projects Because of its small size and simple structure, this project is ideal for beginners learning the basics of amigurumi. You’ll only need to learn a few foundational stitches like the magic ring, single crochet, and invisible decreases.
A Thoughtful Handmade Gift A Cat Keychain Amigurumi is a heartwarming gift, especially for cat lovers. It shows effort, creativity, and attention to detail—all the things that store-bought gifts can’t replicate.
Great for Selling at Craft Fairs or Online These keychains are perfect to sell at craft fairs, Etsy shops, or local boutiques. Their small size and cuteness make them irresistible, and you can produce multiple items in a short amount of time.
Endless Customization Options From yarn color to facial expression, to little accessories like bows or collars, you can personalize each cat to suit a different style or personality. You can even make a whole collection based on real pets!
Encourages Sustainable Crafting Because they require so little yarn, these amigurumi keychains are a wonderful way to use up leftover materials. This promotes waste reduction and sustainable crafting.
Portable and Functional Not only are they cute, but they’re also functional. Attach your mini cat to your keys or bag, and it becomes a fun accessory that’s easy to take everywhere.
2. Materials You’ll Need for the Pattern
To make your own Cat Keychain Amigurumi – Pattern, you’ll need a few basic materials, most of which you may already have in your crochet toolbox.
Yarn Use worsted weight or DK cotton or acrylic yarn. Cotton tends to hold shape better and gives a smooth finish, while acrylic makes for softer plushies. Choose your favorite cat color—gray, black, white, orange, or even pastel tones for a kawaii look.
Crochet Hook A 2.5mm or 3.0mm crochet hook is generally used for amigurumi. The hook should create tight stitches so that the stuffing doesn’t poke through.
Stuffing (Polyfill) You’ll need a small amount of polyester fiberfill stuffing. If you’re eco-conscious, consider recycled stuffing options or use yarn scraps.
Safety Eyes or Embroidery Thread For the cat’s face, you can use 6mm–8mm safety eyes, or embroider the features using black thread if you’re making it child-safe.
Tapestry Needle Used for sewing the parts together and weaving in ends. A blunt-tipped needle works best for yarn.
Keychain Ring or Lobster Clasp Attach a sturdy keyring or clasp to the top of your amigurumi cat. These can be found in any craft store or ordered online in bulk.
3. Step-by-Step: Creating the Cat Keychain Amigurumi
Here’s a simplified overview of how to follow a typical Cat Keychain Amigurumi – Pattern. Every pattern will vary slightly, but the basic structure remains similar.
Advertising
Step 1: Crochet the Head and Body Start with a magic ring and work in continuous rounds using single crochet stitches. The head and body are usually one piece, formed by increasing and then decreasing your stitch count. Stuff the piece before closing it completely.
Step 2: Make the Ears The ears are made separately and sewn onto the top of the head. Usually small triangles made with 3–4 rounds, they give the cat its adorable silhouette.
Step 3: Add the Tail The tail can be a simple chain with a row of single crochets or a tiny tube, depending on the pattern. Sew it to the back of the body to give the character more dimension.
Step 4: Embroider or Add Eyes and Nose Use safety eyes or embroidery thread to make the eyes and nose. For added cuteness, blush the cheeks with a bit of pink pastel chalk or embroidery thread.
Step 5: Attach the Keychain Hardware Thread a loop of yarn or ribbon through the top of the head and attach your keyring or clasp. Make sure it’s secure, especially if the keychain will be used daily.
Step 6: Customize with Accessories Add a tiny scarf, collar, bow, or heart to personalize your cat. You can even add little whiskers using embroidery floss for extra detail.
4. Creative Ideas for Customization
One of the joys of working with the Cat Keychain Amigurumi – Pattern is how easy it is to customize. Below are some popular and fun ideas to make each cat truly your own.
Make a Rainbow Set Use different yarn colors for each cat and create a rainbow collection. These are great to gift as a set or to sell as limited edition collections.
Create Cat Breeds Design your keychains to mimic real cat breeds—Siamese, Calico, Tuxedo, Tabby, etc. Use specific color patterns to replicate their markings.
Holiday-Themed Cats Add Santa hats, Halloween costumes, or Valentine hearts to turn your amigurumi cats into seasonal decorations or gifts.
Use Sparkle or Variegated Yarn Experiment with glitter yarn or multicolored yarn to give your cat a unique twist. This is especially fun for fantasy-themed versions like a “Galaxy Cat” or “Unicorn Cat.”
Add Mini Props Make tiny fish, balls of yarn, or books to go with your cat. These can be attached as extras to make your keychain even more adorable.
Make Matching Sets with Other Animals If you enjoy amigurumi, you can create a series with other animal keychains—dogs, bears, pandas—so your cat has friends!
FAQ – Cat Keychain Amigurumi – Pattern
Q1: Is this pattern beginner-friendly? Yes! The Cat Keychain Amigurumi – Pattern is a great beginner project. It uses basic stitches and is small in scale, making it less intimidating for new crocheters.
Q2: How long does it take to complete one keychain? Most crocheters can complete one cat in 1 to 2 hours. It’s a quick and satisfying project.
Q3: What kind of yarn should I use? Worsted weight cotton or acrylic yarn works best. Cotton holds shape better, but acrylic offers a softer feel.
Q4: Are safety eyes necessary? No. You can embroider the eyes instead, especially if the keychain is for a child or if you want a completely handmade look.
Q5: Can I sell keychains made from this pattern? Yes, handmade items based on the Cat Keychain Amigurumi – Pattern are great for selling, especially during holiday seasons or at craft markets.
Q6: How do I attach the keychain ring securely? Use a yarn loop, ribbon, or metal loop sewn securely into the top of the head. Reinforce the attachment with tight stitches.
Conclusion
The Cat Keychain Amigurumi – Pattern is more than just a crochet project—it’s a chance to turn yarn into joy. With just a few materials and a little bit of time, you can create a tiny cat that carries personality, love, and handmade charm wherever it goes. Whether you’re making them for gifts, sales, or your own keyring, each one is a delightful expression of creativity.
We hope this guide inspired you to give this fun and festive pattern a try. If you’ve made your own Cat Keychain Amigurumi, we’d love to hear your experience! Please leave a sincere comment below sharing your thoughts, suggestions, or photos of your finished creations. Happy crocheting!


