
Crochet Flower - Tutorial

Crochet Hat – Tutorial: learning how to create a beautiful, cozy, and stylish accessory from scratch is one of the most rewarding journeys you can undertake in the crafting world. Whether you are looking to stay warm during the chilly winter months, crafting a thoughtful handmade gift for a loved one, or even aiming to start your own small business, mastering the art of a crochet hat is a fantastic milestone. This comprehensive tutorial is designed to guide you through every single step of the process, ensuring that even if you have never held a hook before, you will finish with a product you are incredibly proud to wear.
The beauty of a handmade crochet hat lies in its absolute versatility and the endless room for personalization. By simply changing your yarn type, adjusting your stitch style, or switching up your color palette, a basic tutorial transforms into a gateway for creating slouchy beanies, structured bucket hats, or classic ribbed caps. Throughout this guide, we will break down the essential techniques, unravel the mystery behind tension, and provide you with actionable, step-by-step insights that make the entire crafting experience feel like a breeze.
As we dive into this Crochet Hat – Tutorial, you will discover that the process is not just about following directions; it is about embracing a relaxing, therapeutic hobby that connects you to a timeless tradition. We have optimized this guide with the best SEO practices and clear, structural advice to make sure you get the absolute most out of your crafting time. So, grab your favorite yarn, find a comfortable spot to sit, and let’s explore the wonderful world of crochet together!
Selecting the perfect yarn and hook combination is the critical first step for any successful crochet hat project. For beginners diving into a tutorial like this, a medium-weight yarn (often labeled as worsted weight or number 4) is highly recommended because it allows you to see your stitches clearly and works up relatively quickly.
Along with your yarn, you will need the correct hook size, which is usually indicated on the yarn label, though a 5.0mm or 5.5mm hook is a standard, versatile choice. Having a pair of sharp scissors, a yarn needle for weaving in those loose ends, and a few stitch markers on hand will make your Crochet Hat – Tutorial experience much smoother.
When considering materials, think about the fiber content, as acrylic and wool blends offer excellent elasticity and warmth for a winter crochet hat. Cotton yarn can also be used if you prefer a lighter, more breathable hat for the spring or autumn seasons.
Proper material preparation prevents frustration down the line, ensuring that your stitches maintain the perfect balance of tightness and flexibility. Taking a few minutes to gather high-quality tools means your tutorial progress will be seamless and highly enjoyable.
Keep in mind that using the exact materials suggested helps you match the gauge of the project, which is essential for ensuring the final piece actually fits your head. Once your workspace is set up with these essentials, you are fully prepared to begin stitching your masterpiece.
Before jumping into the main body of our Crochet Hat – Tutorial, it is vital to understand the foundational stitches required to build the structure. The most common stitches used in a classic crochet hat include the chain stitch, the single crochet, and the half double crochet, which provides a lovely, dense texture.
Mastering these basic techniques allows you to create a beautiful fabric that is both stretchy and durable, perfect for everyday wear. This tutorial emphasizes practicing these stitches on a small swatch before working on the actual hat to build up your rhythm and confidence.
Understanding gauge—which is simply the number of stitches and rows per inch—is the secret weapon to making sure your crochet hat turns out the exact size you intend. If your stitches are too tight, the hat will be stiff and small; if they are too loose, it will turn out oversized and floppy.
To check your gauge for this tutorial, crochet a small square using your chosen yarn and hook, then measure how many stitches fit into a four-inch area. Adjust your hook size up or down if your count does not match the recommendations, ensuring a flawless fit.
Consistency in your tension comes with practice, so do not feel discouraged if your first few rows look a bit uneven. As you progress through the Crochet Hat – Tutorial, your hand muscles will adapt, and your stitches will naturally become beautifully uniform.
By dedicating time to learning these core elements, you lay a rock-solid foundation that makes the rest of the tutorial incredibly easy to follow. Now that you understand the stitches and gauge, you are ready to start shaping your project.
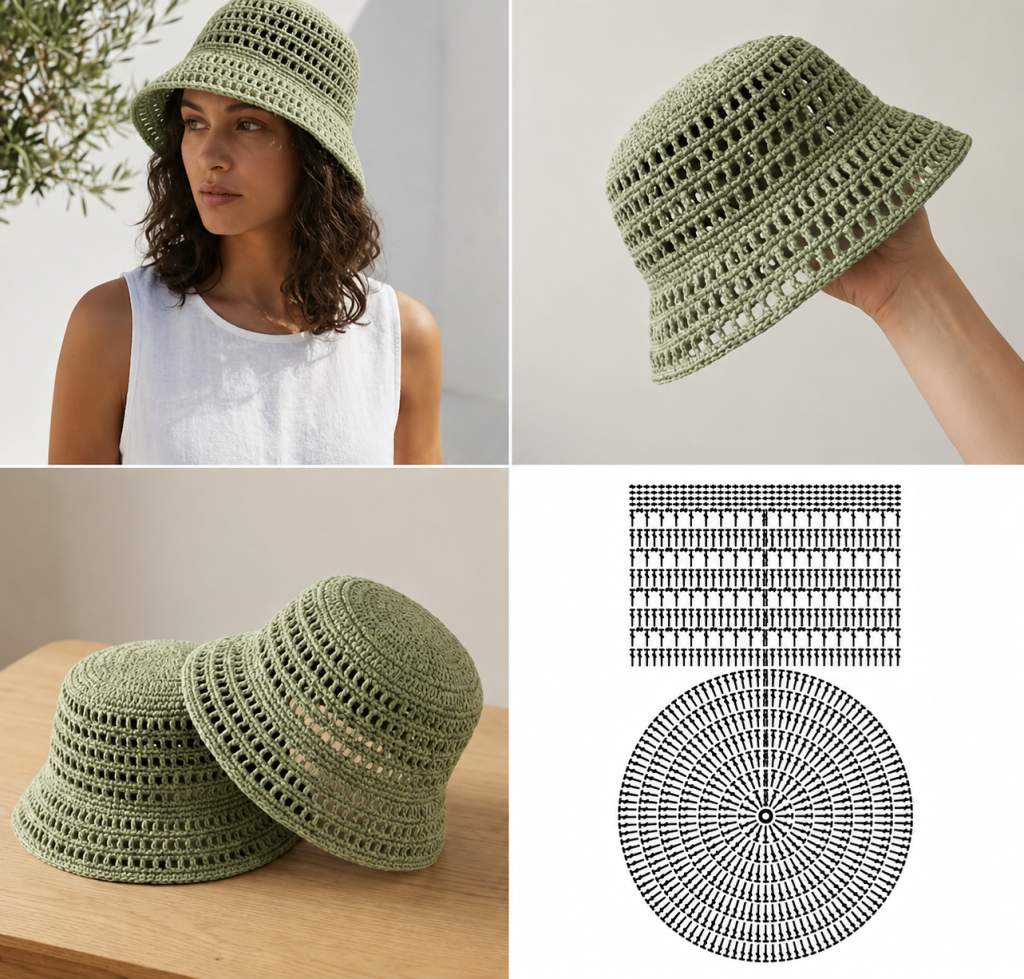
Now we reach the heart of our Crochet Hat – Tutorial, where we actually construct the shape of the beanie from the top down or the bottom up. For this specific guide, we are focusing on a top-down approach, which begins with creating a magic ring or a small loop of chains.
You will work a specific number of stitches into this initial ring, which forms the very crown of your crochet hat. From there, the tutorial guides you through gradual increase rounds, where you carefully add stitches to expand the circle into a flat disc.
Once the crown reaches the correct diameter for your head size, the increasing stops, and you begin working even rounds. This is the magic phase of the Crochet Hat – Tutorial where the flat circle begins to cup and grow downwards, forming the sides of the hat.
Continue working these straight rows until the body of the hat reaches just above your ears, maintaining an even tension throughout. This section of the tutorial is incredibly relaxing, as you can easily watch your favorite show or listen to a podcast while your hands do the work.
Adding a ribbed brim or a simple border at the bottom edge gives your crochet hat a polished, professional look while providing extra grip to keep it securely on your head. You can customize the length of this section if you prefer a stylish slouchy look or a classic, snug beanie fit.
Finishing up this stage involves fastening off your yarn securely and using your yarn needle to weave in all the remaining loose ends. Following this structured tutorial ensures that your final piece looks clean, tidy, and ready to face the elements outside.
The true joy of completing a Crochet Hat – Tutorial is the ability to customize the final product to perfectly match your personal fashion style. You can easily add a fluffy yarn pom-pom to the top, experiment with vibrant color stripes, or even sew on a custom leather patch for a boutique finish.
As you become more comfortable with the steps in this tutorial, you can experiment with advanced stitch patterns like the basketweave or cable stitch to add rich texture to your crochet hat. The skills you learn here serve as a springboard for countless future creative projects.
Taking proper care of your handmade items ensures that the time and effort you invested in this tutorial lasts for many years to come. Always check the care instructions on your yarn label, as many handmade items benefit greatly from gentle hand washing.
To wash your crochet hat, submerge it in cool water with a mild detergent, gently squeeze out the excess water without wringing, and lay it flat on a clean towel to dry. This simple care routine preserves the shape, elasticity, and softness of the yarn fibers.
Sharing your completed projects with the crafting community online is a wonderful way to celebrate your success and inspire other beginners to start their own Crochet Hat – Tutorial journey. Your unique spin on this classic design might be exactly what someone else needs to see to get started.
Remember that every single stitch you made represents patience, creativity, and learning a valuable new skill. Wear your newly crafted accessory with pride, knowing you mastered this detailed guide from start to finish.
What is the best yarn to use for a beginner crochet hat tutorial?
For beginners, a category 4 worsted weight acrylic or wool-blend yarn is the absolute best choice. It is easy to handle, holds its shape well, and allows you to see your stitches clearly as you follow along with the tutorial.
How do I know what size hook to use for my crochet hat?
The easiest way to find the correct hook size is to check the back of your yarn label, which will display a recommended size. For a standard worsted weight crochet hat, a 5.0mm (H-8) or 5.5mm (I-9) hook is typically ideal.
How can I make sure my crochet hat fits perfectly?
To ensure a perfect fit, always check your gauge before starting the main project and measure your head circumference. Adjusting your hook size or adding/subtracting a few rows as outlined in the tutorial will help you achieve the exact fit you need.
Can a complete beginner finish this crochet hat tutorial successfully?
Absolutely! This Crochet Hat – Tutorial is specifically broken down into simple, manageable steps with foundational stitches, making it highly accessible for anyone willing to practice and learn.
How long does it take to complete a standard crochet hat?
For a beginner, it might take anywhere from three to six hours of focused stitching to complete your first crochet hat. As your muscle memory improves and you get used to the rhythm, you will find you can finish a hat in just a couple of hours.
Why is my crochet hat turning out wavy or curving too fast?
If your hat looks wavy, you might be adding too many increase stitches during the crown stage; if it is curving too fast into a cone shape, you might not be increasing enough. Double-check your stitch count for each round against the tutorial guidelines to fix this issue.
In this comprehensive Crochet Hat – Tutorial, we have covered everything from choosing the perfect worsted weight yarn to mastering the foundational stitches and checking your gauge for an ideal fit.
We explored the step-by-step process of shaping the crown, working the body of the hat, and adding those gorgeous finishing touches that make your project truly unique. By following these structured guidelines, you have learned a beautiful, practical skill that allows you to create cozy accessories whenever inspiration strikes.


