
Crochet Flower - Tutorial

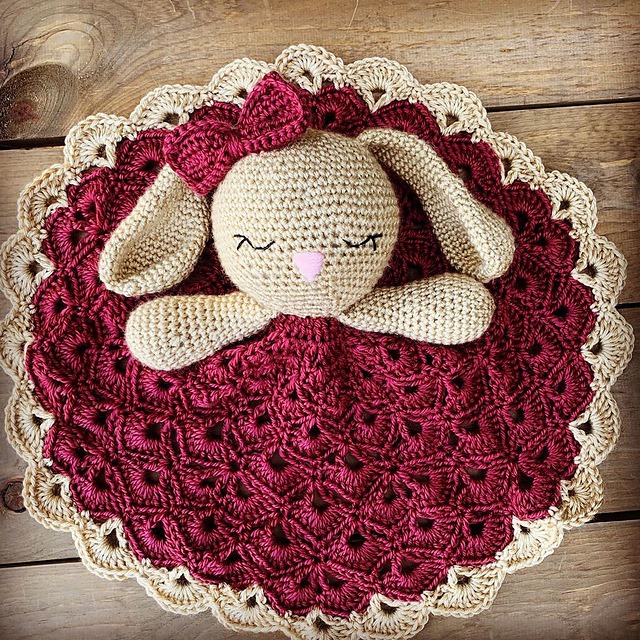
Finding the perfect Bunny Lovey Parts & Pieces Crochet – Pattern is a heartwarming journey for any crafter looking to create a cherished security blanket that combines the softness of a plush toy with the comfort of a classic granny square. This specific project is a staple in the world of baby gifts, as it provides infants with a tactile companion that is easy to grasp and incredibly soothing against their delicate skin. Whether you are preparing for a new arrival in your own family or crafting a thoughtful handmade gift for a baby shower, this pattern offers the ideal balance of structural variety and rhythmic stitching that makes the creative process truly enjoyable.
Working on a Bunny Lovey Parts & Pieces Crochet – Pattern allows you to practice several different techniques in one single project, from amigurumi-style shaping for the head and ears to flat-stitch lace work for the blanket body. This “hybrid” nature of the design is what makes it so engaging, as you transition between working in tight spirals and open, airy rounds. By choosing a high-quality hypoallergenic yarn and a soft color palette, you ensure that the finished lovey is not only beautiful to look at but also safe and durable enough to withstand years of cuddling, washing, and play.
The magic of the Bunny Lovey Parts & Pieces Crochet – Pattern lies in the personality you can breathe into the character through small, intentional details. From the placement of the sleepy embroidered eyes to the length of the floppy ears, every choice you make contributes to a unique final product that feels like a one-of-a-kind heirloom. In this comprehensive guide, we are going to break down every component needed to master this crochet pattern, ensuring that your assembly is seamless and your stitches are consistent, resulting in a professional-grade security blanket that will be loved for generations.
Selecting the right yarn is the most important decision you will make for your Bunny Lovey Parts & Pieces Crochet – Pattern. Since this item is intended for babies, you must prioritize soft, breathable fibers that are machine washable. Many experts recommend a cotton-acrylic blend because it offers the softness of cotton with the durability and “bounce” of acrylic, ensuring the bunny’s head maintains its shape even after being squeezed. Avoid yarns with long fibers or “fuzz” that could be a choking hazard or irritate a baby’s sensitive respiratory system.
For the amigurumi portion of the Bunny Lovey Parts & Pieces Crochet – Pattern, you will need a crochet hook that is slightly smaller than the yarn label suggests. This creates a tight fabric that prevents the polyester fiberfill stuffing from peeking through the stitches. A 2.5mm or 3.0mm hook is usually ideal for the head and arms, while you can switch to a larger 4.0mm or 5.0mm hook for the blanket section to ensure it has a soft, flexible drape that isn’t too stiff for a baby to cuddle.
Safety is paramount when constructing the Bunny Lovey Parts & Pieces Crochet – Pattern. While “safety eyes” are common in many crochet toys, most pediatric experts recommend embroidered facial features for items intended for infants under three years old. Using a dark embroidery floss to stitch on the eyes and a soft pink for the nose ensures there are no small plastic parts that could potentially come loose. This simple adjustment makes your handmade security blanket much safer for unsupervised sleep and play.
The “blanket” part of the Bunny Lovey Parts & Pieces Crochet – Pattern often features a classic star or granny square design. To achieve a professional look, you should choose a yarn that has great stitch definition, allowing the geometric pattern of the blanket to stand out. Pastel shades like mint green, lemon yellow, or dusty rose are popular choices, but don’t be afraid to go for a modern look with high-contrast neutrals like cream and slate gray for a “Scandi-style” nursery aesthetic.
In addition to your yarn and hooks, you will need a few essential tools to finish the Bunny Lovey Parts & Pieces Crochet – Pattern effectively. A long tapestry needle is vital for sewing the head securely to the center of the blanket. You will also want some stitch markers to keep track of your rounds in the amigurumi section, as working in a continuous spiral can make it very easy to lose your place. Having these tools organized before you start will make the assembly process much smoother and more enjoyable.
Finally, consider the weight of the finished Bunny Lovey Parts & Pieces Crochet – Pattern. You want the head to be light enough that it doesn’t cause the blanket to sag excessively when the baby holds it. Using a lightweight stuffing and ensuring the blanket isn’t overly dense will create a balanced piece. This thoughtful approach to crochet ergonomics ensures that the lovey is easy for small hands to carry around, making it a constant and comforting companion for the child as they grow.
The first major component of the Bunny Lovey Parts & Pieces Crochet – Pattern is the head, which is typically started with a magic ring. This technique allows you to pull the center hole completely shut, creating a seamless start for the bunny’s face. You will work in rounds of single crochet (sc), gradually increasing until you reach the desired diameter. Consistency in your tension here is key; you want a firm fabric that feels sturdy but still has a bit of “squish” to it for comfort.
Next in the Bunny Lovey Parts & Pieces Crochet – Pattern are the iconic floppy ears. These are usually worked as two long, flat ovals or cones. One of the best tips for making “pro” ears is to crochet a second, slightly smaller set in a contrasting color (like a soft pink) and sew them to the inside of the main ears. This adds a beautiful pop of color and gives the bunny a more lifelike, high-end appearance that looks like it came from a luxury baby boutique.
The placement of the ears on the Bunny Lovey Parts & Pieces Crochet – Pattern can completely change the expression of your bunny. If you sew them high on the head, the bunny looks alert and cheerful; if you sew them lower on the sides, it looks sleepy and cuddly. Use sewing pins to test different positions before you commit to the final stitching. This stage of the crochet assembly is where you can really show off your creative flair and give your character its own unique personality.
Don’t forget the tiny arms for your Bunny Lovey Parts & Pieces Crochet – Pattern. While some patterns only include a head, adding two small paws at the junction where the head meets the blanket gives the baby more “bits” to grab onto. These arms are usually very simple, involving only a few rounds of stitches. They provide a nice transition between the 3D amigurumi head and the flat blanket, making the overall design feel more cohesive and well-proportioned.
Stuffing the head of your Bunny Lovey Parts & Pieces Crochet – Pattern requires a gentle touch. You want to fill it firmly enough so that it doesn’t look wrinkled, but not so much that the stitches stretch and show the white stuffing inside. Many crafters like to add a small rattle insert inside the head during this stage. A soft rattling sound can provide extra sensory stimulation for the baby, turning the lovey into a multi-sensory developmental toy.
Closing the head is the final step of the “parts” phase in the Bunny Lovey Parts & Pieces Crochet – Pattern. You will use a series of decreases to bring the stitch count back down to a small circle. Leave a very long “tail” of yarn—at least 12 inches—after you finish the head. You will use this extra length to sew the head onto the blanket later. Keeping the same strand of yarn for the attachment ensures the structural integrity of the lovey, making it much harder for the head to be pulled off.
The “lovey” part of the Bunny Lovey Parts & Pieces Crochet – Pattern is the blanket itself, which usually measures between 12 and 15 inches across. A popular choice is a 6-point or 12-point star pattern, which gives the blanket a beautiful ripple effect and plenty of corners for a baby to hold. Using the double crochet (dc) stitch for this section allows the blanket to grow quickly and ensures it remains soft and pliable, which is essential for a security item.
When following the Bunny Lovey Parts & Pieces Crochet – Pattern, you can choose between a solid color or a striped design for the blanket. Striping is a fantastic way to use up scrap yarn from other projects while creating a vibrant, stimulating pattern for the baby to look at. If you choose to do stripes, try to carry the yarn up the side or use a “sourceless” color change technique to keep the back of the blanket looking as clean and professional as the front.
Texture is another way to elevate your Bunny Lovey Parts & Pieces Crochet – Pattern. Some crafters like to incorporate “bobble stitches” or “waffle stitches” into the blanket rounds. These raised bumps provide a tactile experience for the baby, helping with sensory development. However, make sure the holes in the lace aren’t so large that a baby’s tiny fingers could get stuck; a moderately tight “granny stitch” is usually the safest and most effective choice.
The border of the Bunny Lovey Parts & Pieces Crochet – Pattern is where you can add a decorative “frame” to your work. A simple crab stitch (reverse single crochet) or a delicate shell border can provide a finished, polished look. If you used multiple colors in the bunny’s head, bringing those same colors back for the final two rounds of the blanket border creates a wonderful visual harmony that ties the whole crochet project together.
Blocking the blanket section of your Bunny Lovey Parts & Pieces Crochet – Pattern is highly recommended before you attach the head. Since the blanket is worked in the round, it can sometimes “curl” at the edges. A light steam blocking session will relax the fibers and ensure the blanket lies perfectly flat. This makes the final assembly much easier and gives the lovey a professional “store-bought” finish that looks great in photos and even better in person.
Finally, think about the drape of the fabric in your Bunny Lovey Parts & Pieces Crochet – Pattern. A security blanket should be “floppy” enough to fold easily over a baby’s hand. If you find your blanket is too stiff, you may need to increase your hook size. The goal is to create a “cloud-like” texture that provides immediate comfort. By focusing on the softness and flexibility of the blanket body, you ensure that the lovey becomes the child’s favorite go-to item for naptime and travel.
Assembly is the most critical stage of the Bunny Lovey Parts & Pieces Crochet – Pattern. You must sew the head to the very center of the blanket using a “whip stitch” or a “mattress stitch.” It is not enough to just sew around the edge of the head; you should sew through the first round of the blanket and into the neck of the bunny several times. This “double-reinforcement” is vital because babies often pull on the head of their crochet lovey, and you want it to remain securely attached.
Once the head is attached, you will sew the arms (if your Bunny Lovey Parts & Pieces Crochet – Pattern includes them) just below the chin. Position them so they look like the bunny is “hugging” the blanket. Again, use multiple passes with your tapestry needle to ensure they are anchored firmly. Weaving the yarn tails back into the head and out through the other side before clipping them is a great trick to prevent the ends from ever popping out.
Safety checks are the final part of the Bunny Lovey Parts & Pieces Crochet – Pattern process. Give every part of the lovey a “tug test.” Pull on the ears, the head, and the arms with moderate force to make sure nothing shifts or feels loose. Check the embroidered face to ensure the stitches are tight and can’t be snagged by a stray fingernail. This quality control step is what ensures your handmade gift is a blessing and not a hazard to the new parents.
If you want to add a personalized touch to your Bunny Lovey Parts & Pieces Crochet – Pattern, you can embroider the baby’s initial onto one corner of the blanket. Use a contrasting color of the same yarn type you used for the project. This small addition transforms the lovey into a personalized heirloom, making it a standout gift that the parents will likely save in a memory box long after the child has outgrown it.
Caring for the Bunny Lovey Parts & Pieces Crochet – Pattern is something you should explain to the recipient. Even if you used washable yarn, it is best to recommend machine washing on a gentle cycle inside a mesh laundry bag. This prevents the bunny’s ears from getting tangled or stretched by the washing machine’s agitator. Providing a small “care card” with these instructions is a thoughtful touch that shows you care about the longevity of your handmade crochet art.
In conclusion, following the Bunny Lovey Parts & Pieces Crochet – Pattern is a labor of love that results in a truly special object. It combines technical skills with creative passion, allowing you to build a character that will provide real comfort to a child. From the first magic ring to the final safety check, every minute spent on this crochet bunny is an investment in a child’s happiness. We hope this guide helps you create the perfect lovey that will be squeezed, dragged, and cuddled for years to come.
1. What is the best yarn for a Bunny Lovey Parts & Pieces Crochet – Pattern?
A cotton/acrylic blend or 100% soft cotton is best. It needs to be soft for baby skin, durable for washing, and firm enough to hold the amigurumi shape of the head and ears.
2. How do I make sure the head doesn’t wobble?
When following the Bunny Lovey Parts & Pieces Crochet – Pattern, sew the head to the blanket using a wide base. Instead of just sewing one point, sew a circle around the base of the neck to create a sturdy “platform” for the head.
3. Is this pattern safe for newborns?
Yes, provided you embroider the eyes and nose instead of using plastic safety eyes. Always ensure every piece is sewn on with multiple reinforced stitches to prevent any parts from coming loose.
4. How big should the blanket part be?
A standard lovey blanket is usually between 12 and 15 inches in diameter. This is large enough to be a security blanket but small enough for an infant to carry without tripping over it.
5. Can I use “velvet” or “chenille” yarn for this pattern?
While very soft, these yarns can be harder to work with for amigurumi because it’s difficult to see the stitches. If you use them for the Bunny Lovey Parts & Pieces Crochet – Pattern, make sure the “shedding” is minimal to keep it safe for the baby.
This article has provided a deep dive into the rewarding process of creating a Bunny Lovey Parts & Pieces Crochet – Pattern. We have explored the importance of choosing safe, washable yarns, the technical steps for crafting the amigurumi head and floppy ears, and the best ways to design a soft, comforting blanket body.
By focusing on reinforced assembly and embroidered safety features, you can create a high-quality handmade baby gift that is as durable as it is adorable. This project is a wonderful way to showcase your crochet skills while making a meaningful impact on a child’s life.


