
Crochet Flower - Tutorial

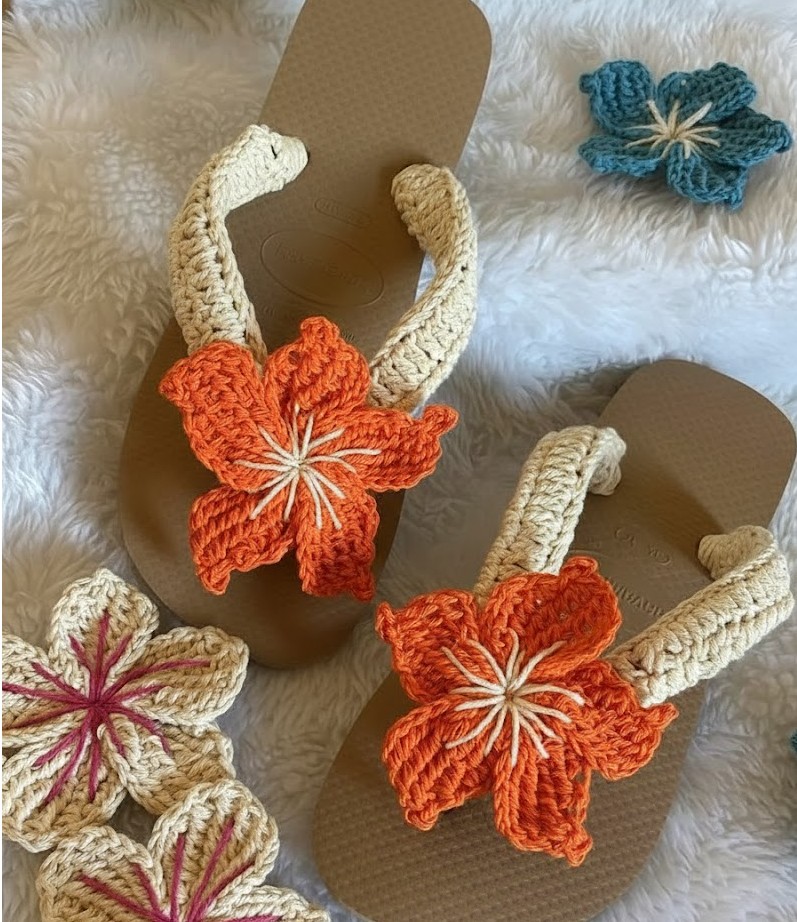
Flip-flops with crocheted flowers – Pattern is the ultimate way to transform a basic pair of summer shoes into a personalized fashion statement that reflects your unique style and creativity. Whether you are a seasoned crafter or a beginner looking for a rewarding weekend project, learning how to decorate your footwear with handmade floral accents is a fantastic skill to acquire. By following a detailed Flip-flops with crocheted flowers – Pattern, you can breathe new life into old sandals or customize a brand-new pair to match a specific outfit or occasion, making them perfect for beach weddings, garden parties, or casual strolls.
The beauty of working with a Flip-flops with crocheted flowers – Pattern lies in the endless versatility of the designs and the relatively low cost of materials required to get started. All you truly need is a pair of standard rubber sandals, some high-quality cotton yarn, a crochet hook, and a bit of imagination to create something truly extraordinary. Many people find that crafting crocheted flowers is a meditative process that allows for artistic expression while producing a practical item that can be worn and enjoyed throughout the warmer months.
In this comprehensive guide, we will explore everything you need to know about the Flip-flops with crocheted flowers – Pattern, including the best materials to use, step-by-step techniques, and tips for ensuring your creations are durable. We will dive deep into the specific terminology of the craft, ensuring you understand exactly how to execute each stitch and assembly phase. By the end of this article, you will feel confident in your ability to master this crochet project and perhaps even start a small business or gift these beautiful items to your friends and family.
When we talk about a Flip-flops with crocheted flowers – Pattern, we are referring to the specific set of instructions that guides you through creating decorative floral elements and attaching them to the straps of a sandal. This process usually begins with a foundation ring or a magic circle, which serves as the center of the flower from which the petals will bloom. A well-written pattern will specify the exact number of chains, single crochets, and double crochets needed to achieve a balanced and symmetrical look.
The Flip-flops with crocheted flowers – Pattern is essential because it provides the structural blueprint for your project, ensuring that the flowers are the correct size for the straps. If the flowers are too large, they may become floppy or trip you up; if they are too small, they might lose their visual impact. Following a dedicated crochet tutorial helps you maintain consistent tension, which is vital for a professional-looking finish that stands up to the wear and tear of walking.
One of the most important aspects of the Flip-flops with crocheted flowers – Pattern is the choice of yarn weight and fiber content, as this dictates the final texture of the embellishment. Most enthusiasts recommend using mercerized cotton because it has a beautiful sheen and is much more resistant to stretching when wet compared to wool or acrylic. This ensures that your handmade sandals maintain their shape even after a trip to the beach or a sudden summer rain shower.
To successfully execute a Flip-flops with crocheted flowers – Pattern, you must also become familiar with the “join” method, which is how the flower is secured to the rubber or plastic strap. Some crafters prefer to crochet a “sleeve” that slides over the strap first, while others sew the flowers directly onto the material using a strong nylon thread. Each variation of the pattern offers a different aesthetic, ranging from vintage chic to modern bohemian styles.
Beyond the technical steps, a Flip-flops with crocheted flowers – Pattern serves as an inspiration for color theory and design composition. You can choose to make a single, large statement flower or a series of smaller blossoms that trail down the side of the foot. By varying the colors within the crochet pattern, you can create ombre effects or vibrant contrasts that make the flip-flops pop against your skin tone or summer wardrobe.
Finally, mastering the Flip-flops with crocheted flowers – Pattern allows you to engage in sustainable fashion by upcycling plain items into high-end accessories. Instead of buying expensive designer sandals, you can use a simple DIY crochet guide to achieve a luxury look for a fraction of the price. This approach not only saves money but also reduces waste, as you are giving a new purpose to basic footwear through the art of hand-knitting and crochet.
Before you begin working on your Flip-flops with crocheted flowers – Pattern, you must gather the right tools to ensure the process is smooth and enjoyable. The most critical component is the crochet hook, which should be sized appropriately for the yarn you have selected. For most floral patterns, a 2.5mm or 3.0mm hook is ideal as it creates tight, sturdy stitches that hold their shape well over time.
Selecting the right pair of sandals is just as important as the yarn itself; look for flip-flops with sturdy straps that provide a solid base for your work. If the straps are very thin, you may need to wrap them in yarn first to create more surface area for the crocheted flowers to grip onto. Ensuring the base is comfortable and high-quality will mean your customized footwear lasts for many seasons rather than just a few weeks.
You will also need a variety of notions, such as sharp scissors, a tapestry needle for weaving in ends, and perhaps some decorative beads or buttons for the flower centers. Adding a pearl or crystal to the middle of your flower can elevate the Flip-flops with crocheted flowers – Pattern from a simple craft to a piece of wearable art. These small details are what distinguish a amateur project from a professional-grade handmade accessory.
Adhesives can also play a role in your Flip-flops with crocheted flowers – Pattern success, specifically if you choose not to sew the elements on. A high-quality, waterproof fabric glue or E6000 can be used to reinforce the attachment points, ensuring the flowers don’t budge during movement. However, most purists prefer the durability of hand-sewing with heavy-duty thread to ensure the longevity of the crochet embellishments.
Don’t forget the importance of a stitch marker, especially if your Flip-flops with crocheted flowers – Pattern involves complex, multi-layered petals. Marking the beginning of each round prevents mistakes that could lead to an asymmetrical flower. Keeping your workspace organized with a yarn bowl can also prevent tangles, making the creative process for your floral sandals much more efficient and stress-free.
Lastly, consider the environment where you will be wearing your Flip-flops with crocheted flowers – Pattern creations when choosing your yarn. If you plan on being near salt water, look for colorfast yarns that won’t bleed or fade quickly. Preparing your materials thoughtfully is the first step in ensuring that your crochet project results in a beautiful, durable, and functional piece of fashion that you can be proud to wear.
To start the actual work on the Flip-flops with crocheted flowers – Pattern, you generally begin by creating the “base” of the flower using a series of slip stitches and chains. This foundation needs to be firm so that the petals have a strong anchor point. Many artists find that starting with a magic ring allows them to pull the center tight, leaving no visible hole, which creates a cleaner look for the crocheted flower.
Once the center is established, the Flip-flops with crocheted flowers – Pattern will guide you through the petal construction, which usually involves a combination of half-double and double crochet stitches. To get that classic rounded petal shape, you will often increase the height of the stitches in the middle of the petal and decrease them toward the ends. This technique gives the hand-crafted flower a realistic, organic appearance that mimics nature.
As you progress through the Flip-flops with crocheted flowers – Pattern, you might encounter instructions for “front post” or “back post” stitches. these are used to create texture and depth, making the petals look like they are overlapping. This 3D effect is highly sought after in crochet fashion because it adds a level of sophistication and detail that flat designs simply cannot match.
After completing the required number of flowers for your Flip-flops with crocheted flowers – Pattern, it is time to prepare the sandals for attachment. If you are covering the straps, you will crochet a long, narrow strip of single crochet that matches the length of the strap. Wrapping the yarn around the strap and securing it with tight stitches provides a soft cushion for the foot and a perfect surface for mounting the flowers.
Carefully positioning the blossoms is a vital part of the Flip-flops with crocheted flowers – Pattern process to ensure they don’t rub against the top of your foot. It is often best to pin them in place first to check the alignment before doing the final stitching or gluing. Comfort is just as important as aesthetics, so make sure the placement of the crochet decor doesn’t interfere with the natural movement of your toes.
The final step in finishing your Flip-flops with crocheted flowers – Pattern is the “blocking” phase, where you lightly steam the flowers to help the stitches settle and the petals lay flat. This professional touch ensures that your DIY sandals look store-bought. Once the flowers are set and the glue or thread is secure, your crocheted footwear is ready to be showcased to the world as a testament to your skill.
One of the most exciting parts of following a Flip-flops with crocheted flowers – Pattern is the ability to customize the design to fit your personal brand. You aren’t limited to just daisies or roses; you can adapt the pattern to create sunflowers, hibiscus, or even abstract geometric shapes. Using multi-colored yarn or “variegated” thread can create a beautiful, complex look without requiring you to switch balls of yarn constantly.
You can also adjust the scale of your Flip-flops with crocheted flowers – Pattern by changing the yarn weight and hook size. For a delicate, feminine look, use lace-weight thread and a tiny hook to create miniature blossoms that look like fine embroidery. Conversely, for a bold, “boho-chic” statement, use chunky cotton yarn to create oversized flowers that cover the entire top of the sandal.
Another variation to the Flip-flops with crocheted flowers – Pattern involves adding secondary elements like green leaves or vine-like tendrils. These additions can be crocheted separately and tucked under the flowers to provide a pop of color and a more “garden-like” feel. Experimenting with different textures, such as mixing matte cotton with a bit of metallic thread, can also add a touch of glamour to your summer shoes.
For those who want a more functional twist on the Flip-flops with crocheted flowers – Pattern, consider making the flowers removable. By attaching a small snap fastener or Velcro to the back of the flower and the strap of the shoe, you can swap out different colors and styles to match your outfit of the day. This “interchangeable” system makes your crochet accessories incredibly versatile and travel-friendly.
Seasonal themes are another great way to use the Flip-flops with crocheted flowers – Pattern. You can create red and white flowers for a nautical summer look, or bright neon colors for a music festival vibe. The versatility of crochet means that your imagination is the only limit to what you can achieve with a basic pair of sandals and a little bit of time spent with your crochet hook.
Finally, remember that the Flip-flops with crocheted flowers – Pattern can be used as a base for teaching others. Hosting a crochet workshop or sharing your finished pieces on social media can inspire a community of crafters. By mastering this unique pattern, you become part of a global tradition of artisans who value the beauty of handmade goods and the joy of creating something beautiful from a simple strand of yarn.
1. What type of yarn is best for a Flip-flops with crocheted flowers – Pattern?
The best yarn is 100% mercerized cotton. It is durable, holds its shape, and doesn’t get heavy or “soggy” if it gets wet. It also has a slight shine that makes the crocheted flowers look more polished and high-end.
2. How do I clean my flip-flops once the crocheted flowers are attached?
It is best to hand wash them gently using cool water and a mild detergent. Avoid scrubbing the flowers too hard, as this can cause the yarn to pill. Air dry them away from direct sunlight to prevent the colors from fading.
3. Can a beginner complete a Flip-flops with crocheted flowers – Pattern?
Absolutely! Most floral patterns use basic stitches like the chain, single crochet, and double crochet. If you can master those three, you can easily create beautiful hand-decorated sandals.
4. How long does it take to finish one pair of sandals?
Depending on your speed and the complexity of the Flip-flops with crocheted flowers – Pattern, it usually takes between 2 to 4 hours to complete both shoes, including the strap covering and the floral accents.
5. Will the flowers stay on the sandals permanently?
If you sew them on using strong nylon or upholstery thread, they are very secure. Using a combination of stitching and a small amount of waterproof glue is the best way to ensure the crochet elements stay in place during heavy use.
6. Do I need to buy expensive flip-flops for this project?
No, actually, simple rubber flip-flops often work best because the straps are flexible and easy to work with. You can find affordable pairs at most department stores that serve as a perfect “blank canvas” for your crochet art.
In this article, we have explored the wonderful world of the Flip-flops with crocheted flowers – Pattern, covering everything from the initial materials and tools to the intricate steps of construction and customization.
We learned that using mercerized cotton and the right crochet hook is essential for a durable finish, and that the “join” method is key to keeping your decorations secure. By following these SEO-optimized tips and techniques, you can create a pair of sandals that are not only beautiful but also a reflection of your personal creativity and craftsmanship.


