
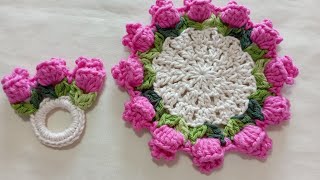
Crochet Flower - Tutorial

This Tulip-shaped coasters crochet Tutorial – Pattern is the perfect way to bring a touch of eternal springtime into your home while protecting your furniture with handmade charm. There is something incredibly satisfying about creating functional art, and these floral-inspired coasters offer a delightful blend of elegance and utility. Whether you are looking to brighten up your coffee table or searching for a heartfelt, handmade gift for a friend, following this Tulip-shaped coasters crochet Tutorial – Pattern will guide you through every stitch with ease and clarity.
Crafting your own home decor allows for a level of customization that store-bought items simply cannot match. With this Tulip-shaped coasters crochet Tutorial – Pattern, you have the freedom to choose colors that perfectly complement your interior design, from classic red tulips to soft pastel pinks or even vibrant purple hues. The project is designed to be accessible for those who have mastered the basic stitches, making it an ideal “next step” for beginners who want to explore more decorative shapes and textures without feeling overwhelmed.
By the time you finish this Tulip-shaped coasters crochet Tutorial – Pattern, you will have a set of beautiful, absorbent, and durable coasters that serve as a constant reminder of your creative skills. Throughout this guide, we will break down the complex-looking floral structure into simple, manageable steps. We will focus on yarn selection, stitch precision, and the finishing touches that make these coasters stand out. Let’s pick up our hooks and begin this floral journey with our comprehensive Tulip-shaped coasters crochet Tutorial – Pattern.
The success of any project using a Tulip-shaped coasters crochet Tutorial – Pattern begins with selecting the right yarn, and for coasters, cotton is the undisputed king. Cotton yarn is highly absorbent, heat-resistant, and holds its shape exceptionally well even after multiple washes. When you follow this Tulip-shaped coasters crochet Tutorial – Pattern, we recommend a mercerized cotton for a slight sheen or a standard “kitchen” cotton for a more rustic, matte look that excels at soaking up condensation from cold drinks.
Selecting the correct hook size is the next vital step in our Tulip-shaped coasters crochet Tutorial – Pattern. Most worsted weight cotton yarns pair beautifully with a 3.5mm or 4.0mm hook, depending on how tightly you naturally crochet. For a Tulip-shaped coasters crochet Tutorial – Pattern, you want a slightly denser fabric than you would for a garment to ensure that liquid doesn’t seep through the stitches onto your table, so don’t be afraid to go down a hook size if your work feels a bit loose.
Color planning is where the Tulip-shaped coasters crochet Tutorial – Pattern truly becomes fun and personalized. You will generally need three distinct colors: a green for the leaves and stem, a vibrant “flower” color for the tulip petals, and perhaps a neutral cream or white for the background or border. Having these organized before starting the Tulip-shaped coasters crochet Tutorial – Pattern ensures a smooth workflow, allowing you to focus on the rhythm of the stitches rather than hunting for the right skein.
In addition to yarn and hooks, you will need a few essential notions to complete your Tulip-shaped coasters crochet Tutorial – Pattern successfully. A pair of sharp scissors and a sturdy tapestry needle are non-negotiable for cutting yarn and weaving in the ends of your floral creation. As this Tulip-shaped coasters crochet Tutorial – Pattern involves color changes, you will have a few more ends to hide than a single-color project, so a good needle makes this final step much faster and cleaner.
Stitch markers can be incredibly helpful when working through the Tulip-shaped coasters crochet Tutorial – Pattern, especially during the initial rounds where the base is formed. Because the tulip shape relies on specific stitch placements to create the “V” of the leaves and the puff of the petals, marking your starting point prevents errors. Any Tulip-shaped coasters crochet Tutorial – Pattern is easier to follow when you aren’t constantly second-guessing your stitch count at the end of every round.
Finally, ensure you have a comfortable workspace with plenty of light as you begin your Tulip-shaped coasters crochet Tutorial – Pattern. Working with dark greens or deep reds can sometimes make it difficult to see stitch definition, so good lighting is your best friend. With your materials gathered and your space prepared, you are ready to master the Tulip-shaped coasters crochet Tutorial – Pattern and create a blooming garden right at your fingertips.
The foundation of the Tulip-shaped coasters crochet Tutorial – Pattern typically starts with a flat circular base that will serve as the “ground” for your flowers. We usually begin with a magic ring to ensure the center is tightly closed, preventing any moisture from reaching the table surface through the middle. In this Tulip-shaped coasters crochet Tutorial – Pattern, the first few rounds are worked in simple double crochet stitches to create a solid, even surface for your mugs and glasses.
Consistency is key during this phase of the Tulip-shaped coasters crochet Tutorial – Pattern. You must follow the standard rules of increasing in the round—adding a specific number of stitches each row—to keep the coaster perfectly flat. If the base of your Tulip-shaped coasters crochet Tutorial – Pattern starts to “bowl” or “wave,” it’s a sign that your stitch count or tension is slightly off, which could make the coaster unstable for holding drinks.
The transition from the solid base to the decorative floral edge is a pivotal moment in the Tulip-shaped coasters crochet Tutorial – Pattern. Once the base reaches the desired diameter (usually about 3 to 4 inches), you will prepare for the “leaf” round. This involves using green yarn to create V-stitches, which act as the stems and leaves in our Tulip-shaped coasters crochet Tutorial – Pattern, providing the framework upon which the colorful tulip petals will eventually sit.
When working the green round of the Tulip-shaped coasters crochet Tutorial – Pattern, pay close attention to the spacing between the V-stitches. These spaces determine how many tulips will fit around the edge of your coaster. A well-designed Tulip-shaped coasters crochet Tutorial – Pattern ensures that the flowers are not too crowded, allowing each one to be clearly defined and visible, creating a beautiful scalloped edge that mimics a garden bed.
Changing colors smoothly is a skill you will perfect while following this Tulip-shaped coasters crochet Tutorial – Pattern. To keep the transitions looking professional, finish the last pull-through of the final green stitch with your new petal color. This technique, highlighted in our Tulip-shaped coasters crochet Tutorial – Pattern, prevents the “jog” that often happens during color changes and ensures that your tulips look like they are growing directly out of their green stems.
The circular base is the unsung hero of the Tulip-shaped coasters crochet Tutorial – Pattern. While the flowers get all the attention, the base provides the structural integrity needed for a functional item. By mastering this part of the Tulip-shaped coasters crochet Tutorial – Pattern, you ensure that your coasters aren’t just pretty to look at, but are also durable enough to withstand daily use in a busy household.
Now we reach the most exciting part of the Tulip-shaped coasters crochet Tutorial – Pattern: the petals. To create the iconic tulip look, we often use a “popcorn” stitch or a “puff” stitch worked into the center of the green V-stitches from the previous round. This Tulip-shaped coasters crochet Tutorial – Pattern uses these textured stitches to give the flowers a 3D effect, making them pop against the flat background of the coaster base.
Working a popcorn stitch in the Tulip-shaped coasters crochet Tutorial – Pattern involves crocheting several double crochets into the same space, then joining the first and last together to pull the stitch into a rounded bulb. It sounds complex, but our Tulip-shaped coasters crochet Tutorial – Pattern makes it simple by breaking down each movement. This stitch is what gives the tulips their volume and realistic shape, turning a flat circle into a floral masterpiece.
As you work your way around the coaster in this Tulip-shaped coasters crochet Tutorial – Pattern, you will notice the transformation immediately. Each colorful puff stitch becomes a budding flower, separated by a few chain stitches to maintain the flat shape of the coaster. This part of the Tulip-shaped coasters crochet Tutorial – Pattern is incredibly satisfying, as you can see the garden taking shape with every completed flower.
Tension is particularly important during the petal round of the Tulip-shaped coasters crochet Tutorial – Pattern. If your popcorn stitches are too tight, they won’t have that lovely rounded volume; if they are too loose, the tulips might look floppy. This Tulip-shaped coasters crochet Tutorial – Pattern encourages you to find a middle ground where the stitches are firm enough to stand up but soft enough to look like delicate flower petals.
After completing the petals, many versions of the Tulip-shaped coasters crochet Tutorial – Pattern include a final “calm” round in a neutral color. This round fills in the gaps between the tulips and creates a smooth, finished edge. Following this step in the Tulip-shaped coasters crochet Tutorial – Pattern ensures that your coaster has a clean, circular perimeter that frames the flowers beautifully and adds a final layer of stability to the piece.
By the end of this stage in the Tulip-shaped coasters crochet Tutorial – Pattern, the visual impact is stunning. You have successfully translated a complex natural shape into a geometric crochet design. This section of the Tulip-shaped coasters crochet Tutorial – Pattern is usually the favorite of most crafters because it allows the vibrant colors to shine and showcases the unique texture that only handmade crochet can provide.
Once the final stitch is placed, the Tulip-shaped coasters crochet Tutorial – Pattern enters the finishing stage. Weaving in the ends is a task that requires patience, but it is essential for the longevity of your coasters. In this Tulip-shaped coasters crochet Tutorial – Pattern, we recommend weaving the yarn tails through the back of the dense popcorn stitches to hide them completely, ensuring that both sides of your work look tidy and professional.
Blocking is a secret weapon that can take a project from this Tulip-shaped coasters crochet Tutorial – Pattern from “good” to “extraordinary.” Because cotton can sometimes be a bit stubborn, pinning your coasters out into perfect circles and lightly steaming them helps the petals lay flat and the base stay even. Any Tulip-shaped coasters crochet Tutorial – Pattern looks much more refined after a quick blocking session, as it sets the stitches into their final, ideal positions.
Durability is a major benefit of using this Tulip-shaped coasters crochet Tutorial – Pattern. Because cotton is sturdy, these coasters can handle a lot of wear. If they get stained by coffee or juice, they can usually be tossed into a mesh laundry bag and washed on a gentle cycle. Our Tulip-shaped coasters crochet Tutorial – Pattern emphasizes using high-quality materials so that your hard work doesn’t fade or fray after just a few uses.
Gifting your creations from the Tulip-shaped coasters crochet Tutorial – Pattern is a wonderful way to spread joy. A set of four or six coasters tied with a simple twine ribbon makes for a sophisticated and thoughtful present. This Tulip-shaped coasters crochet Tutorial – Pattern is particularly popular for Mother’s Day, housewarming parties, or even as wedding favors, as the tulip symbolises deep love and the arrival of spring.
For those who want to expand on the Tulip-shaped coasters crochet Tutorial – Pattern, consider making a matching “mug rug” or a larger trivet using the same logic. By simply adding more rounds to the base and increasing the number of tulips, you can create a coordinated set of table linens. The skills you learned in this Tulip-shaped coasters crochet Tutorial – Pattern are easily transferable to larger, more ambitious projects.
Finally, don’t forget to take pride in your finished Tulip-shaped coasters crochet Tutorial – Pattern. Handmade items carry a story and an energy that mass-produced items lack. Whether they are sitting on your desk while you work or being used during a dinner party, the items you made using this Tulip-shaped coasters crochet Tutorial – Pattern are a testament to your patience, creativity, and love for the craft of crochet.
What is the best yarn weight for the Tulip-shaped coasters crochet Tutorial – Pattern?
The most common choice for this Tulip-shaped coasters crochet Tutorial – Pattern is a Weight 4 (Worsted) or Weight 3 (DK) cotton yarn. These weights provide the perfect balance between absorbency and stitch detail, ensuring your tulips look defined without the coaster becoming too bulky or thick.
Can I use acrylic yarn for the Tulip-shaped coasters crochet Tutorial – Pattern?
While you can use acrylic, it is not the best choice for coasters. Acrylic does not absorb moisture as well as cotton and can sometimes melt if a very hot mug is placed on it. For the best experience with this Tulip-shaped coasters crochet Tutorial – Pattern, we strongly recommend sticking with 100% cotton yarn.
How long does it take to make one coaster using this Tulip-shaped coasters crochet Tutorial – Pattern?
For an intermediate crocheter, one coaster usually takes about 30 to 45 minutes to complete. It is an excellent “quick-win” project that allows you to see beautiful results in a single evening, making the Tulip-shaped coasters crochet Tutorial – Pattern very satisfying for busy crafters.
Is this Tulip-shaped coasters crochet Tutorial – Pattern difficult for beginners?
If you know how to do a double crochet and are comfortable with color changes, you can certainly handle this Tulip-shaped coasters crochet Tutorial – Pattern. The only “new” thing might be the popcorn stitch, but it is easy to learn and very fun to execute once you get the hang of it.
How do I prevent the coaster from curling up?
Curling usually happens if your tension is too tight or if you missed an increase in the base rounds. If you follow the Tulip-shaped coasters crochet Tutorial – Pattern instructions for increases carefully and block your finished piece with steam, your coaster should lay perfectly flat.
How many tulips are typically in one coaster?
In a standard-sized coaster from this Tulip-shaped coasters crochet Tutorial – Pattern, you will typically have between 10 and 12 tulips around the edge. This provides a full, lush floral border without making the coaster too large for a standard mug.
In this article, we have thoroughly explored the creative process of following a Tulip-shaped coasters crochet Tutorial – Pattern. We began by selecting the ideal cotton yarn and tools, moved through the construction of a sturdy circular base, mastered the artistic popcorn stitches that form the petals, and concluded with essential tips for finishing and caring for your handmade items.
These coasters are more than just a surface for your drinks; they are a celebration of color and technique that can brighten any room.


