
Crochet Flower - Tutorial

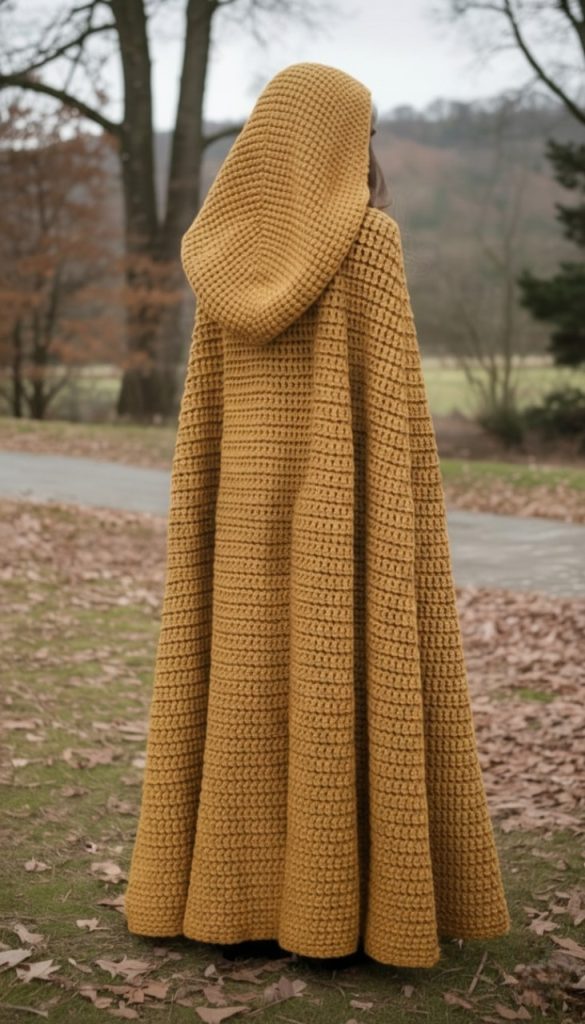
This Crochet hooded cape – Pattern is the ultimate guide for anyone looking to create a garment that combines timeless fantasy aesthetics with modern cozy comfort. There is something deeply satisfying about wrapping yourself in a handmade cape, whether you are channeling your inner forest wanderer or simply looking for a stylish alternative to a traditional coat. By following this Crocheted hooded cape tutorial – Pattern, you will learn how to construct a piece that flows elegantly and features a spacious, practical hood that keeps the autumn chill at bay.
The beauty of a Crocheted hooded cape tutorial – Pattern lies in its simplicity and the impressive impact of the final silhouette. Unlike sweaters or cardigans that require complex shaping for sleeves and armholes, a cape is a more forgiving project that focuses on graceful increases and drape. This Crocheted hooded cape tutorial – Pattern is designed to walk you through the structural basics, from the neckline down to the hem, ensuring that your finished garment fits beautifully regardless of your body type or height.
In the following sections, we will delve deep into the technical and creative aspects of the Crocheted hooded cape tutorial – Pattern. We will discuss how to select the perfect yarn for maximum warmth, how to master the increase rows that give the cape its signature flare, and how to seamlessly attach a hood that looks professional and feels comfortable. This Crocheted hooded cape tutorial – Pattern is more than just a set of instructions; it is an invitation to explore your creativity and build a wardrobe staple that will last for years to come.
The first step in any successful Crocheted hooded cape tutorial – Pattern is choosing the right yarn weight. For a cape that offers both warmth and a luxurious feel, a category 4 (worsted) or category 5 (bulky) yarn is typically the best choice. When working with a Crocheted hooded cape tutorial – Pattern, keep in mind that capes use a significant amount of yarn, so purchasing extra skeins from the same dye lot is essential to maintain color consistency throughout the project.
Your choice of crochet hook is equally important when executing a Crocheted hooded cape tutorial – Pattern. If you want a stiff, structured cape, use the hook size recommended on the yarn label; however, for a more fluid and “drapey” look, many crafters using this Crocheted hooded cape tutorial – Pattern opt for a hook one size larger. A larger hook allows the stitches to breathe and prevents the garment from feeling too heavy or rigid when worn.
Fiber content will drastically change the outcome of your Crocheted hooded cape tutorial – Pattern. Wool blends are fantastic for winter capes because they provide natural insulation, while acrylic blends offer durability and easy care for everyday wear. Our Crocheted hooded cape tutorial – Pattern encourages you to feel the yarn against your neck before starting, as the hood and collar will be in direct contact with your skin, making softness a top priority.
Don’t overlook the importance of notions like stitch markers and a measuring tape when following a Crocheted hooded cape tutorial – Pattern. Because capes expand as you work toward the bottom, it is easy to lose track of where your increases should be placed. Using markers as suggested in this Crocheted hooded cape tutorial – Pattern ensures that your cape remains symmetrical and that the hood aligns perfectly with the center of the back.
Fastenings are the “jewelry” of your Crocheted hooded cape tutorial – Pattern. You can choose from large wooden buttons, elegant metal clasps, or even crochet-covered toggles to secure the neck of your cape. This Crocheted hooded cape tutorial – Pattern allows for total customization in this area, letting you decide if you want a rustic, medieval look or a clean, contemporary finish for your new favorite garment.
Finally, ensure you have a comfortable workspace with plenty of surface area as you progress through the Crocheted hooded cape tutorial – Pattern. As the cape grows, it can become quite heavy and bulky to hold in your lap. A large table or a supportive armchair will help you manage the weight of the yarn, making the process of completing this Crocheted hooded cape tutorial – Pattern a much more enjoyable and ergonomic experience.
Most versions of a Crocheted hooded cape tutorial – Pattern begin at the neckline, working in rows to create a “C” shape that wraps around the shoulders. The foundation chain must be loose enough to sit comfortably without pulling, so this Crocheted hooded cape tutorial – Pattern often recommends using a foundation single crochet row instead of a standard chain. This provides the necessary stretch for a comfortable fit around the neck and shoulders.
The “flare” of the cape is achieved through strategic increases, a core component of the Crocheted hooded cape tutorial – Pattern. Usually, increases are placed at the shoulders and down the center back to allow the fabric to widen as it moves toward the waist and hips. Following the Crocheted hooded cape tutorial – Pattern closely during these rows is vital to avoid a “wavy” hem or a cape that doesn’t close properly at the front.
One of the most exciting parts of this Crocheted hooded cape tutorial – Pattern is seeing the drape develop. As you add more rows, the weight of the yarn pulls the stitches downward, creating a beautiful flow. In this Crocheted hooded cape tutorial – Pattern, we emphasize the use of double crochet or half-double crochet stitches, as they provide a good balance between speed of progress and a solid fabric that isn’t too “holey.”
The hood is often worked as a separate rectangle or by picking up stitches directly from the neckline of the Crocheted hooded cape tutorial – Pattern. If you want a “wizard” style hood that is long and pointed, you will continue straight for many rows before seaming the top. This Crocheted hooded cape tutorial – Pattern provides the flexibility to adjust the depth of the hood, making it as cozy or as decorative as you prefer.
Attaching the hood to the body of the cape is a milestone in the Crocheted hooded cape tutorial – Pattern. Using a slip stitch join or a mattress stitch seam ensures the connection is strong and seamless. This Crocheted hooded cape tutorial – Pattern suggests trying the cape on before final assembly to ensure the hood sits where you want it and doesn’t pull the neckline too far back or forward.
Length is entirely up to you when working with a Crocheted hooded cape tutorial – Pattern. Some prefer a short “capelet” that ends at the elbows, while others want a full-length cloak that reaches the ankles. The beauty of this Crocheted hooded cape tutorial – Pattern is that you can simply stop whenever you reach your desired length, making it one of the most adaptable garment patterns in the world of crochet.
To make your project stand out, this Crocheted hooded cape tutorial – Pattern can be adapted with various textured stitches. Using post stitches (front post or back post) can create a “ribbed” effect that looks like high-end knitwear. By incorporating these into your Crocheted hooded cape tutorial – Pattern, you add a level of sophistication and thickness that makes the cape even warmer for those cold winter nights.
The “shell stitch” is another popular choice for a Crocheted hooded cape tutorial – Pattern, especially for the border or hem. It adds a feminine, scalloped edge that finishes the garment beautifully. When you follow this Crocheted hooded cape tutorial – Pattern, you can choose to keep the main body simple and use a decorative stitch only for the last few rows to create a stunning visual contrast.
Colorwork can also transform a Crocheted hooded cape tutorial – Pattern. Consider using a variegated yarn for the body and a solid coordinating color for the hood and borders. This Crocheted hooded cape tutorial – Pattern is the perfect canvas for “yarn cakes” that have long, slow color transitions, resulting in a beautiful gradient effect that highlights the circular construction of the cape.
For those who enjoy a bit of sparkle, carrying a thin strand of metallic thread alongside your main yarn can give your Crocheted hooded cape tutorial – Pattern a magical, ethereal quality. This is a common modification for those using the Crocheted hooded cape tutorial – Pattern to make costumes or holiday outfits. It adds visual interest without changing the gauge or the structure of the pattern itself.
Pocket additions are a practical modification to the Crocheted hooded cape tutorial – Pattern. You can crochet two simple squares and sew them onto the front of the cape. This Crocheted hooded cape tutorial – Pattern recommendation is a favorite for those who plan to wear their cape outdoors, providing a warm place for hands or a secure spot for a phone and keys.
Finally, consider the “fringe” or “tassel” option for your Crocheted hooded cape tutorial – Pattern. Adding long strands of yarn to the bottom hem or a large tassel to the point of the hood can give the piece a bohemian or vintage feel. This Crocheted hooded cape tutorial – Pattern is your foundation—don’t be afraid to experiment with these finishing touches to make the garment truly your own.
Weaving in your ends is the final technical step of the Crocheted hooded cape tutorial – Pattern. Because a cape is a large garment that moves a lot, it is important to weave in tails securely and over a long distance (at least 3-4 inches). This Crocheted hooded cape tutorial – Pattern tip prevents the ends from popping out after a few wears, ensuring your hard work stays looking pristine for a long time.
Blocking is highly recommended for a Crocheted hooded cape tutorial – Pattern. Since capes have a lot of surface area, “wet blocking” helps to even out the tension and open up the stitches, which significantly improves the drape. After finishing your Crocheted hooded cape tutorial – Pattern, soak the garment, gently squeeze out the water, and lay it flat to dry in the correct shape to achieve that professional look.
Adding a lining is an advanced option for the Crocheted hooded cape tutorial – Pattern. If you live in a very cold climate, sewing a fleece or satin lining inside the cape and hood can turn it into a heavy-duty winter coat. While this Crocheted hooded cape tutorial – Pattern focuses on the crochet aspect, knowing that you can add a lining makes the project even more versatile for different seasons.
Proper storage is key to maintaining the shape of your Crocheted hooded cape tutorial – Pattern. Avoid hanging the cape on a thin wire hanger, as the weight of the yarn can cause the shoulders to stretch and lose their shape. Instead, this Crocheted hooded cape tutorial – Pattern suggests folding the cape neatly and storing it in a cedar chest or a breathable garment bag to protect it from dust and pests.
Washing your handmade garment should be done with care, as explained in this Crocheted hooded cape tutorial – Pattern. Hand washing in cool water with a mild wool wash is always the safest route. If your yarn is machine washable, use a delicate cycle and a mesh laundry bag. This Crocheted hooded cape tutorial – Pattern advice ensures that the fibers don’t felt or pill, keeping the texture soft and the colors vibrant.
The most important part of finishing the Crocheted hooded cape tutorial – Pattern is wearing it with pride! A hooded cape is a statement piece that reflects your skill and patience as a maker. When you step out in your finished Crocheted hooded cape tutorial – Pattern, you aren’t just wearing a garment—you are wearing a piece of art that you created one stitch at a time, tailored perfectly to your own style and needs.
How much yarn do I need for a full-sized Crocheted hooded cape tutorial – Pattern?
For an adult-sized cape that reaches the hips, you will typically need between 1,500 to 2,000 yards of worsted weight yarn. If you are making a floor-length version of the Crocheted hooded cape tutorial – Pattern, you should plan for 3,000 yards or more to ensure you don’t run out.
Is this Crocheted hooded cape tutorial – Pattern suitable for beginners?
Yes, it is! While it is a large project, the stitches used are basic. If you can do a double crochet and understand how to increase, you can follow this Crocheted hooded cape tutorial – Pattern. It is a great way to practice consistency on a large scale without the stress of complex garment fitting.
Can I make the hood removable in this Crocheted hooded cape tutorial – Pattern?
Absolutely. Instead of sewing the hood directly to the neckline, you can add small buttons along the neck of the cape and loops to the bottom of the hood. This modification to the Crocheted hooded cape tutorial – Pattern gives you two styles in one garment.
How do I prevent the cape from being too heavy?
To keep your Crocheted hooded cape tutorial – Pattern lightweight, choose a yarn with a high percentage of acrylic or a “blown” yarn. Using a larger hook to create a looser stitch pattern will also help reduce the overall weight while maintaining a beautiful drape.
What is the best way to seam the hood in the Crocheted hooded cape tutorial – Pattern?
The mattress stitch is generally preferred because it creates an invisible seam. However, for a decorative look, you could use a slip stitch join on the outside of the hood to create a visible “ridge” that adds to the rustic charm of the Crocheted hooded cape tutorial – Pattern.
Can I add arm slits to the Crocheted hooded cape tutorial – Pattern?
Yes, you can easily create arm slits by working in two separate sections for a few rows at the height where your arms naturally rest, then joining the sections back together. This is a popular functional upgrade to the standard Crocheted hooded cape tutorial – Pattern.
In this comprehensive guide, we have explored the essential steps to master the Crocheted hooded cape tutorial – Pattern. We’ve covered everything from selecting the right yarn and hook to the technicalities of increases, hood construction, and finishing techniques like blocking and seaming.
A hooded cape is a timeless project that rewards the maker with a garment that is as functional as it is beautiful. By following this Crocheted hooded cape tutorial – Pattern, you have learned the foundation needed to create a unique piece that reflects your personal style.


