
Crochet Flower - Tutorial

This Crochet Cable Holder Tutorial – Pattern is designed to help you organize your workspace while adding a touch of handmade charm to your daily life. In our increasingly digital world, tangled cords and messy desks have become a common frustration for many of us. This comprehensive guide will walk you through the entire process of creating a functional, stylish, and eco-friendly solution to keep your chargers and USB cables perfectly coiled and ready for use.
Whether you are looking for a quick weekend project or a thoughtful gift for a tech-savvy friend, this Crochet Cable Holder Tutorial – Pattern offers the perfect balance of simplicity and utility. Using just a small amount of yarn and a few basic stitches, you can transform leftover scraps into a high-quality accessory. We will focus on creating a durable texture that ensures your crochet cable holder lasts through years of opening and closing, maintaining its shape and grip.
Mastering a Crochet Cable Holder Tutorial – Pattern is an excellent way for beginners to practice stitch consistency and finishing techniques like attaching buttons or Velcro. Throughout this article, we will explore the best materials to use, the step-by-step construction of the holder, and how to customize the size for different cord thicknesses. By the end of this tutorial, you will have a professional-looking crochet cable organizer that reflects your personal style and keeps your environment clutter-free.
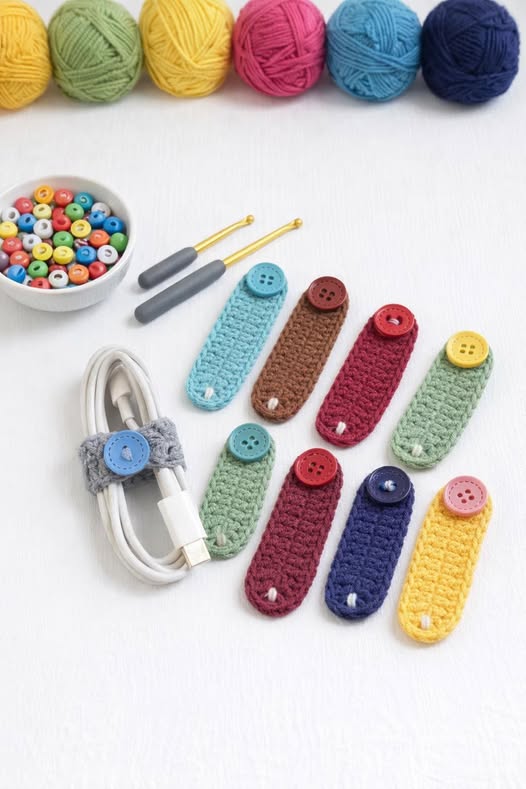
Choosing the right materials is the first step in ensuring your Crochet Cable Holder Tutorial – Pattern results in a high-quality product. For this specific project, I highly recommend using mercerized cotton yarn. Cotton is preferred over acrylic because it is less stretchy and much more durable, which is essential for an item that will be handled frequently. A medium weight (worsted or aran) works best to provide the necessary structure.
In addition to your yarn, you will need a crochet hook that is slightly smaller than what the yarn label suggests. Using a smaller hook, such as a 3.5mm or 4.0mm hook, creates a tighter tension. This tight tension prevents the crochet cable holder from becoming floppy over time. When the stitches are dense, the fabric holds its shape better, ensuring that your cables stay securely fastened inside the wrap.
You will also need a few hardware items to complete the Crochet Cable Holder Tutorial – Pattern. A sturdy button (usually 15mm to 20mm) is the classic choice for a closure, but you could also use snap fasteners or even Velcro strips. Make sure you have a tapestry needle on hand for weaving in your ends and sewing on your chosen fastener securely to the finished crochet piece.
Don’t forget a pair of sharp embroidery scissors and a stitch marker if you prefer working in continuous rounds, though this specific pattern is worked in flat rows. Having all your tools ready before you start will make the crafting process much smoother and more enjoyable. High-quality tools often lead to a more polished final result in any handmade crochet project.
If you are planning to make a set of these, consider choosing a variety of colors that complement your tech gear or office decor. Neutral tones like beige, grey, or navy blue offer a sophisticated look, while vibrant neon colors make it easy to find your cables inside a dark backpack or laptop bag. Customization is one of the best parts of following this Crochet Cable Holder Tutorial – Pattern.
Lastly, keep a measuring tape nearby. While the pattern provides a standard size, you might want to adjust the length depending on whether you are wrapping a thin phone charger or a thick laptop power brick. Measuring as you go ensures that your custom crochet cable holder fits your specific needs perfectly, avoiding a fit that is too loose or too tight.
To begin this Crochet Cable Holder Tutorial – Pattern, you will start by creating a slip knot and chaining a short length, typically around 12 to 15 chains. This initial chain determines the width of your holder. For a standard USB cable, a width of about 2 inches is ideal. If you want a wider holder for heavy-duty cords, simply increase the number of starting chains accordingly.
The primary stitch used in this Crochet Cable Holder Tutorial – Pattern is the Single Crochet (sc). Single crochet creates a thick, “bumpy” texture that is perfect for grip. After your foundation chain, you will work one single crochet into the second chain from the hook and in each chain across. At the end of the row, you will chain one and turn your work to begin the next row.
Continue working in rows of single crochet until your piece reaches approximately 4 to 5 inches in length. This creates a rectangular strip of fabric. To add a bit of visual interest and extra durability, you can work in the back loops only (BLO). This technique creates a ribbed effect that allows the crochet cable holder to stretch slightly around the cord while remaining firm and secure.
Once you have reached the desired length, it is time to create the buttonhole. In the final row of your Crochet Cable Holder Tutorial – Pattern, crochet halfway across the row, then chain 2 or 3 (depending on your button size), skip two stitches, and crochet in the remaining stitches. This creates a small gap in the fabric that will serve as your functional button loop.
If you prefer a cleaner look without a hole, you can skip the buttonhole row and instead crochet a small chain loop at the very end of the strip. This loop will wrap over the button on the opposite side. Both methods are effective, but the integrated buttonhole is often considered more “pro” in the world of crochet accessory patterns and offers a flatter profile.
Finish the piece by doing a border of slip stitches all the way around the rectangle. This simple step gives the edges a rounded, professional finish and prevents the corners from curling. Once the border is complete, fasten off your yarn and leave a long tail. Use this tail with your tapestry needle to sew the button onto the opposite end of the holder.
One of the greatest advantages of this Crochet Cable Holder Tutorial – Pattern is its inherent versatility. Not all cables are created equal; some are thin like headphone wires, while others are thick and braided. To adapt the pattern, you simply need to modify the row count. For smaller items, a 3-inch strip is often sufficient, whereas larger cables might require a 6-inch or 7-inch wrap.
You can also experiment with different stitch patterns to change the aesthetic of your holder. While single crochet is the standard, using the Half Double Crochet (hdc) can speed up the process if you are making many holders at once. The hdc stitch is slightly taller than the single crochet but still provides enough density to keep the crochet cable organizer functional and strong.
For those who want a more decorative look, the Crochet Cable Holder Tutorial – Pattern can be modified using the Moss Stitch (also known as the Granite Stitch). This involves alternating single crochets and chain stitches. The result is a beautiful, woven-looking fabric that looks very high-end. This is a great way to use variegated yarn, as the stitch highlights the color changes beautifully.
Another customization option is the addition of leather accents. You can crochet the main body and then sew a small piece of leather or faux leather over the button area. This “mixed media” approach is very popular in modern crochet trends and can make your handmade items look like they were purchased from an expensive boutique. It also adds extra reinforcement to the button closure.
If you are making these for children, you can add amigurumi elements. Imagine a small crochet flower or a tiny animal face sewn onto the top of the crochet cable holder. This makes the item fun for kids to use and helps them stay organized with their school tablets and gaming devices. Adding these small details turns a basic Crochet Cable Holder Tutorial – Pattern into a unique piece of art.
Don’t forget about color blocking. Using two different colors of yarn—one for the center and another for the border—can make the design pop. You can even use the tapestry crochet technique to incorporate a small initial or a simple geometric shape into the center of the holder. The possibilities for personalization within this crochet pattern are truly endless.
Since your Crochet Cable Holder Tutorial – Pattern results in an item that is frequently touched, it will eventually need cleaning. This is why choosing washable yarn like cotton is so important. To clean your cable holder, simply hand wash it in warm water with a mild detergent. Avoid wringing it out harshly; instead, pat it dry with a towel to maintain its original shape.
Over time, you might notice some “pilling” or fuzziness on the surface of the yarn. This is natural for handmade items. You can easily fix this by using a fabric shaver or a small pair of scissors to carefully trim away the excess fuzz. Maintaining your crochet cable holder in this way ensures it continues to look brand new even after months of daily use.
If you used a wooden button in your Crochet Cable Holder Tutorial – Pattern, be careful not to soak it in water for too long, as wood can crack or warp. If the button becomes loose from constant opening and closing, simply re-attach it using a double strand of yarn for extra security. A well-sewn button is the key to a long-lasting crochet cable wrap.
For those who travel often, these holders are a lifesaver. However, they can pick up lint from the bottom of bags. A quick pass with a lint roller will keep your crochet accessories looking sharp. If you notice the fabric stretching out too much, you can give it a quick steam with an iron (holding the iron an inch away) to “set” the fibers back into place.
Storing your extra holders is easy. Because they are flat and small, you can keep a stash of them in a small jar or drawer. Having a few ready to go means you can quickly organize a new device or gift one to a friend. The durability of the Crochet Cable Holder Tutorial – Pattern makes it a sustainable alternative to plastic zip ties or disposable rubber bands.
Finally, remember that the “handmade” look is part of the charm. Minor imperfections in your crochet stitches give the piece character. As you get more comfortable with the Crochet Cable Holder Tutorial – Pattern, your tension will become more even, and your finished products will look increasingly professional. Enjoy the process of creating something both beautiful and useful with your own two hands.
1. What is the best yarn for a Crochet Cable Holder?
The best yarn for a Crochet Cable Holder Tutorial – Pattern is 100% cotton. Cotton is durable, non-stretchy, and can be washed easily. It holds the shape of the holder much better than wool or acrylic, ensuring your cables stay tightly wrapped.
2. Can a beginner make this Crochet Cable Holder?
Absolutely! This project only requires knowledge of the slip knot, foundation chain, and single crochet stitch. It is one of the most beginner-friendly patterns available and can be completed in under 30 minutes.
3. How do I adjust the size for a laptop charger?
To make the holder larger, simply increase the number of rows you crochet. A laptop charger usually requires a strip that is 6 to 8 inches long. You may also want to increase the width by starting with a longer foundation chain (around 20 chains).
4. Can I use a snap instead of a button?
Yes, snaps are a great alternative. If you use a metal or plastic snap, you don’t need to crochet a buttonhole. Simply finish a solid rectangle and sew the two parts of the snap onto opposite ends once you are finished.
5. How do I prevent the holder from stretching out?
The key to preventing stretch is tight tension. Use a crochet hook that is 0.5mm or 1mm smaller than recommended for the yarn. Additionally, using the Back Loop Only (BLO) technique provides a ribbed structure that snaps back into shape better than standard stitches.
6. Is this pattern a good way to use scrap yarn?
Yes, this is a perfect scrap-buster project. A single cable holder uses very few yards of yarn, making it an ideal way to clear out your stash while creating something functional and organized.
In this Crochet Cable Holder Tutorial – Pattern, we have covered everything from selecting the right cotton yarn and tools to the step-by-step construction of a durable, stylish organizer.
We explored how the single crochet stitch provides the perfect density and how simple modifications can tailor the size to fit everything from tiny earbuds to bulky power cords. By adding a professional border and a secure button closure, you now have a versatile accessory that solves the universal problem of tangled wires.


