
Crochet Flower - Tutorial

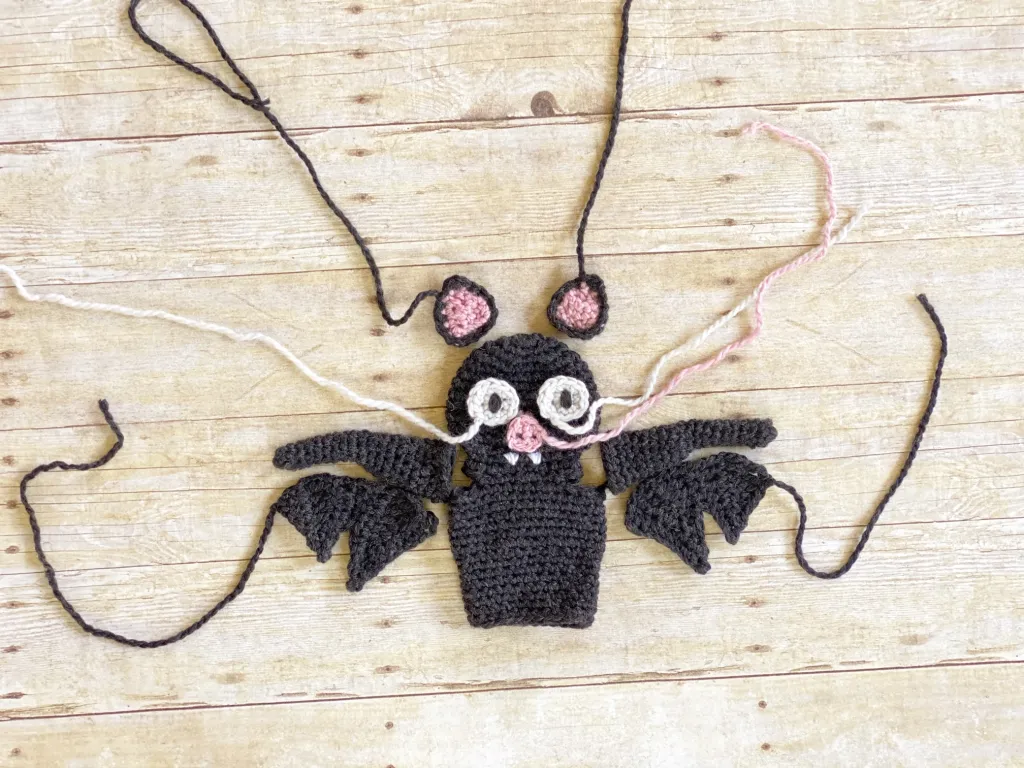
The Bat Hand Puppet Crochet – Pattern is an incredibly engaging project that combines the whimsical world of imaginative play with the intricate art of fiber crafts. Creating a handmade puppet allows for a level of personalization and charm that store-bought toys simply cannot replicate, making this specific design a favorite for parents, teachers, and hobbyists alike. Whether you are preparing for a spooky Halloween season or looking to gift a child a new winged companion for storytelling, mastering the Bat Hand Puppet Crochet – Pattern is a delightful way to sharpen your skills while producing something truly functional.
As you explore the nuances of the Bat Hand Puppet Crochet – Pattern, you will find that it is much more than just a stuffed animal; it is an interactive tool designed for movement and expression. The structure of a crochet hand puppet requires a balance between a sturdy body that fits a human hand and soft, flexible wings that can “flutter” during play. By following a well-designed Bat Hand Puppet Crochet – Pattern, you ensure that the proportions are correct, allowing for comfortable finger movement in the head and wings, which is essential for bringing your character to life.
Embarking on a Bat Hand Puppet Crochet – Pattern journey also opens the door to sustainable and safe toy making. By choosing your own materials, you can ensure that the yarn is hypoallergenic and the construction is durable enough to withstand hours of energetic play. In this comprehensive guide, we will delve into the essential steps, from selecting the perfect nocturnal color palette to finishing your puppet with expressive details. Our goal is to provide you with all the insights needed to successfully complete your Bat Hand Puppet Crochet – Pattern and create a high-quality heirloom toy.
When starting your Bat Hand Puppet Crochet – Pattern, the selection of yarn is the most important decision you will make. For a puppet that will be handled frequently, a cotton-acrylic blend is often the best choice because it offers the softness of cotton with the durability and “bounce” of acrylic. This ensures that the bat puppet maintains its shape even after being stretched over a hand repeatedly, which is a common challenge with purely natural fibers.
The color scheme of your Bat Hand Puppet Crochet – Pattern doesn’t have to be limited to traditional black. Many crafters find that using deep purples, charcoal greys, or even a vibrant “midnight blue” makes the stitch definition easier to see while working. If you are making the puppet for a small child, choosing a yarn with a slight sheen or a variegated texture can add a magical, fantasy element to the finished bat’s appearance.
Your choice of crochet hook size will directly impact the density of the fabric in your Bat Hand Puppet Crochet – Pattern. It is generally recommended to use a hook that is half a millimeter smaller than what the yarn label suggests. This creates a tight stitch tension, which is crucial for puppets because it prevents the stuffing from peeking through and ensures that the user’s hand isn’t visible through the stitches during a performance.
Safety is a priority when following a Bat Hand Puppet Crochet – Pattern, especially if the toy is for a toddler. Instead of using plastic safety eyes, which can sometimes pose a choking hazard if they become loose, consider embroidering the eyes using a satin stitch with white or yellow yarn. This not only makes the puppet safer but also gives you more control over the bat’s expression, allowing you to make it look friendly, sleepy, or mischievous.
Don’t forget the importance of a good tapestry needle for the assembly phase of your Bat Hand Puppet Crochet – Pattern. Bat puppets usually involve several separate pieces—the body, the ears, and the large wings—which must be sewn together securely. Using a high-quality needle ensures that your seams are invisible and strong, preventing the wings from drooping or detaching during an intense “flight” across the living room.
Lastly, consider the type of stuffing you will use for the head of your Bat Hand Puppet Crochet – Pattern. You want the head to be firm enough to hold its shape but light enough that it doesn’t make the puppet top-heavy. Using a premium polyester fiberfill allows you to sculpt the bat’s face effectively, ensuring that the snout and ears stand upright as intended by the original crochet design.
Most Bat Hand Puppet Crochet – Pattern designs utilize the amigurumi technique, which involves working in continuous rounds. This creates a seamless, tube-like body that is perfect for a hand to slide into. Mastering the magic ring is essential here, as it allows you to start the top of the bat’s head with a perfectly closed circle, preventing any stuffing from falling out and giving the puppet a professional, polished look.
To create the iconic look of a bat, the Bat Hand Puppet Crochet – Pattern often incorporates increases and decreases to shape the snout and the brow. Using the invisible decrease (inv dec) technique is highly recommended; it reduces the bulkiness of standard decreases and keeps the surface of the puppet smooth. This level of detail in the crochet shaping is what gives the bat its distinct character and makes the face look more realistic.
The wings of a Bat Hand Puppet Crochet – Pattern are usually worked in rows rather than rounds to create a flat, fabric-like texture. To achieve the “scalloped” look of bat wings, the pattern may call for a combination of double crochet (dc) and picot stitches. This variety in stitch height creates the pointed edges that define a bat’s silhouette, making the crochet wings the most visually striking part of the entire project.
A key feature of a functional Bat Hand Puppet Crochet – Pattern is the thumb and finger holes. Some advanced patterns include “internal pockets” or specific slots that allow the puppeteer to move the wings. Learning how to create reinforced openings in your crochet work ensures that these high-stress areas do not fray or stretch out over time, keeping the puppet responsive to the user’s movements.
Texture can be added to the body of your Bat Hand Puppet Crochet – Pattern by using the loop stitch or bobble stitch. If you want your bat to look “furry,” these stitches can be placed strategically around the neck or chest area. Adding texture not only improves the tactile experience for a child but also adds a layer of visual depth that makes your handmade puppet look like a work of art.
Finally, the ears are a defining characteristic of any Bat Hand Puppet Crochet – Pattern. These are often crocheted as separate triangles or “cones” and then flattened. To make the ears stand up straight without flopping, you can use a smaller hook to create a very stiff fabric. Some crafters even insert a small piece of felt inside the ears to give them extra structure without adding unnecessary weight to the crochet bat.
Once the main structure of your Bat Hand Puppet Crochet – Pattern is complete, the real fun begins with personalization. You can add a small crochet bow tie or a tiny felt heart to the bat’s chest to give it a unique personality. These small additions make the finished puppet feel like a specific character with its own story, which is a wonderful way to encourage creative play in children.
Color-blocking is another great way to make your Bat Hand Puppet Crochet – Pattern stand out. You might choose to make the inside of the wings a contrasting color, such as a bright red or a soft pink. This “pop of color” is only visible when the bat opens its wings, creating a dynamic visual effect that is very engaging during puppet shows and storytelling sessions.
For a more “gothic” or realistic Bat Hand Puppet Crochet – Pattern, you can use fabric paint or chalk pastels to add shading around the eyes and wings. This “weathering” technique adds realism and makes the crochet stitches look more like natural fur and skin. It’s a favorite technique among advanced amigurumi artists who want to push the boundaries of what a traditional crochet pattern can achieve.
If you are following the Bat Hand Puppet Crochet – Pattern for a holiday-themed event, consider using glow-in-the-dark yarn for the eyes or the wing tips. This adds an incredible “wow factor” that children love, especially during evening play. Using specialized yarns can transform a simple crochet project into a high-tech toy that provides hours of entertainment in the dark.
The “inner sleeve” is an optional but helpful addition to a Bat Hand Puppet Crochet – Pattern. By sewing a simple fabric lining inside the crochet body, you protect the stitches from the oils on the user’s skin and prevent fingers from getting caught in the yarn loops. This lining technique makes the puppet feel much more premium and comfortable, similar to a high-end professional puppet.
Lastly, you can customize the size of your Bat Hand Puppet Crochet – Pattern by simply changing the yarn weight. If you use a bulky “blanket yarn,” you can create a giant, cuddly bat puppet that doubles as a pillow. If you use embroidery floss, you can create a tiny “finger puppet” version of the same design. This versatility in scaling is one of the many reasons why this pattern is so popular among the crafting community.
Because a Bat Hand Puppet Crochet – Pattern is designed for hands-on use, it will eventually need cleaning. If you used mercerized cotton, the puppet will be quite hardy and can often be hand-washed with a mild detergent. Always avoid wringing the puppet out; instead, roll it in a towel to remove excess moisture and reshape the wings while damp to ensure it dries in its original, intended form.
Pilling is a common issue with many yarns used for the Bat Hand Puppet Crochet – Pattern, especially after lots of play. You can maintain the neat appearance of your puppet by using a fabric shaver or a pair of small scissors to carefully trim away any “fuzz” that develops. Keeping the surface clean and smooth ensures that the stitch details of your bat remain sharp and visible for years to come.
Store your Bat Hand Puppet Crochet – Pattern creation in a way that doesn’t crush the wings or the ears. Ideally, placing it over a clean, empty bottle or a dedicated puppet stand will help it keep its shape. If the wings do become creased, a very light steaming (without touching the iron to the yarn) can help “relax” the fibers and bring back the crisp look of the original crochet pattern.
If you notice a stitch starting to come loose in your Bat Hand Puppet Crochet – Pattern, fix it immediately with a matching piece of yarn and a needle. Small repairs are easy to hide within the textured crochet fabric, but if left alone, a small hole can quickly grow due to the tension of a hand being inserted and removed. A little “maintenance sewing” will keep your bat in top-flight condition.
For those who sell items made from the Bat Hand Puppet Crochet – Pattern, providing a small care card with the purchase is a great touch. This card can explain the best washing methods and remind the owner that the puppet is a handmade item that deserves gentle care. It builds trust with your customers and ensures that the bat puppet remains a cherished part of their toy collection.
Finally, remember that the Bat Hand Puppet Crochet – Pattern is a living piece of art. As it ages, it may gain a “loved” look that adds to its charm. Whether it’s used in a classroom to teach about animals or at home for bedtime stories, a well-cared-for crochet hand puppet is a durable, eco-friendly, and heart-filled alternative to mass-produced plastic toys.
1. Is the Bat Hand Puppet Crochet – Pattern difficult for beginners?
This pattern is generally considered “intermediate.” While it uses basic stitches, the shaping of the wings and the assembly of multiple parts can be a bit challenging. However, a determined beginner who is familiar with the amigurumi technique can certainly succeed with a bit of patience!
2. How long does it take to finish a Bat Hand Puppet Crochet – Pattern?
For an average crocheter, it takes about 4 to 6 hours to complete the entire puppet, including the assembly. It’s a perfect “weekend project” that provides a lot of satisfaction once you see the finished bat come to life on your hand.
3. What is the best way to attach the wings to the body?
The most secure way is to use a whipstitch or a “ladder stitch.” Make sure to sew along a significant portion of the wing’s base so that it doesn’t “flop” too much. Checking the Bat Hand Puppet Crochet – Pattern instructions for specific placement marks is key to getting the balance right.
4. Can I use acrylic yarn for this pattern?
Yes, acrylic yarn is a popular choice because it is affordable and comes in many colors. Just be aware that some low-quality acrylics can be “scratchy” on the skin, so look for a soft-touch acrylic to ensure the puppet is comfortable for the person wearing it.
5. How do I make the bat’s wings stay open?
If you want the wings to be stiffer, you can “double up” the wing layers or use a smaller crochet hook to create a very dense fabric. Some people also use a light spray of fabric stiffener, though this is not recommended if the puppet is for a very young child who might put it in their mouth.
6. What size hand does the Bat Hand Puppet Crochet – Pattern fit?
Most patterns are designed to fit an average adult hand so that parents can put on a show. However, you can easily downsize the puppet for a child’s hand by using a lighter yarn weight (like sport weight) and a smaller hook without changing the stitch count of the pattern.
In this article, we have journeyed through the entire process of bringing a Bat Hand Puppet Crochet – Pattern to life. We began by selecting the highest quality cotton and acrylic yarns to ensure durability and comfort. We then explored the technical aspects of the craft, focusing on amigurumi shaping, magic rings, and the intricate construction of those iconic scalloped wings. We also discussed how to infuse personality into your work through custom colors and safety-conscious decorations, as well as how to maintain your puppet so it lasts for generations.
The Bat Hand Puppet Crochet – Pattern is more than just a crafting project; it is an invitation to play and a celebration of handmade creativity. By following these steps, you are not just making a toy—you are creating a character that will inspire stories and laughter. We hope this guide has given you the confidence to pick up your hook and start your own nocturnal adventure!


