
Crochet Flower - Tutorial

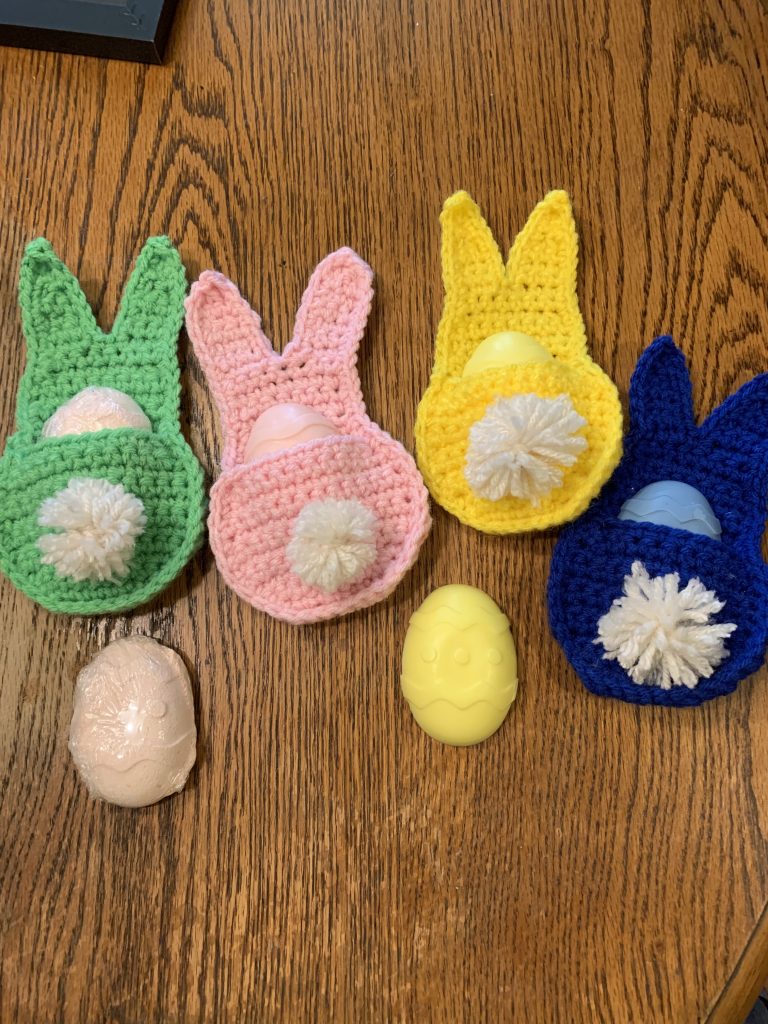
Creating an Easter Bunny Pockets – Pattern is one of the most heartwarming ways to welcome the spring season and add a handmade touch to your holiday festivities. These adorable little pouches are designed to hold treats, candies, or small gifts, making them a favorite for children and adults alike who appreciate the charm of DIY decor. By using an Easter Bunny Pockets – Pattern, you can transform simple scraps of fabric into functional art pieces that serve as the centerpiece of an Easter basket or a thoughtful party favor for your upcoming spring brunch.
The versatility of an Easter Bunny Pockets – Pattern allows crafters of all skill levels to participate in the joy of creating something unique. Whether you prefer the rustic feel of felt, the crisp texture of cotton, or even the cozy look of burlap, this specific Easter Bunny Pockets – Pattern can be adapted to suit any aesthetic. The beauty of these pockets lies in their simplicity; they are quick to assemble yet offer a high-impact visual appeal that instantly brightens up any room, bringing a sense of whimsical joy to your seasonal home styling.
In this comprehensive guide, we will dive deep into everything you need to know about mastering the Easter Bunny Pockets – Pattern. We will discuss the essential materials, provide tips for flawless construction, and explore creative ways to personalize your bunnies so they reflect your individual style. By the end of this article, you will feel confident in your ability to use the Easter Bunny Pockets – Pattern to create beautiful, long-lasting keepsakes that your family will look forward to seeing every year as the tulips begin to bloom.
The foundation of a successful Easter Bunny Pockets – Pattern starts with choosing the right textiles to bring your vision to life. Most crafters find that high-quality felt is the most forgiving material, especially for those who are new to sewing, because it provides structure without the need for complex linings. When you use felt with your Easter Bunny Pockets – Pattern, you don’t have to worry about edges fraying, which allows for a clean and professional look even if you are stitching by hand.
If you are looking for a more traditional or vintage appearance, quilting cotton is an excellent alternative for your Easter Bunny Pockets – Pattern. Cotton fabrics come in an endless array of pastel colors and floral prints that perfectly capture the essence of the Easter holiday. When working with cotton, it is often helpful to use a bit of fusible interfacing on the back of your fabric pieces to ensure that your Easter Bunny Pockets maintain their shape when filled with heavier chocolate eggs.
Texture plays a significant role in how your finished Easter Bunny Pockets – Pattern project is perceived by others. Mixing materials—such as using a soft fleece for the bunny’s ears and a sturdy canvas for the pocket body—can add a sophisticated, multi-dimensional feel to your work. This contrast in textures makes the Easter Bunny Pockets more tactile and engaging, particularly for young children who love the sensory experience of soft, fuzzy holiday decorations.
Don’t be afraid to look through your scrap bin before buying new materials for your Easter Bunny Pockets – Pattern. Because these pockets are typically small, they are the ideal project for using up leftover bits of lace, ribbon, and fabric from previous sewing adventures. Repurposing these materials not only makes your Easter Bunny Pockets more eco-friendly but also ensures that every single bunny you create has its own unique story and a one-of-a-kind personality.
Color selection is equally important when preparing your Easter Bunny Pockets – Pattern materials for the cutting phase. While soft pinks, blues, and yellows are the standard for spring, many modern designers are opting for neutral tones like oatmeal, slate, and cream to create a more minimalist look. Choosing a cohesive color palette for your Easter Bunny Pockets will help them look like a professional set, making them perfect for gifting to teachers, neighbors, or colleagues.
Finally, consider the thread and embellishments you will need to complete your Easter Bunny Pockets – Pattern. Using a contrasting embroidery floss can make your stitches pop, adding a decorative “primitive” charm to the edges of the pocket. Small details like tiny buttons for eyes or a pom-pom for a tail can elevate the Easter Bunny Pockets from a simple sewing project to a high-end craft that looks like it was plucked straight from a boutique shelf.
Before you begin the actual sewing of your Easter Bunny Pockets – Pattern, gathering the right tools will make the process much smoother and more enjoyable. You will need a set of sharp fabric shears to ensure that the curves of the bunny ears are cut cleanly without any jagged edges. Having a dedicated pair of small embroidery scissors is also helpful for trimming threads and navigating the tight corners often found in a detailed Easter Bunny Pockets – Pattern.
Accurate marking is a crucial step that many beginners overlook when starting their Easter Bunny Pockets – Pattern. Using a heat-erasable pen or tailor’s chalk allows you to trace the pattern onto your fabric precisely without leaving permanent marks. This ensures that when you sew the two halves of your Easter Bunny Pockets together, they line up perfectly, resulting in a symmetrical bunny that stands up straight and looks professionally made.
If you plan on making multiple sets, creating a sturdy template for your Easter Bunny Pockets – Pattern out of cardstock or thin plastic is a great time-saver. Instead of pinning paper to fabric every time, you can simply trace your durable template, which prevents the fabric from shifting and ensures consistency across all your Easter Bunny Pockets. Consistency is especially important if you are planning to sell your handmade items at craft fairs or online shops.
A good iron is a secret weapon for anyone working with an Easter Bunny Pockets – Pattern. Pressing your fabric before you cut and after you sew helps to set the stitches and gives the final product a crisp, polished finish. For the Easter Bunny Pockets, pressing the seams flat can make the difference between a project that looks “homemade” in a messy way and one that looks “handmade” in a high-quality, artisanal way.
For those who prefer machine sewing, ensure your needle is appropriate for the weight of the fabric you have chosen for your Easter Bunny Pockets – Pattern. A universal needle works well for most cottons, but if you are using a thick wool felt, you might need a slightly stronger needle to prevent breakage. Taking a few moments to test your stitch length on a scrap piece of fabric will ensure that your Easter Bunny Pockets are durable enough to hold gifts.
Lastly, don’t forget the importance of a clean workspace when working on your Easter Bunny Pockets – Pattern. Having your pins, needles, and measuring tape within reach prevents frustration and allows you to focus on the creative aspects of the project. Organizing your materials beforehand means you can enjoy the rhythmic process of assembling your Easter Bunny Pockets, making your crafting time a relaxing and therapeutic escape from the daily grind.
The first step in assembling the Easter Bunny Pockets – Pattern is to sew the facial features onto the front panel while the fabric is still flat. It is much easier to add eyes, a nose, and whiskers at this stage than it is to try and embroider them once the pocket is closed. This part of the Easter Bunny Pockets – Pattern is where you can truly express yourself, giving each bunny a different expression, from a sleepy wink to a joyful smile.
Once the face is complete, place the front and back pieces of your Easter Bunny Pockets – Pattern together. If you are using felt, you can place them “wrong sides together” and sew around the outside edge with a decorative blanket stitch. For cotton Easter Bunny Pockets, you will likely place the “right sides together,” sew around the perimeter, and then turn the bunny inside out through the top opening to hide the raw seams inside.
The most characteristic part of the Easter Bunny Pockets – Pattern is, of course, the ears. Depending on your design, you might sew the ears as separate pieces and then attach them to the body, or they might be integrated into the main body shape. Ensuring the ears are stuffed lightly or interfaced properly will help them stand up tall, giving your Easter Bunny Pockets that iconic, alert bunny silhouette that everyone recognizes and loves.
As you sew around the body, remember to leave the top portion of the Easter Bunny Pockets – Pattern open. This opening is what transforms the bunny into a functional pocket. A good tip is to backstitch at the beginning and end of this opening to reinforce the area. Since the Easter Bunny Pockets will be handled frequently as people reach for treats, these extra-strong stitches will prevent the pocket from ripping over time.
If you are following a version of the Easter Bunny Pockets – Pattern that includes a lining, you will repeat the assembly process with your lining fabric and then slip it inside the outer shell. This gives the Easter Bunny Pockets a very high-end finish and hides any messy thread ends from the facial embroidery. While it adds an extra step, the results are well worth the effort for a truly professional-looking holiday gift.
The final touch in the construction of your Easter Bunny Pockets – Pattern is the addition of a tail or a hanging loop. A fluffy white pom-pom glued or sewn to the back adds a delightful surprise when someone turns the pocket around. If you want to hang your Easter Bunny Pockets on a “tree” or a mantle, sewing a small ribbon loop between the ears allows you to incorporate them into your larger home decor displays.
Once you have finished sewing your Easter Bunny Pockets – Pattern, the fun of using them begins. These pockets are the perfect size for holding traditional chocolate eggs, but you can also get creative with what you put inside. For a non-candy alternative, consider filling the Easter Bunny Pockets with seed packets, small bottles of bubbles, or even a pair of festive socks, making them a versatile gift for all ages.
In addition to being gift containers, items made from the Easter Bunny Pockets – Pattern make excellent place settings for a holiday dinner. You can slip a set of silverware and a napkin into the pocket and place one at each seat on your table. This adds a charming, personalized touch to your Easter brunch, and guests will be delighted to know they can take their Easter Bunny Pockets home as a memento of the day.
If you are a teacher or a group leader, the Easter Bunny Pockets – Pattern is a fantastic project for a classroom craft day. Because the design is simple, older children can practice their basic sewing skills while making something functional. Seeing a whole row of Easter Bunny Pockets hanging in a classroom brings a wonderful sense of community and seasonal cheer to the learning environment during the weeks leading up to the holiday.
For those who enjoy home organization, the Easter Bunny Pockets – Pattern can be used to hold small springtime essentials. You could hang a series of them in a child’s room to hold hair ties, crayons, or small toy cars. Using the Easter Bunny Pockets as decorative storage solutions allows you to keep the festive spirit alive while also keeping your home tidy and organized in a playful, imaginative way.
If you are looking to monetize your crafting hobby, the Easter Bunny Pockets – Pattern is a high-demand item at spring craft fairs. People are always looking for unique, handmade gifts that aren’t available in big-box stores. Selling your Easter Bunny Pockets in sets of three or five, perhaps packaged in a pretty box with some “Easter grass,” can create an irresistible product for shoppers looking for special holiday treats.
Finally, think about using the Easter Bunny Pockets – Pattern to spread kindness in your community. You can fill several Easter Bunny Pockets with small treats and leave them as “random acts of kindness” for neighbors, or donate them to a local nursing home or children’s hospital. The joy that a simple, handmade bunny can bring to someone’s day is immeasurable, proving that the Easter Bunny Pockets – Pattern is truly a gift that keeps on giving.
1. Is the Easter Bunny Pockets – Pattern suitable for a complete beginner?
Yes, absolutely! The Easter Bunny Pockets – Pattern is one of the best projects for beginners because it involves simple shapes and basic stitches. If you are nervous about using a sewing machine, you can easily complete the entire project by hand using a basic running stitch or a blanket stitch.
2. How much fabric do I need for one pocket?
You don’t need much at all. A single “fat quarter” of fabric or a standard 9×12 inch sheet of craft felt is usually more than enough to complete one Easter Bunny Pockets – Pattern. This makes it an incredibly cost-effective project and a great way to use up your existing fabric scraps.
3. Can I resize the Easter Bunny Pockets – Pattern to make it larger?
Yes, you can easily scale the Easter Bunny Pockets – Pattern up or down depending on your needs. If you want to create a large “tote bag” style bunny, simply increase the dimensions on your printer. Just remember that larger pockets might require heavier interfacing to stay upright.
4. What is the best way to clean my Easter Bunny Pockets?
If you used cotton for your Easter Bunny Pockets – Pattern, you can usually hand wash them in cold water and air dry. However, if you used felt or added glued-on elements like googly eyes, it is best to spot clean them with a damp cloth to prevent the material from pilling or the decorations from falling off.
5. How long does it take to make one bunny pocket?
Once your fabric is cut, a single Easter Bunny Pockets – Pattern can be sewn in about 20 to 30 minutes. If you are making them in a “production line” style—doing all the cutting first, then all the embroidery, then all the sewing—you can finish a large batch in just a couple of hours.
6. Can I add a zipper or a button to the Easter Bunny Pockets – Pattern?
While the traditional Easter Bunny Pockets – Pattern is an open pouch, you can certainly add a closure if you wish. A small piece of Velcro or a snap button at the top is a great way to ensure that the contents don’t fall out, especially if the pockets are being used by active children.
In this article, we have explored the delightful process of using an Easter Bunny Pockets – Pattern to create beautiful, functional holiday decorations.
We started by discussing how to select the best fabrics and tools, moved through a detailed step-by-step construction guide, and concluded with creative ideas for gifting and using your finished pieces. Whether you are sewing for yourself or others, the Easter Bunny Pockets – Pattern offers a wonderful opportunity to slow down and enjoy the art of handmade creation.


