
Crochet Flower - Tutorial

Creating a Crochet Bunny Cutlery Holder- Pattern is one of the most delightful ways to add a touch of handmade charm to your festive table settings. Whether you are preparing for a bright Easter brunch or simply love whimsical kitchen decor, a Crochet Bunny Cutlery Holder serves as both a functional tool and a conversation starter for your guests. Using a well-designed pattern allows you to maintain consistency across your set, ensuring that every fork, knife, and spoon is cradled in a cozy, long-eared friend that brings smiles to the dining room.
The beauty of following a specific Crochet Bunny Cutlery Holder- Pattern lies in its adaptability and the joy of the crafting process itself. For many enthusiasts, the crochet technique offers a meditative escape, and finishing a small project like a cutlery holder provides instant gratification. By selecting the right yarn and mastering a few basic stitches, you can create a durable and washable accessory that lasts for years. This pattern typically focuses on creating a pocket-like body where the cutlery sits, topped with iconic bunny ears that peek over the top of the table.
When you dive into a Crochet Bunny Cutlery Holder- Pattern, you are engaging in a tradition of “tablescaping” that prioritizes personality over store-bought uniformity. A bunny-themed holder is particularly popular because it evokes feelings of springtime and renewal. Throughout this guide, we will explore the essential materials, the technical breakdown of the pattern, and the finishing touches that make your crochet work stand out. Let’s explore how you can transform a simple ball of yarn into a functional piece of art for your home.
To begin your Crochet Bunny Cutlery Holder- Pattern, you first need to select a high-quality cotton yarn. Cotton is the preferred choice for a cutlery holder because it is sturdy, heat-resistant, and can be easily washed if it comes into contact with food. Unlike acrylic, cotton holds its shape well, which is vital for maintaining the bunny silhouette and ensuring the crochet stitches remain tight and professional.
The next tool in your kit is the crochet hook, and for this specific pattern, a smaller size like 3.5mm or 4.0mm is usually recommended. Using a smaller hook creates a denser fabric, which is necessary so that the handles of your cutlery don’t poke through the gaps in the yarn. A tight tension is the secret to a successful Crochet Bunny Cutlery Holder, as it provides the structural integrity needed to stand upright or lay flat without curling.
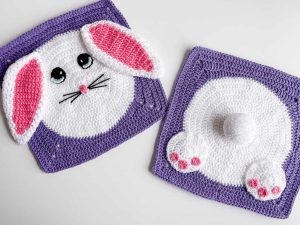
You will also need a tapestry needle and a pair of sharp scissors to finish your Crochet Bunny Cutlery Holder- Pattern. The needle is used to weave in the ends and to embroider the small details like the bunny’s nose or eyes. For many, adding a small pink pom-pom for a tail or using embroidery floss for whiskers is what truly brings the bunny character to life within the crochet structure.
Stitch markers are another essential for this pattern, especially when working in the round. Since many cutlery holders are constructed as a continuous tube or pouch, keeping track of the beginning of your rows is crucial for symmetry. Without markers, you might find your bunny ears misaligned, which can detract from the overall look of your Crochet Bunny Cutlery Holder.
Don’t forget about the lining if you want an extra touch of luxury. While not strictly required by every Crochet Bunny Cutlery Holder- Pattern, some makers like to sew a small piece of felt inside the pouch. This protects the crochet stitches from sharp knife edges and adds a pop of color that can be seen through the yarn loops, enhancing the festive aesthetic.
Lastly, consider your color palette before starting the pattern. While traditional white or cream yarn is classic for a bunny, pastel shades like mint green, lavender, or baby blue can make your Crochet Bunny Cutlery Holder set look modern and vibrant. Choosing a yarn with a slight sheen can also make the crochet details pop under the dining room lights.
The core of the Crochet Bunny Cutlery Holder- Pattern usually begins with a magic ring or a foundation chain. This creates the base of the pouch where the cutlery will eventually rest. Most patterns utilize the single crochet (sc) stitch for the main body because it creates a solid, opaque surface that hides the metal of the utensils and provides a clean canvas for the bunny features.
As you work your way up the pattern, you will transition from the base to the sides of the holder. This is often done by working in the back loops only (BLO) for one round to create a sharp edge that allows the crochet piece to sit flat on the table. The height of the Crochet Bunny Cutlery Holder is generally around 4 to 5 inches, which is the perfect size to cover the handles of standard forks and knives.
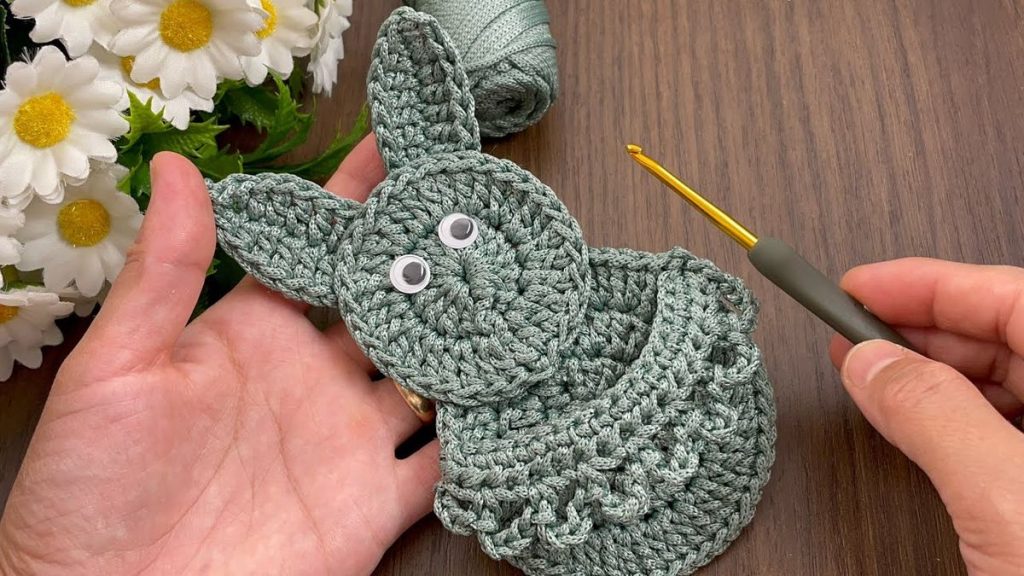
The most exciting part of the Crochet Bunny Cutlery Holder- Pattern is crafting the ears. These are usually worked separately and then sewn onto the top edge of the crochet pouch. To get that signature bunny look, the ears are often long and tapered, achieved through a series of increases and decreases. Some patterns suggest inserting a thin wire or starching the yarn to keep the ears standing tall.
Increasing and decreasing are the two most important techniques to master for this pattern. In crochet, an increase involves placing two stitches into one, while a decrease merges two stitches into one. These maneuvers allow you to shape the bunny’s head and the curve of the ears, ensuring that your Crochet Bunny Cutlery Holder doesn’t look like a simple rectangle but like a recognizable animal figure.
Joining the pieces is where your Crochet Bunny Cutlery Holder- Pattern truly comes together. Using a whip stitch or a slip stitch join, you will attach the ears to the back of the pouch. It is important to center them perfectly so that when the cutlery is inserted, the bunny looks balanced. Professional crochet artists often use pins to hold the ears in place before the final sewing to ensure precision.
Finally, the pattern will guide you through the “face” of the holder. Many people prefer a minimalist look, using just two small black beads for eyes and a pink “V” shape for the nose. However, if you are skilled in amigurumi, you can add more three-dimensional details. This customization is what makes the Crochet Bunny Cutlery Holder- Pattern a favorite among creative crafters who want to put their own spin on the design.
Success with a Crochet Bunny Cutlery Holder- Pattern depends heavily on your stitch consistency. If your stitches are too loose in one section and tight in another, the holder will look warped. To avoid this, maintain an even tension on your yarn and take breaks to stretch your hands. Consistent crochet work ensures that if you make a set of six, they all look identical on your holiday table.
Choosing the right environment for your crochet session can also improve the quality of your Bunny Cutlery Holder. Good lighting is essential for seeing the small loops in the cotton yarn, especially if you are working with darker colors. Many patterns recommend using a “daylight” lamp to reduce eye strain and help you catch any mistakes in the crochet rows before you get too far ahead.
Blocking your finished Crochet Bunny Cutlery Holder- Pattern is a professional secret that makes a huge difference. Blocking involves pinning your crochet piece to a foam board and lightly steaming it or misting it with water. This “sets” the yarn fibers, making the bunny ears lie flat and ensuring the pouch is perfectly rectangular. It elevates the cutlery holder from “homemade” to “handmade professional.”
Gauge is another factor that shouldn’t be ignored, even for a small Crochet Bunny Cutlery Holder- Pattern. If your gauge is too large, your cutlery will fall out; if it’s too small, you won’t be able to fit the knife and fork inside. Always do a small swatch of the crochet stitches before starting the full project to ensure your hook and yarn combination matches the pattern requirements.
Organization is key when working on a set of Crochet Bunny Cutlery Holders. Since you are likely making multiple pieces, keep a “prototype” nearby to compare your progress. This ensures that every bunny has ears of the same length and a body of the same width. Keeping your crochet supplies in a dedicated basket prevents the cotton yarn from getting tangled or dirty between sessions.
Lastly, remember that the Crochet Bunny Cutlery Holder- Pattern is meant to be enjoyable. If you find a certain stitch difficult, don’t be afraid to simplify it. The goal is to create a functional crochet piece that adds joy to your home. The more comfortable you are with the pattern, the faster you will be able to whip up a whole family of bunnies for your next big dinner party.
Once you have mastered the basic Crochet Bunny Cutlery Holder- Pattern, the possibilities for variation are endless. You can change the “texture” of the bunny by using a bobble stitch for the tail or a ribbed stitch for the body. This adds a tactile element to your crochet work that guests will love to touch while they wait for their meal to be served.
You can also adapt the Crochet Bunny Cutlery Holder- Pattern for different seasons. While bunnies are perfect for spring, you could use the same basic pouch pattern and change the ears to create reindeer for Christmas or bears for a woodland-themed baby shower. The core crochet technique remains the same, proving just how versatile a good cutlery holder design can be.
For those who love a bit of sparkle, consider weaving a metallic thread alongside your cotton yarn. This gives the Crochet Bunny Cutlery Holder a subtle shimmer that is perfect for formal events or evening dinners. Adding tiny silk ribbons around the bunny’s neck is another way to add a sophisticated touch to the crochet project without altering the base pattern.
If you are making these as gifts, you can customize the Crochet Bunny Cutlery Holder- Pattern with the recipient’s initials. Using a surface slip stitch or basic embroidery, you can stitch a name onto the front of the crochet pouch. A personalized bunny holder makes a wonderful keepsake that friends and family will cherish and bring out year after year.
Another fun variation is the “floppy ear” look. Instead of making the ears stand straight up, you can modify the Crochet Bunny Cutlery Holder- Pattern to have one or both ears folded down. This gives the bunny a more relaxed and cute personality. This is achieved by changing the placement of your decreases or simply sewing the ear down at an angle to the crochet body.
Finally, consider the presentation. You can place a sprig of dried lavender or a small paper napkin inside the Crochet Bunny Cutlery Holder along with the cutlery. This turns your crochet project into a full sensory experience. Experimenting with these variations ensures that your Crochet Bunny Cutlery Holder- Pattern remains a fresh and exciting project every time you pick up your hook.
What is the best type of yarn for a Crochet Bunny Cutlery Holder?
The best yarn is 100% mercerized cotton. It is durable, has a beautiful sheen, and doesn’t pill. Since cutlery holders are used around food, being able to wash them without the fabric becoming fuzzy is a major advantage.
How long does it take to finish one holder?
For an intermediate crocheter, one Crochet Bunny Cutlery Holder typically takes between 45 minutes to an hour. It is a perfect “one-sitting” project, making it easy to create a full set of four or six over a single weekend.
Can I use this pattern for chunky yarn?
You can, but it will result in a much larger bunny. If you use chunky yarn, the Crochet Bunny Cutlery Holder might become more of a bread basket or a bottle holder rather than a slim pouch for cutlery. Stick to DK or Worsted weight for the best results.
How do I keep the bunny ears from falling over?
There are three main ways: sew the ears onto the crochet body with a wide base, use a slightly smaller hook to make the stitches very stiff, or apply a fabric stiffener spray once the pattern is finished.
Is this project suitable for a total beginner?
Yes! If you know how to make a chain, a single crochet, and a slip stitch, you can complete this pattern. It is a great way to practice working in the round and learning basic shaping without the commitment of a large blanket or sweater.
How do I clean my crochet cutlery holders?
If made from cotton, you can place them in a mesh laundry bag and wash them on a delicate cycle. Lay them flat to dry and reshape the bunny ears while they are damp to ensure they look perfect once they are dry.
In this article, we have explored the wonderful world of the Crochet Bunny Cutlery Holder- Pattern. We covered everything from the essential cotton yarn and tools needed to the technical steps of increasing, decreasing, and joining the ears to the pouch.
We also discussed how to maintain stitch consistency and explored various ways to customize your bunny to suit your personal style or festive theme. Creating a Crochet Bunny Cutlery Holder is a rewarding way to blend your love for crochet with functional home decor.


