
Crochet Flower - Tutorial

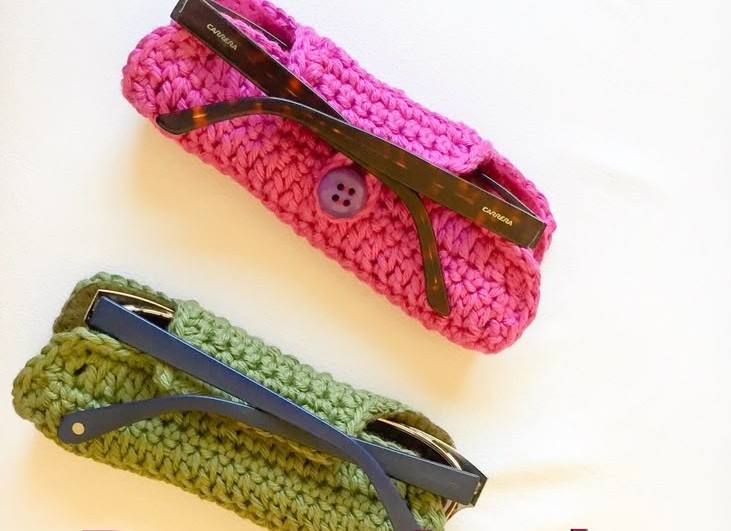
Creating a Crochet eyeglass case – Pattern is one of those delightful projects that perfectly balances functionality with artistic expression. If you have ever fumbled around your bag looking for your glasses only to find a new scratch on the lens, you know exactly why a crochet eyeglass case is a must-have accessory. In this guide, we are going to dive deep into how you can create your own personalized eyeglass case using a simple yet elegant crochet pattern that caters to both beginners and seasoned crafters alike.
The beauty of following a Crochet eyeglass case – Pattern lies in its versatility, as you can customize the size, color, and texture to match your personal style or even make them as thoughtful gifts for friends and family. Using high-quality cotton yarn or soft acrylic blends, these cases provide a cushioned layer of protection that store-bought plastic cases often lack. Plus, the handmade nature of a crochet case ensures that your eyewear stays snug and secure while adding a touch of vintage charm to your daily routine.
When we talk about an optimized Crochet eyeglass case – Pattern, we are looking for a design that is durable enough to withstand being tossed into a purse but soft enough to prevent any damage to delicate frames. By mastering a few basic crochet stitches, such as the single crochet or the half double crochet, you can build a sturdy fabric that serves as a stylish “sleeping bag” for your spectacles. Let’s explore the essential components, techniques, and creative steps required to master this rewarding DIY crochet project from start to finish.
Selecting the right yarn is the foundational step for any successful Crochet eyeglass case – Pattern. For a project like this, mercerized cotton is often the top choice because it offers excellent stitch definition and doesn’t pill over time. A medium weight yarn (worsted) is typically recommended to ensure the case has enough body to hold its shape without being too bulky.
The hook size you choose will significantly impact the tension of your crochet eyeglass case. Generally, using a 3.5mm or 4.0mm crochet hook allows for a tighter weave, which is essential for keeping dust and lint away from your lenses. If your stitches are too loose, the glasses might poke through or the case might stretch out too quickly with daily use.
Don’t forget about the importance of notions and accessories when preparing your pattern. You will need a yarn needle for weaving in ends and perhaps some stitch markers to keep track of your rounds. If you plan on adding a closure, consider picking out a decorative button or some velcro strips to ensure your glasses don’t slide out unexpectedly.
The lining is another optional but highly recommended element for a premium Crochet eyeglass case – Pattern. Adding a small piece of microfiber fabric or felt inside the case can provide an extra layer of cleaning and protection. This step elevates a simple handmade gift into a professional-looking accessory that provides maximum utility for the user.
Color choice plays a huge role in the aesthetic appeal of your crochet project. You can opt for variegated yarn to create a natural color-change effect without switching balls of yarn, or go for solid colors to highlight intricate stitch patterns. Bright, bold colors make the case easier to find inside a dark handbag, which is a practical tip for daily life.
Finally, think about the durability of the materials you select for your Crochet eyeglass case – Pattern. Since this item will be handled frequently, choosing a washable yarn is a smart move. Cotton and some synthetic blends can be tossed in the laundry, ensuring your crochet eyewear protector stays fresh and clean no matter where your travels take you.
To begin your Crochet eyeglass case – Pattern, you must first master the foundation chain. This determines the width of your case, so you should chain enough stitches to comfortably fit the widest part of your glasses. Usually, a chain of 12 to 15 stitches is a standard starting point for most adult-sized eyewear, allowing for a bit of “give” in the fabric.
The single crochet (sc) is the workhorse of most eyeglass case patterns because it creates a dense, sturdy fabric. By working in continuous rounds, you eliminate the need for side seams, which makes the crochet case much stronger and smoother. This “spiral” technique is a favorite among amigurumi creators and works perfectly for tubular items like this one.
If you want a bit more texture, the half double crochet (hdc) is an excellent alternative for your Crochet eyeglass case – Pattern. It is slightly taller than a single crochet but still maintains a tight enough structure to protect the contents. Incorporating back loop only (BLO) stitches can also create a beautiful ribbed effect that adds a sophisticated touch to the final product.
Proper tension control is vital when working through a crochet pattern. If you crochet too tightly, the case will be stiff and difficult to use; if you crochet too loosely, it won’t provide adequate protection. Practicing your gauge before starting the actual project ensures that your handmade glass holder turns out the exact size you intended.
Transitioning between colors is a great way to make your Crochet eyeglass case – Pattern stand out. You can create stripes by changing yarn every few rounds, or use the tapestry crochet technique to incorporate small logos or floral designs. This allows you to personalize the pattern to reflect your personality or the interests of the person you are making it for.
Finishing your work correctly is just as important as the stitches themselves. Learning the invisible join technique will give the top edge of your crochet eyeglass case a polished, professional look. Once the main body is complete, you can add a scalloped border or a simple slip stitch edge to reinforce the opening and prevent it from stretching out over time.
The first step in assembling your Crochet eyeglass case – Pattern is to create the base. Many patterns suggest working on both sides of the initial foundation chain to create an oval bottom. This method ensures there is no hole at the bottom of the case, providing a secure “pocket” for your glasses to sit in from the very beginning.
As you move up the body of the crochet case, consistency is key. You will continue to work your chosen crochet stitches in rounds until the piece reaches the desired length. For a standard pair of glasses, this is usually around 6 to 7 inches, but it’s always best to measure against the actual frames you intend to store inside the crochet holder.
Once you reach the top of your Crochet eyeglass case – Pattern, you need to decide on a closure style. A popular choice is a crocheted flap that folds over the opening. To do this, you simply stop working in rounds and start working in rows across half of the stitches, decreasing at the edges to create a rounded or pointed triangular shape.
Creating a button loop is a simple yet effective way to secure the flap of your eyeglass case. This usually involves a short chain stitch sequence that is joined back to the flap, forming a loop that fits snugly over a button. Choosing a unique button—perhaps a vintage wooden one or a shiny pearl—adds a great focal point to your crochet design.
If you prefer a more minimalist Crochet eyeglass case – Pattern, you can opt for a drawstring closure instead. By creating a row of “eyelets” (using a chain-1, skip-1 sequence), you can thread a crocheted cord or a ribbon through the top. This allows the case to be cinched shut, which is particularly useful for smaller reading glasses or even sunglasses.
The final assembly step involves weaving in all loose ends using your yarn needle. Make sure to secure the yarn on the inside of the case so the knots aren’t visible or uncomfortable. If you chose to add a fabric lining, this is the moment to hand-stitch it into place, ensuring it sits flat against the crocheted walls for a clean finish.
One of the best things about a Crochet eyeglass case – Pattern is how easily it can be adapted for oversized sunglasses. Simply increase the number of stitches in your foundation chain and add a few extra rounds of height. Because sunglasses often have more curved frames, adding a bit of stitch increases in the middle of the case can create a “bulge” that accommodates the shape perfectly.
For those who enjoy a more modern look, try using t-shirt yarn or macrame cord for your Crochet eyeglass case – Pattern. These thicker materials create a very rigid, protective shell that feels almost like a hard case. While the stitches will be larger, the resulting crochet accessory is incredibly trendy and works well with contemporary fashion styles.
You can also turn your eyeglass case into a multi-functional item by adding a neck strap or a wristlet loop. This is a fantastic modification for people who are constantly losing their glasses. By attaching a long chain of stitches to the sides of the case, you create a “portable” version of the Crochet eyeglass case – Pattern that is always within reach.
Embellishments are where you can really let your creativity shine. You can sew on crochet flowers, add beadwork, or even use embroidery thread to stitch initials onto the surface. These small details transform a basic crochet pattern into a one-of-a-kind piece of art that reflects the time and effort you put into your handicraft.
If you are making a Crochet eyeglass case – Pattern for a child, consider adding “ears” or “eyes” to turn the case into a cute animal character. Using bright colors and playful shapes can encourage children to keep their glasses safe and protected. This approach makes the crochet project fun for the maker and exciting for the recipient.
Finally, consider the seasonal aspect of your crochet projects. You can make a festive holiday-themed case using red and green yarn, or a breezy summer version using linen yarn and maritime colors. The flexibility of the Crochet eyeglass case – Pattern means you can have a different style for every season of the year, keeping your eyewear protected in style.
1. What is the best yarn for a Crochet eyeglass case – Pattern?
The best yarn is typically 100% cotton or a high-quality cotton-acrylic blend. Cotton is durable, holds its shape well, and provides a smooth surface that won’t scratch your lenses.
2. How long does it take to crochet an eyeglass case?
Because it is a small project, an experienced crocheter can finish a Crochet eyeglass case – Pattern in about 1 to 2 hours. It is an ideal “one-sitting” project for those who want quick results.
3. Do I need to line my crochet eyeglass case?
While not strictly necessary, lining your crochet case with felt or microfiber is highly recommended. It prevents the hooks and yarn from catching on the nose pads of the glasses and adds an extra layer of lens protection.
4. Can I wash my handmade eyeglass case?
Yes, as long as you use washable yarn. It is best to hand wash the case in cool water with a mild detergent and lay it flat to dry to maintain the integrity of the crochet stitches.
5. How do I make the case fit different sizes of glasses?
To adjust the size of your Crochet eyeglass case – Pattern, simply add or subtract stitches from your foundation chain for width, and add or subtract rounds for height. Always measure against the specific glasses you are using.
6. Can a beginner complete this Crochet eyeglass case – Pattern?
Absolutely! This project primarily uses basic stitches like the chain and single crochet. It is a fantastic way for beginners to practice working in rounds and learning simple assembly techniques.
In this article, we explored the wonderful world of the Crochet eyeglass case – Pattern, covering everything from selecting the right cotton yarn to mastering the essential stitches needed for a durable finish.
We learned that whether you are using a single crochet for a tight texture or adding a decorative flap for security, the possibilities for customization are endless. This project is not just about making a utility item; it’s about creating a personalized accessory that reflects your style and protects your valuable eyewear.


