
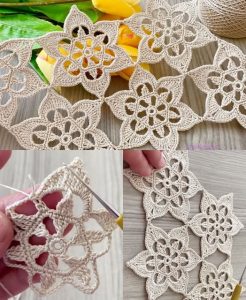
Crochet Flower - Tutorial

Finding the perfect Crochet Pencil Bookmark – Pattern is a game-changer for stationery lovers and craft enthusiasts who want to combine their passion for reading with a touch of handmade charm. This whimsical project is not only incredibly functional but also serves as a delightful gift for teachers, students, or anyone who appreciates the “dark academia” or “back-to-school” aesthetic. Creating a Crochet Pencil Bookmark – Pattern allows you to practice essential stitches while producing something that prevents dog-eared pages in your favorite novels.
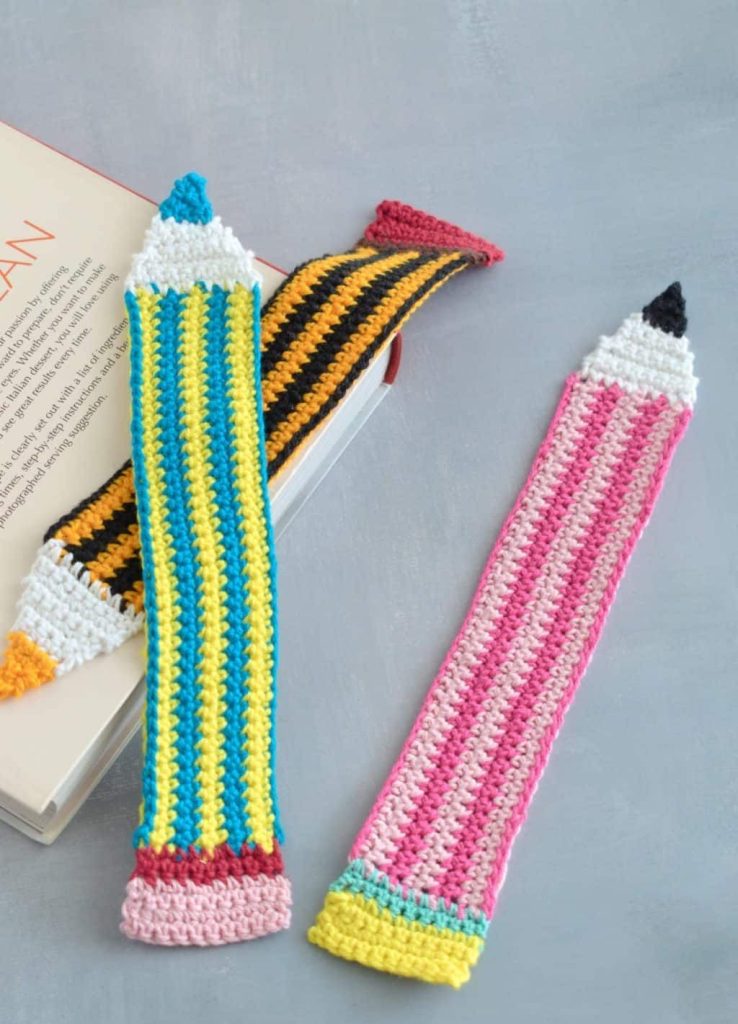
In the world of fiber arts, the Crochet Pencil Bookmark – Pattern stands out because of its iconic shape and vibrant color blocking. It mimics the classic yellow No. 2 pencil, complete with a pink eraser, a silver ferrule, and a sharpened tip. Whether you are a seasoned pro or a curious beginner, following a Crochet Pencil Bookmark – Pattern provides a satisfying, quick-finish project that uses very little yarn, making it an excellent stash-buster for those leftover scraps in your collection.
To ensure your project looks professional and polished, understanding the nuances of the Crochet Pencil Bookmark – Pattern is key. This article will dive deep into the specific techniques required, from choosing the right cotton yarn to mastering the tapestry crochet transitions between the lead and the wood of the pencil. By the end of this guide, you will have all the knowledge necessary to create a beautiful, durable, and highly Instagrammable Crochet Pencil Bookmark – Pattern that will last for years of reading adventures.
When starting your project, the quality of your yarn weight is the most critical factor for success. Most patterns recommend using a Category 4 (Worsted Weight) or a Category 3 (DK) cotton yarn. Cotton is preferred over acrylic for a Crochet Pencil Bookmark – Pattern because it provides excellent stitch definition and lies flat without curling, which is essential for a functional bookmark.
The color palette is what truly brings the Crochet Pencil Bookmark – Pattern to life. You will need a bright “school bus” yellow for the body, a soft pink for the eraser, a light beige or cream for the sharpened wood, and a dark grey or black for the pencil lead. Don’t forget a small amount of silver or grey yarn to represent the metal ferrule that holds the eraser in place.
Selecting the correct crochet hook size ensures that your stitches are tight enough so the bookmark isn’t too floppy. Typically, a 3.5mm (E) or 4.0mm (G) hook works best to create a dense fabric. A tighter tension is beneficial for the Crochet Pencil Bookmark – Pattern because it helps the item maintain its rectangular shape even after being tucked inside heavy textbooks.
You will also need a few basic notions like a tapestry needle for weaving in ends and a pair of sharp embroidery scissors. Because this project involves several color changes, you will have multiple yarn tails to manage. Using a stitch marker can also be helpful if you are working the tip of the pencil in continuous rounds to avoid a visible seam.
For those who want an extra crisp finish, consider using a fabric stiffener or lightly blocking your finished piece. While not strictly necessary for every Crochet Pencil Bookmark – Pattern, blocking helps even out the edges and ensures the “pencil” doesn’t look warped. This professional touch makes your handmade gift look like it was bought from a high-end boutique.
Lastly, consider the portability of this project. One of the best things about the Crochet Pencil Bookmark – Pattern is that it is small enough to fit in a travel pouch. It is the ultimate “waiting room” project, allowing you to make progress on your handmade gifts whenever you have a spare fifteen minutes, without needing to lug around a massive bag of yarn.
The foundation of most Crochet Pencil Bookmark – Pattern designs is the Single Crochet (sc) stitch. This stitch provides a solid, opaque fabric that looks clean and modern. To start, you will usually create a foundation chain that determines the width of your pencil, then work in rows or rounds depending on whether you want a flat or 3D effect.
Achieving a “seamless” look during color changes is what separates an amateur Crochet Pencil Bookmark – Pattern from a masterpiece. The trick is to pull the new color through the last two loops of the previous stitch. This color change technique ensures that the top of the stitch matches the body, creating a sharp, horizontal line between the eraser and the yellow body.
The “sharpened” look of the pencil involves decreases, specifically the Single Crochet Two Together (sc2tog). As you move from the yellow body to the beige wood section, you will begin narrowing the piece to form a triangle. Following the Crochet Pencil Bookmark – Pattern instructions for these decreases is vital to ensure the tip is symmetrical and sharp.
For the very tip of the pencil, where the “lead” is exposed, you will switch to black yarn. This is often the most fiddly part of the Crochet Pencil Bookmark – Pattern because you are working with very few stitches. Precision is key here; a single misplaced stitch can make the pencil lead look crooked, so take your time with this final transition.
Some advanced versions of the Crochet Pencil Bookmark – Pattern incorporate the Back Loop Only (BLO) technique. Working in the back loops can create a decorative ridge that mimics the texture of a real wooden pencil or the grip of the metal ferrule. This adds a layer of tactile detail that makes the bookmark feel more realistic and premium to the touch.
If you find that your edges are looking a bit uneven, you can finish your Crochet Pencil Bookmark – Pattern with a slip stitch border around the entire perimeter. Using the matching colors for each section while bordering can be time-consuming, but it hides any jagged edges from the turning chains and gives the bookmark a sturdy, reinforced frame.
Personalization is a major trend in the DIY community, and the Crochet Pencil Bookmark – Pattern is incredibly easy to customize. You can change the “yellow” body to a pastel blue, mint green, or even a sparkly yarn to create “fancy pencils.” This flexibility makes the Crochet Pencil Bookmark – Pattern a versatile template for any personality or brand.
Adding embroidery is another way to elevate the design. You can use a surface slip stitch or a needle and thread to “write” a student’s name or a short word like “READ” onto the yellow section of the pencil. This turns a simple Crochet Pencil Bookmark – Pattern into a cherished personalized keepsake that any bookworm would adore.
The size of your Crochet Pencil Bookmark – Pattern can be adjusted by changing your yarn weight and hook. If you use embroidery floss and a tiny 1.5mm hook, you can create a miniature version to use as a planner charm. Conversely, using blanket yarn and a large hook could turn this pattern into a quirky wall hanging for a classroom or library.
Think about the seasonal appeal of your crafts. For a Halloween-themed version, you could use orange and purple yarns, or for a Christmas version, turn the pencil into a candy cane colored writing utensil. The basic geometry of the Crochet Pencil Bookmark – Pattern remains the same, but the color theory you apply can completely change the vibe.
For those who sell their crafts at artisan markets, the Crochet Pencil Bookmark – Pattern is a high-margin item. It uses cents’ worth of material but carries high perceived value due to its clever design. Packaging them on a nice cardstock backing with a cute quote can increase your sales and make your crochet business more profitable.
Don’t forget the functionality of the eraser. Some crafters like to make the eraser section a bit thicker by adding a small amount of fiberfill stuffing to create a 3D effect. While this makes the Crochet Pencil Bookmark – Pattern a bit bulkier inside a book, it adds a cute “squishy” element that children especially love during their reading time.
Since a Crochet Pencil Bookmark – Pattern is handled frequently, it’s important to consider durability. Using high-quality mercerized cotton ensures that the yarn doesn’t pill over time. Because books can be heavy, your bookmark needs to withstand being pressed flat for long periods without losing its structural integrity or the vibrancy of its colors.
Cleaning your bookmark is simple if you’ve used the right materials. Most cotton-based Crochet Pencil Bookmark – Pattern items can be gently hand-washed in cool water with a drop of mild detergent. Avoid wringing the bookmark; instead, lay it flat on a towel and reshape it to air dry, which prevents the pencil tip from becoming distorted.
If you notice the “lead” tip of your pencil becoming fuzzy, you can use a fabric shaver or a small pair of scissors to trim away any stray fibers. Maintaining the crisp lines of your Crochet Pencil Bookmark – Pattern will keep it looking brand new, even after it has traveled through dozens of different novels and textbooks.
For those who use their bookmarks in school bags, consider adding a lobster claw clasp or a braided tassel to the eraser end. This allows the Crochet Pencil Bookmark – Pattern to be clipped to a zipper or a keychain when not in use. It prevents the bookmark from getting lost at the bottom of a backpack and adds an extra layer of utility.
Storage is also a factor if you are making a large batch of these. Keep your finished Crochet Pencil Bookmark – Pattern pieces in a dry, cool place away from direct sunlight to prevent the vibrant yellow and pink dyes from fading. A simple plastic organizer or a dedicated “finished objects” basket works perfectly to keep them flat and clean.
Finally, remember that the Crochet Pencil Bookmark – Pattern is a reflection of your skill and creativity. Every time you open a book and see that cheerful little pencil, you’ll be reminded of the joy of making. Sharing your progress on social media using relevant hashtags can also connect you with a global community of makers who share your love for functional crochet art.
How long does it take to complete a Crochet Pencil Bookmark – Pattern?
For an intermediate crocheter, a single bookmark usually takes between 45 minutes to 1.5 hours. It’s a perfect “one-sitting” project that provides instant gratification.
Can beginners try this Crochet Pencil Bookmark – Pattern?
Yes! As long as you know how to chain, single crochet, and change colors, you can successfully complete this project. It is actually a fantastic way for beginners to practice their tension control.
What is the best yarn for a bookmark?
Cotton yarn is widely considered the best choice. It is thin, durable, and doesn’t stretch out of shape, which is vital for something that needs to fit between the pages of a book without damaging the spine.
Do I need to block my crochet bookmark?
While not mandatory, wet blocking or steam blocking helps the bookmark lie perfectly flat. It gives the Crochet Pencil Bookmark – Pattern a more professional, finished look that is especially important if you are giving it as a gift.
Is this pattern suitable for selling at craft fairs?
Absolutely! It is a low-cost, high-interest item. Many crafters find that these sell quickly during the back-to-school season or as teacher appreciation gifts in May and June.
In conclusion, the Crochet Pencil Bookmark – Pattern is a versatile, fun, and practical project that appeals to makers of all levels. We have explored the importance of selecting the right cotton yarns, mastering the art of color changes, and customizing the design to fit various styles and needs.
This project is a wonderful way to use up your scrap yarn while creating something that encourages a love for reading. Whether you are making one for yourself or a dozen for a classroom, the result is always a charming and useful accessory.


