
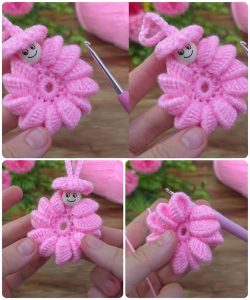
Crochet Flower - Tutorial

Making your own Mini Crochet keychain Bag is one of the most rewarding quick crafts you can dive into today. This comprehensive tutorial will guide you through every single step to create a tiny, functional accessory that is taking the crafting world by storm. Whether you want to hook it onto your keys, backpack, or give it as a heartfelt handmade gift, this Mini Crochet keychain Bag – Tutorial is designed to give you flawless results.
Crochet enthusiasts are constantly looking for stash-busting projects that do not require hours of commitment. This Mini Crochet keychain Bag fits the bill perfectly because it uses only a fraction of a yarn skein and can be completed in under an hour. In this tutorial, we will explore the best techniques, stitch patterns, and assembly methods to ensure your finished product looks completely professional and holds up to daily wear and tear.
As you follow along, you will notice that working on a miniature scale requires a bit of patience, but the payoff is incredibly satisfying. By optimizing your tension and choosing the right materials detailed in this Mini Crochet keychain Bag – Tutorial, you will master the art of micro-crafting in no time. Grab your favorite yarn hook, settle into your favorite crafting chair, and let’s begin building this adorable accessory from scratch.
Before you loop your yarn, you need to gather the correct supplies to ensure your Mini Crochet keychain Bag turns out sturdy and well-shaped. For this tutorial, a lightweight yarn is highly recommended because thick yarn can make a miniature bag look bulky and lose its definition. A cotton or sturdy acrylic blend in sports weight or fingering weight works best for maintaining a crisp structure over time.
Selecting the right crochet hook size is the next critical step for this Mini Crochet keychain Bag – Tutorial. You want to use a hook that is slightly smaller than what the yarn label recommends, such as a 2.5mm or 3.0mm hook. This creates tight, dense stitches that prevent your keys, coins, or lip balm from slipping through the gaps of your finished project.
In addition to yarn and hooks, you will need a few essential notions to complete the assembly phase of the tutorial. Keep a pair of sharp scissors close by, along with a tapestry needle for weaving in loose ends securely. You will also need a high-quality metal keychain ring or a lobster clasp to transform your miniature pouch into a functional Mini Crochet keychain Bag.
Optional but highly recommended embellishments include small buttons, snaps, or tiny beads to create a secure closure for the bag opening. If you want to add a unique flair to your Mini Crochet keychain Bag, consider sourcing colorful stitch markers to keep track of your rounds during the tutorial. Having these items organized before you start will make the entire crafting process seamless and highly enjoyable.
When writing or sharing your own versions of this Mini Crochet keychain Bag – Tutorial, always remind your audience that material quality directly impacts durability. High-quality metal hardware ensures the keychain stays attached to bags or keys without breaking under pressure. Now that your workspace is fully prepped with the necessary tools, you are ready to move on to the fundamental techniques.
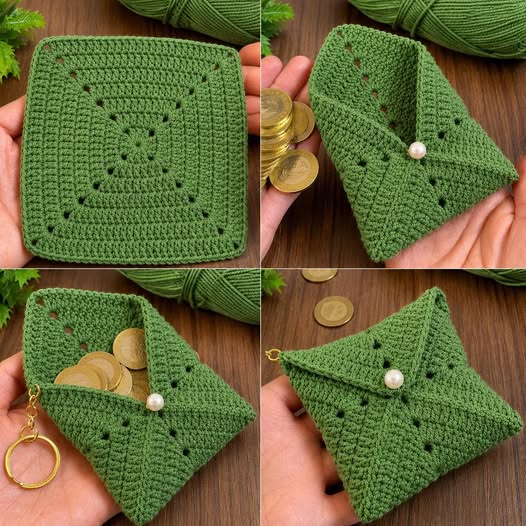
To kick off the construction phase of this Mini Crochet keychain Bag – Tutorial, we begin by forming a solid foundation at the bottom of the pouch. Start by making a slip knot and chaining a small number of stitches, typically around six or eight chains depending on your desired width. This initial chain row dictates how wide your final Mini Crochet keychain Bag will look once it is fully assembled.
Once your base chain is ready, you will work single crochet stitches down one side of the chain, and then rotate your work to crochet down the opposite side. This oval-style increase method is a classic technique used throughout this tutorial to create a flat, seamless bottom without any holes. It gives your Mini Crochet keychain Bag a professional look right from the very first round.
As you round the corners of your base chain, remember to place two or three single crochets into the very last stitch. This extra spacing prevents the corners from curling upward too early, ensuring the bottom of your Mini Crochet keychain Bag sits completely flat. Keeping your tension consistent during this stage of the tutorial is absolutely vital for symmetry.
Once the base round is complete, you will join the circle with a slip stitch or continue working in continuous spirals. Working in a continuous spiral is a favorite method in this Mini Crochet keychain Bag – Tutorial because it eliminates visible seams along the back of the accessory. Use a stitch marker here to keep track of where each new round officially begins.
Take a moment to inspect your base before moving upward to ensure the stitch count matches your pattern blueprint exactly. A miscounted base can cause the walls of your Mini Crochet keychain Bag to look lopsided or warped in later stages. Trusting the process during this fundamental phase of the tutorial guarantees a beautiful, uniform shape.
Now that the foundation is securely established, the next phase of our Mini Crochet keychain Bag – Tutorial focuses on building height. To transition from the flat base to the vertical walls, you will work one round of single crochets into the back loops only. This simple trick creates a distinct ridge line that helps the Mini Crochet keychain Bag stand upright automatically.
For the next ten to twelve rounds, you will simply place one single crochet into every stitch around without making any further increases. Watching the walls rise as you follow this tutorial is incredibly satisfying as the project truly starts looking like a real purse. Feel free to experiment with alternating yarn colors here to give your Mini Crochet keychain Bag vibrant stripes.
As you reach the final round of the bag body, it is time to integrate the closure mechanism into the design. For a simple button loop option, chain five stitches in the middle of the back row, then slip stitch back into the same space. This creates a durable loop that stretches easily over a small button sewn onto the front of your Mini Crochet keychain Bag.
Next, this tutorial moves directly into creating the functional strap that will connect the fabric pouch to your metal hardware. Without fastening off your yarn, chain fifteen to twenty stitches from the side edge of your bag to form a sturdy loop. This strap needs to be strong enough to withstand being pulled and tossed around inside a pocket or purse.
Attach the opposite end of the chain strap to the facing side of the pouch using a secure slip stitch. To reinforce the strap so it doesn’t stretch out over time, work a row of slip stitches all the way back down the chain. This double-layer technique is a staple of our Mini Crochet keychain Bag – Tutorial for maximizing everyday product longevity.
With the main structure completed, you have officially reached the assembly and detailing stage of the Mini Crochet keychain Bag – Tutorial. Fasten off your yarn, leaving a tail of about six inches, which you will use to weave away any remaining gaps. Use your tapestry needle to carefully hide all yarn tails inside the inner stitches of your Mini Crochet keychain Bag.
Now it is time to attach the metal keyring or lobster clasp to the sturdy fabric strap you just finished crocheting. Open the jump ring or clasp mechanism and slide it directly through the center of the reinforced crochet strap loop. Ensuring a tight connection here prevents the Mini Crochet keychain Bag from accidentally detaching during your daily travels.
If you opted to add a button closure during the previous step of the tutorial, grab a needle and matching sewing thread now. Position the button perfectly on the front center wall, aligning it precisely with the chain loop hanging from the back edge. Sew it securely into place, knotting the thread multiple times on the inside of the Mini Crochet keychain Bag.
To elevate the overall visual appeal of your project, consider adding a tiny decorative element like a handmade tassel or a micro pom-pom. You can easily loop a contrasting yarn color through the bottom corner of the Mini Crochet keychain Bag to create a trendy boho look. These tiny adjustments make the tutorial customizable for anyone looking to express their personal style.
Give your finished pouch a gentle shape adjustment by pressing the edges with your fingers to crisp up the fabric corners. Your Mini Crochet keychain Bag is now fully completed, durable, and ready to show off to friends or list on your craft shop. Sharing the final results of this tutorial online is a fantastic way to inspire other fiber artists in the community.
The ideal choice for a project like this is a 100% cotton yarn or a high-quality mercerized cotton in sports or fingering weight. Cotton provides excellent stitch definition and does not stretch out or pill easily when rubbed against keys or tossed inside pockets.
Because of its small scale, an intermediate crocheter can complete this entire accessory in about 30 to 45 minutes. Beginners might take a little over an hour to perfect their tension and finish the assembly steps comfortably.
Yes, you are absolutely welcome to sell physical items created using this guide on platforms like Etsy or at local craft fairs. Giving credit to this Mini Crochet keychain Bag – Tutorial online is always appreciated by the crafting community.
Since it is attached to metal hardware, it is best to spot clean the fabric gently using a damp cloth and mild soap. Avoid submerging the entire metal keyring in water for extended periods to prevent any potential rusting or discoloration over time.
Despite its tiny size, it is perfect for holding a standard tube of lip balm, emergency cash, a pair of wireless earbuds, or loose shopping cart coins. It serves as both a stylish statement piece and a highly practical pocket organizer.
This Mini Crochet keychain Bag – Tutorial walked you through every stage of production, from picking stable cotton yarn and small hooks to executing a seamless base foundation. We then explored building structural side walls, creating a durable attachment strap, and fastening high-quality metal hardware along with decorative buttons for a polished look.
By following these steps, you have mastered the essential skills needed to create a trendy, compact, and functional fiber accessory completely from scratch.


