
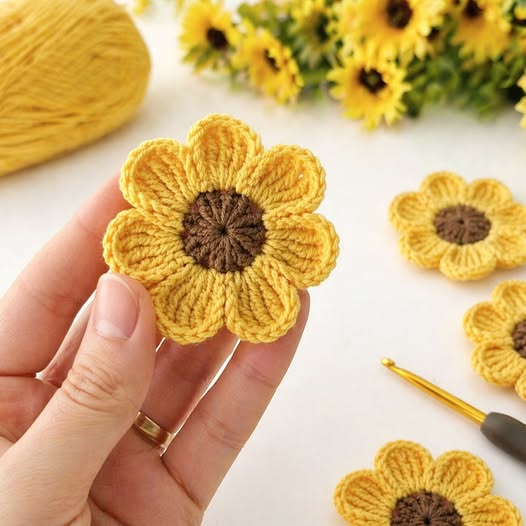
Crochet Flower - Tutorial

Crochet Flower – Tutorial: Creating beautiful, handmade floral accents is one of the most rewarding projects you can undertake in the crafting world. Whether you are looking to embellish a cozy blanket, add a touch of elegance to a sun hat, or create a stunning bouquet that never fades, learning how to master a crochet flower tutorial is the perfect place to start. This comprehensive guide is designed to take you by the hand, offering a step-by-step approach that balances simplicity for beginners with enough depth to keep seasoned crafters engaged.
The beauty of a crochet flower pattern lies in its incredible versatility and the sheer joy of watching a simple strand of yarn transform into a blooming masterpiece. Engaging in this fiber art not only sparks your creativity but also serves as a wonderful, therapeutic escape from the hustle and bustle of daily life. By understanding the foundational elements and practicing the core stitches, you will soon find yourself designing unique, colorful blossoms that can elevate any crochet project from ordinary to extraordinary.
In this detailed crochet flower tutorial, we will explore the essential materials, the foundational stitches, and the exact steps required to bring your yarn creations to life. We will also delve into advanced tips for shaping your petals and troubleshooting common mistakes that crocheters often encounter. Grab your favorite yarn, choose the perfect hook, and let’s dive into the wonderful world of crocheting flowers together.
Selecting the right supplies is the first and most crucial step in ensuring your crochet flower tutorial yields a beautiful, professional-looking result. The type of yarn you choose dramatically impacts the final texture, definition, and size of your blossom. For beginners, a smooth, worsted weight cotton yarn or a high-quality acrylic yarn is highly recommended because it offers excellent stitch definition and is easy to manipulate. Cotton yarn is particularly excellent for flowers because it holds its shape well and provides a crisp, clean look to each individual petal.
Your choice of crochet hook must complement the yarn weight you have selected to achieve the perfect balance of tension. If your hook is too large, your flower will turn out loose, floppy, and lacking structure; if it is too small, the stitches will be tightly packed and difficult to work into. Check the yarn label for the manufacturer’s recommended hook size, but don’t be afraid to drop down a half size if you want stiffer petals that stand up on their own. A comfortable, ergonomic crochet hook can also make a massive difference, preventing hand fatigue during longer crafting sessions.
Beyond the basic yarn and hook, a few essential notions will make your crafting process much smoother and more enjoyable. You will need a sharp pair of craft scissors to snip your yarn cleanly without fraying the delicate fibers. A sturdy tapestry needle (sometimes called a yarn needle) is absolutely indispensable for weaving in your loose ends securely and seamlessly. Finally, locking stitch markers can be incredibly helpful for keeping track of the beginning of your rounds, especially when working in continuous spirals.
Before jumping directly into the petals, you must understand the foundational stitches that form the core structure of your crochet flower tutorial. Most floral patterns begin with either a slip knot and a short chain loop or the highly popular magic ring technique. The magic ring, also known as a magic circle, is preferred by many designers because it allows you to pull the center hole completely shut, leaving no visible gap in the middle of your beautiful flower.
Once your center ring is established, you will typically work a series of single crochet (sc) stitches into the loop to create the core of the flower. The single crochet is the bedrock of amigurumi and floral work, providing a dense, tight fabric that keeps the center of your flower firm. Mastering the consistency of your single crochets ensures that your flower center remains perfectly circular and symmetrical. Always count your stitches at the end of this initial round to ensure your petal math works out perfectly later.
To transition from the center core to the lush petals, you will utilize the slip stitch (sl st) to join your rounds smoothly. The slip stitch is not used to add height, but rather to move your yarn across the piece or close a circle invisibly. For the petals themselves, you will frequently use the half double crochet (hdc) and the double crochet (dc) stitches. These taller stitches are essential because they naturally create the beautiful, curved rise and fall that mimics real botanical petals.
With the foundation secure, you are now ready to begin the most exciting part of the crochet flower tutorial: growing the petals. To start building the petals, you will typically create a series of chain spaces attached to the central ring, which act as small frames for your stitches. For instance, chaining three and skipping a stitch before slip stitching into the next creates the perfect anchors. These loops will house the combinations of tall stitches that give the petals their distinct, rounded shape.
To fill the first chain space and create a classic petal, you will work a sequence of graduating stitches directly into the loop. Start with a slip stitch, follow it with a single crochet, then work multiple double crochet stitches to create the highest point of the petal. To bring the petal back down symmetrically, reverse the sequence by adding another single crochet and ending with a slip stitch. Repeat this exact sequence in each subsequent chain space around the entire circumference of your central core.
As you work your way around, maintaining consistent yarn tension is absolutely vital to ensure all your petals look uniform in size. If your tension loosens up halfway through, you might end up with an asymmetrical blossom that looks slightly lopsided. Take your time with each stitch, ensuring that you pull the yarn up to the same height on every repeat. Once you complete the final petal, use a slip stitch into the very first stitch of the round to lock everything tightly in place.
Now that your flower is fully formed, the final touches of this crochet flower tutorial involve proper finishing techniques and troubleshooting. One common issue crafters face is curling petals, which usually happens when there are too many stitches crowded into a single space. If your petals are rippling excessively, try reducing the number of double crochets in each loop by one. Conversely, if the petals look too flat or skimpy, adding an extra stitch can give them a fuller, more luxurious appearance.
To give your completed flower a truly professional, polished look, you should consider a technique known as wet blocking. Wet blocking involves gently soaking your finished crochet piece in lukewarm water, pressing out the excess moisture with a towel, and pinning it into shape. Let the flower dry completely while pinned down, which relaxes the yarn fibers and permanently sets the beautiful geometry of your petals. This step is a total game-changer if you plan to use your flowers for display or fashion accessories.
Finally, when securing your work, leave a long yarn tail of at least six to eight inches before cutting your working yarn. Thread this tail onto your tapestry needle and weave it carefully through the back of the stitches to hide it completely. If you plan to attach your flower to a blanket, headband, or garment, that long tail can double as your sewing thread. This ensures a strong, durable attachment that will withstand regular wear and washing without unraveling.
What is the best yarn for a crochet flower tutorial?
The best choice for clear definition and structural integrity is a 100% cotton yarn in a sports or worsted weight. Cotton holds its shape beautifully, which prevents the petals from drooping over time. Acrylic yarn is also a great, budget-friendly alternative that offers a softer texture and a vast array of vibrant colors.
How do I prevent the center hole of my flower from opening up?
To keep the center tightly closed, it is highly recommended to use the magic ring method rather than chaining a loop. The magic ring allows you to pull the tail tightly to close the hole completely. To ensure it stays closed permanently, weave the center tail in multiple opposite directions using a tapestry needle.
Can I scale this crochet flower tutorial to make larger or smaller flowers?
Yes, absolutely! You can easily change the size of your flower by altering your yarn weight and hook size. Using a lightweight lace yarn with a tiny steel hook will produce a delicate, miniature blossom. Using a bulky blanket yarn with a large hook will result in a massive, plush flower perfect for pillows.
Why are my flower petals curling upward too much?
Petals usually curl upward because your yarn tension is too tight or because you have placed too many stitches within the chain space frame. Try relaxing your hands as you crochet, or use a hook that is a half size larger to loosen up the stitches naturally.
In this crochet flower tutorial, we have journeyed through the entire creative process of crafting handmade floral elements from scratch. We explored how to choose the ideal cotton or acrylic yarns, mastered foundational stitches like the magic ring and double crochet, and learned how to build uniform petals. Additionally, we covered advanced shaping tips like blocking and troubleshooting tension issues to guarantee a flawless finish for every project you undertake.
We would absolutely love to hear your thoughts on this tutorial! Please leave your sincere opinion and any suggestions for future patterns you would like to see in the comments section below.


